Welcome to my crafty blog... a "garden" of colourful cards, quilting, sewing projects, knitting...and what ever else happens along the way!!


Showing posts with label Quilting. Show all posts

Saturday, March 18, 2017

Worldwide Quilting Day - Hearts

March 18th, 2017 is  
Worldwide Quilting Day
so it is the perfect time to share a
cozy flannelette quilt I made 
for my granddaughter, who 
was born this past November. 
I had a variety of fabrics in my stash, 
so used them for this snuggly quilt.

My inspiration came from the patterned fabric - 
pink, yellow, blue and glittery white hearts 
printed onto a  light blue background. 
I chose white, pink and yellow fabrics to 
coordinate with the print.The white squares 
were machine appliqued with a pink heart 
using a blanket stitch.

The back of the quilt was created by piecing 
yellow strips of fabric on either side of a pink 
flannelette panel. I machine quilted all the 
layers together by stitching on either side 
of the seamed squares.


Yellow and  pink borders were added to the 
front of the quilt before machine quilting. 
A yellow binding was added to the edges 
of the finished quilt.

 Wishing you a warm and cozy week-end!

Thanks for visiting today.
Karen C..

Thursday, October 27, 2016

Quilted Gift Bag & Potholder

If you saw this post about my son's wedding, 
you will recognize the fabrics for this project! 
I wanted to use all of the bits and pieces of material 
leftover from the art folders and bibs.
I decided to make a quilted tote bag and pot holder 
for my new daughter-in-law. 
Since I wasn't able to attend any bridal showers 
(Vancouver is a looong way from home!)  
I packed this bag with towels and some extra treats 
to give Lea and Ian when we arrived for their wedding.

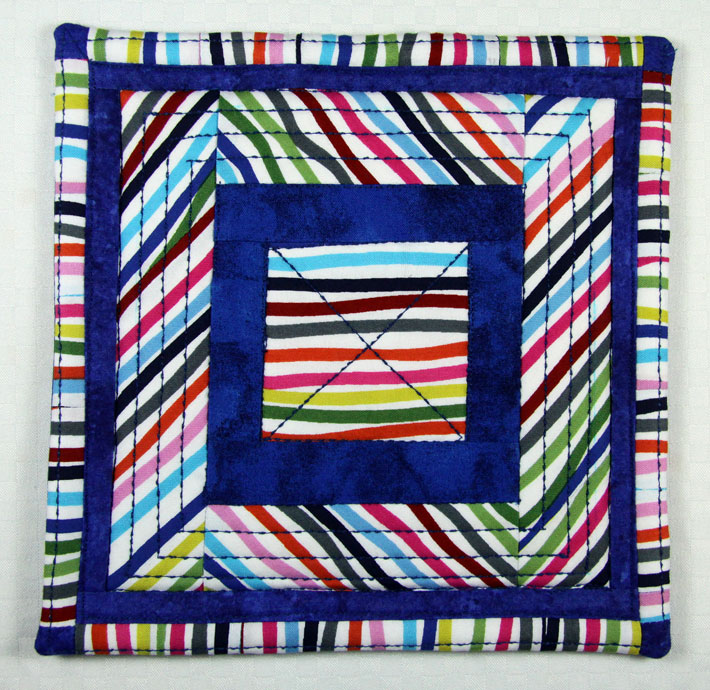
I started by cutting a square of blue fabric that 
became the center of the design. 
From there I added strips of printed and blue fabric 
and then small triangles of the printed material. 
Blue and printed borders finished the front design. 
To complete the bag each piece (front, back and sides) 
were machine quilted and then handles and a lining 
were added. This makes the bag very sturdy and durable.

A large red button creates a colurful focal point on the front.

I made a quilted potholder with the last of the 
printed and blue fabrics. I used a wool quilt batting 
and a decorative machine stitch to quilt each of the sides  
before stitching them together.
Side one of the Potholder

Side 2 of the Potholder
Thanks for visiting today.
Karen C.

Sunday, February 3, 2013

Polly's Birthday Purse

One of my grand nieces turned two in January. I decided to make a little quilted purse for her. I started with the ladybug fabric and then found some 'swirly' red and white fabric at Fabricland that was a good match.

I had a purse pattern for a larger version, using 6 'wedges' of 
fabric, but I tweaked it to make this mini purse with 5 pieces!! 
The red button is 'decorative' ... Velcro was used to hold the purse closed.

I started by cutting 3 wedges from each of the two fabrics so that I 
could play around with the placement of the colours. Here's the first 
combination using two ladybug panels and three of the swirly fabrics.


I finally decided on this arrangement, since I wanted the ladybugs 
to stand out and the darker fabric was planned for the handles.


I used more of the red/white swirls for the back of the purse. 
(the inside was lined with ladybugs)


I used a thin layer of quilt batting and used the  'stitch in the ditch' method between the wedges to hold the layers together. I also stitched in the center 
of each wedge, using white thread on the ladybugs and red thread on the 
swirls. The extra stitching holds everything together very neatly.

On the back of the purse I used the same 
stitching design to hold the layers together.

Polly's Birthday Purse

Polly has been busy 'shopping' with her purse and this little fabric pouch that I made as part of her gift at Christmas. (Details about the pouch here.) 


Christmas Fabric Pouch
      

 It's so nice to hear when the little ones love something that I make for them.

 
I am linking this to Sew Darn Crafty Party Week 100 at Sew Many Ways. 

Thanks for visiting today.
Karen C.

Friday, October 7, 2011

Hanging Up Birthday Wishes

I made two cards for the September Papertrey Ink Blog Hop, but just included one in this post.  I guess the inspiration photo really got me thinking about a variety of images that could be used for the colour and design challenge. I had seen the Hanging Up set used with the small images from the Quilters' Sampler stamp set and wanted to give it a try.  Here's a bright and breezy card I made for an October birthday. 

I cut the large and small cloud dies to create masks on the upper part of the card and then sponged some of the turquoise ink around the stamped images and the 'sky'. The smaller die was cut 4 times from white card stock and then  all glued together to make a thicker dimensional cloud. Before attaching  it to the card front, I stamped it with turquoise ink with the matching stamp from Up, Up & Away. (I stamped off some of the ink on scratch paper, so that it is a very subtle colour). The Happy Birthday sentiment, from Butterfly Dreams, was stamped onto the large cloud.  I stamped the grass image several times to create the look of several layers.

The 3 log cabin quilt blocks were coloured with copic markers, punched out with a square punch and then added to the clothesline. The little clothespins are so adorable!! .... But they are sooo tiny to hand cut - I had to stamp a few extra, as I kept losing them!!

The inside of the card uses a sentiment from Quilters' Sampler and another quilt block. The faux stitching outlined with a blue marker, finishes the outer edge of the sentiment panel.

Card Details:
Stamps:  PTI  Hanging Up;  Quilters' Sampler; Up, Up & Away; Butterfly Dreams
Inks:  Close to My Heart: Clover Meadow, Outdoor Denim; Memento Tuxedo Black; studio g Turquoise
Papers: PTI Stamper's Select White; Canson Indigo Blue
Dies:  PTI Cloud Dies
Other Supplies:  copic markers (R24-R27; Y11-Y02; BG11-BG13); 3/4" square punch; Outdoor Denim marker

Friday, August 12, 2011

Mug Rug and Mug Cozies

A couple of weeks ago I received a package from Karen at Sew Many Ways - containing 125 red and white 5" fabric squares. I was so excited to participate in my first Fabric Swap and when I opened my parcel, I spent a few days sorting patterns and planning some projects. 

There were several deeper red/burgundy prints with a creamier background, so I decided to use these pieces to make a set of mug rugs and mug cozies.   
Mug rugs are part coaster for a mug and part place mat for a snack.
These mug rugs are about 5 1/2" x 10".  I used 6 different squares, but cut and sewed them together in strips to create one half of the mug rug. The other half of the mug rug was made with four smaller squares and edged with a creamy coloured binding. Lots of machine quilting stitches hold the layers together.


Mug cozies are like a little hug for your coffee, tea or cocoa mugs. These cozies were made with the same fabrics, but this time I used 2 1/2" squares sewn together and then bound on the top and bottom with the accent fabric.
Velcro was added to the tab and the main part of the cozy, in order to secure the cozy when you put it on the mug. The big button was added for a decorative accent. 
TEA FOR ONE

OR 
TEA FOR TWO

I've made appliqued variations of mug cozies, but these were my first attempt at making matching mug rugs!! I know I'll be making more of these!!


Here's a link to the post where I gave details about these appliqued cozies. 


I know it's probably very hot in many parts of the country, 
and HOT tea is the last thing on many people's minds. 
But... I still enjoy a hot cuppa tea every day!! Cheers!!

Tuesday, May 3, 2011

Princess Birthday

     My nephew's daughter will be celebrating her fourth birthday later this month. She loves princesses and the colour purple so I decided to make her a little princess birthday card and a matching bag.  When I was a little girl I always loved going to the library to find a collection of books to bring home. This book bag will hold lots of goodies!!


     I've had this Stamping Bella's Everyday Princess stamp for a while and knew that it would be a fun image for her card. I stamped it with Memento Tuxedo Black ink onto PTI's Stampers' Select White card stock and coloured it with copic markers. A few pink rhinestones were added to the crowns.

     Once it was cut and embossed with a Nestabilities die, I sponged the edges with some purple ink and then mounted it on a piece of patterned paper. A small lavender bow was added to the image panel. The card base was made with pink card stock that was embossed with a Sizzix embossing folder.
     The inside of the card was finished with sentiments from Big Birthday Wishes and Everyday Button Bits. The number "4"   (PTI's By the Numbers die set)  was cut from the patterned paper and mounted onto purple paper, cut with one of the Limitless Layers 1 3/4" circles. Purple dashes outline the number and the circle. Pink dots and purple dashes were added to the outside edges of the white card stock. 
The accent strip on the bottom of the card was made by cutting a piece of the patterned paper and mounting it onto the purple paper that had been punched with a dotted scallop border punch.

Here's a closer view of the fabric purchased on a recent shopping trip. 

Here's the book bag that I made for Lilly. I had some pink fabric in my stash, so I made strips along the pockets and the top of the bag to add a little brightness. It has similar design details as these:  here  and  here, that I made for my other grand nieces.


Card Details:
Stamps:  Stamping Bella Everyday Princess; PTI Big Birthday Wishes, Everyday Button Bits.
Inks:  Memento Tuxedo Black, SU Pixie Pink, Lovely Lilac
Papers:  PTI Stamper's Select white; pink card stock; purple and patterned paper from my scrap box
Other Supplies:  Nestabilities Labels #4; PTI By the Numbers die set;  Kaisercraft rhinestones; lavender ribbon;  EK Success Dotted Scallop border punch; copic markers; pink and purple Marvy markers; Embossing folder: Sizzix Curlique; corner rounder.


I've been busy sewing over the past week. 
My 5th grand niece was born last week and I made a few little things for her. You can see those sewing projects here.

Thanks for visiting. Have a great day!!
Karen C.

Sunday, January 23, 2011

Happy Birthday Payton

My little grand niece celebrated her second birthday in the middle of January.
Here's the card I made for Payton, using a variety of stamps.

 
     "Pumpkin Emma"  from C.C. Designs  was stamped onto PTI Stamper's Select White card stock with the pumpkin images masked out, leaving an 'empty' wagon. I then stamped two little cupcakes from PTI's Tiny Treats: Valentine in the wagon. The images were then coloured with copic markers. PTI Polka Dot Basics was stamped in CTMH Sunny Yellow as a background on the white card stock.
     The vertical birthday sentiment (Close to My Heart) was stamped on a strip of patterned paper and then added to the right side of the card. The number 2  from PTI's Outlines Alphabet was stamped onto PTI  Berry Sorbet card stock and then cut out. I used a glue pen and DecorArt Glamour Dust to add a little sparkle to thenumber.
     I layered several different papers from the Sassafrass wee bundle "count me in" in colours of yellow, pink, and sorbet on a PTI Harvest Gold card base.

     
When Payton saw the small flower and button accent, she pointed to it and said "SUN". I put the flower there because the empty space needed a little something, something - never planned for a SUN!!   Smart little girl!


I used little poem that I found on the internet for the inside of the card - just the perfect sentiment for a sweet little 2 year old girl. I layered the Nestability die cut onto a Berry Sorbet mat before attaching it to the card base.


Card Details:  5 1/4 " square card
Stamps: C.C. Designs Pumpkin Emma;  PTI Outline Alphabet, Tiny Treats:Valentine;
CTMH Happy Birthday.
Inks: Memento Tuxedo Black; CTMH Cranberry, Orange, Sunny Yellow
Designer Paper & Flower: Sassafras: "count me in" paper ; "in a stitch blossoms-vintage rose"
Cardstock:  PTI - Berry  Sorbet, Harvest Gold, Stampers' Select White
Other Supplies: Copic markers;  DecorArt Glamour Dust; corner rounder punch; Stickles; Nestabilities Label 1 dies

And finally ... here's the little book bag I made for Payton. Originally it was supposed to be a Christmas present, but it was one of the things that I didn't finish in time.  It's similar to the one I made for another grand niece who lives in New Zealand. I posted about that one in December here.


Have a Great Day. Thanks for taking time to visit.
I appreciate all of your comments.

Tuesday, December 7, 2010

Christmas Gifts - Book Bag

This is the second post today, so please check out my earlier posting and "walk down memory lane" here: Christmas Past - 2009.

I have really neglected posting on my blog this past week , but I have been trying to get a lot of projects finished - some of them had to be packaged up to be sent out of town, so that has been my focus. I will be sharing some of these in the next few days. 

I found these fabrics in a quilt shop in Ketchikan, Alaska when we were there in September.
I knew the printed letter fabric  would be perfect for several little book bags. 
It took me a while to figure out a design as I had limited material and 3 to make. I used a combination of blues, pinks and a touch of green to create a colourful, fun bag. 
There were lots of bits and pieces to this bag, but once I got started it was quick sewing. The  blue embroidery on the pink and green strips was done with one of the stitches on my sewing machine and adds some detail. Several pockets were designed, because little girls need a place to carry important stuff !!


This bag is heading to New Zealand for my 2 year old grand niece - Mattie. My sister-in-law leaves Canada this week-end  to spend Christmas (and January) with her daughter, son-in-law and grand daughter. My niece and her husband are expecting their second child at the end of December, so it will be a busy month for all of them.  

Here's the final grouping of gifts for Mattie - book bag, 3 little books and "Dora the Explorer" doll. She loves books and Dora, so hopefully this will give her some distraction once the new baby arrives!

I also made a little tag with Papertrey Ink's Tiny Treats: Christmas to 
attach to the final gift package.  (My SIL will wrap everything when she 
arrives in NZ, as it's easier to pack things that are not wrapped up in boxes and bags.)


Thanks for visiting. Have a great week!!

Saturday, October 2, 2010

Mug Cozies, Birthdays and More!!

Happy Saturday! I'm still trying to get back into a routine after my vacation. We have lots of yard work to do - we've had cooler nights and many of the annual flowers are looking kind of "droopy"! It's a good time to start planning for  fall and winter 'crafty' projects.

I've seen a variety of "mug cozies" on different blogs, but most have been felted fabric with instructions for covering a coffee shop paper cup. My sister-in-law gave me a great pattern book (Cider Mill Road: Art to Heart by Nancy Halvorsen) for quilting and applique. It has several patterns for a mug cozy that will fit around a regular 10" china mug. So.. I decided to make her a few for her birthday, along with a card and a few other treats! 

I made 4 cozies with two different applique patterns. Each design was traced onto a fusible webbing and then ironed onto the fabric. Once positioned, I used a blanket stitch on my sewing machine to stitch around each design. The buttons are used for decoration - Velcro holds the ends together at the handle.


Here they are wrapped around the mugs, all ready for a 'spot' of tea!


The birthday card uses a Stamping Bella image Content-to-be-a-bella that I coloured with water coloured pencils. All of the coloured "scallops" around the main image are actually little circles that I punched and then arranged on the back of the oval. I added a little pink flower with a pink ribbon and some Stickles" and the sentiment from a Close to My Heart  Birthday stamp set.


My SIL is a great photographer, so I decorated the envelope for the card with a variety of stamps from my stash, to create a collage effect.

Along with the card and envelope, I wrapped a box of photo card paper with paper that I made with stamps from CTMH Picture Perfect set.  The little box on the left  was made so the mug cozies would lie neatly inside. I covered the box with birthday paper from my stash and added a paper flower and ribbon.


 NEW HOME & HAPPY BIRTHDAY

My niece and her husband bought a new house recently, so I thought mug cozies would be a great housewarming gift. They live in New Zealand and shipping small items is always a good choice.  I used the same basic pattern as above for the cozies.

The card uses CTMH set Around the Block. I coloured the house with water colour pencils and added a red ribbon and little Stamping Bella Dots. The 'smoke' from the chimney is liquid applique.


 Here's a close up view of the two cozies. It uses a 'leaf' design with little red buttons as flowers. The green button shows the position for the Velcro closure.


 Since it was Kristen's birthday, I also made a birthday card to include in the package. I used the Stamping Bella image Cecily Cinnamonsticks. I cut the white card stock from the inverted scalloped Nestabilities and then sponged the edges. A little pink button and ribbon from my stash finishes the main image.

Card Details:
Birthday Card #1  Content-to-be-a-bella
Stamps: Stamping Bella; CTMH Happy Birthday,  Picture Perfect; SU Scene in a Garden, Pocket Silhouette, Garden Whimsy
Inks: CTMHGarden Green; SU Pixie Pink
Paper: from my stash
Other Supplies: Stickles, pink flower, ribbon, markers, water colour pencils.
New Home Card
Stamps: CTMH Around the Block
Inks: CTMH Black 
Paper: from my Stash
Other Supplies: Stamping Bella Dots, Liquid Applique, water colour pencils, ribbon, Nestabilities
Birthday Card #2 Cecily Cinnamonsticks
Stamps: Stamping Bella; CTMH Sweet Treats
Inks: CTMH Black; SU Pixie Pink
Paper: from my Stash
Other Supplies: Stickles, water colour pencils, markers, Nestabilities; mini pearls, button, ribbon


Have a great week-end and thanks for looking!!