Welcome to my crafty blog... a "garden" of colourful cards, quilting, sewing projects, knitting...and what ever else happens along the way!!


Showing posts with label Homemade Gifts. Show all posts

Saturday, March 30, 2013

Buttons & Brooches

I  wanted to add a little gift to a parcel I was sending off to one of my grand nieces. Since she studied dinosaurs in pre-school, she has been fascinated by them. I had a sheet of Dinosaur Shrinky Dinks in my stash, so I made this set 
 of brooches and buttons. the Button Card die and Boutique Additions Card Die Collection were used to create packaging for them.

Boutique Accessories - Broochess
Supplies - PTI, unless noted
Stamps - Friendship Jar & Friendship Jar: Spring Fillers; Sew Simple Borders
Inks - Royal Velvet; Berry Sorbet
Paper - Harvest Gold;  Recollection: Easter Paper
Dies - Boutique Accessories Card Die Collection


Buttons

Supplies - PTI, unless noted
Stamps - Button Boutique 
Inks - Royal Velvet;  Berry Sorbet
Paper - Harvest Gold, Berry Sorbet;  Recollection: Easter Paper
Dies - Button Card; Buttoned Up Die #2 
Other - 1/2" & 5/8" square punches; embroidery floss

Thanks for visiting today.
Karen C.

Sunday, January 6, 2013

Tiny Tots Cardigan


Sirdar Snuggly Tiny Tots Yarn Pattern Design 1744

I originally started knitting this cardigan after the birth of my grand niece in August. I didn`t get it finished for her baby shower, so I decided it would make a great Christmas gift..... and then I left it to the last minute to finish!! I was knitting and sewing until Christmas Eve and then hand delivered it on Christmas Day!!  I made the 6-12 month size, so little Emily should be able to wear it over the next few months.


The pattern and yarn were purchased at my local knit shop:
Sirdar Snuggly Tiny Tots Baby Fashion DK: Cherry Pink.
I made a version of the sweater that had a simple banded neckline rather than the shawl collar as shown in the pattern image above. I love the little ruffle trim ... such a sweet girly sweater for a sweet little girl.

 
I'm linking this post to Sew Darn Crafty Party at Sew Many Ways here.

Thanks for visiting today.
Karen C.

Saturday, January 5, 2013

Car Caddy

I was very busy in my sewing room this December. I found  a tutorial for this Car Caddy  and knew it would be a perfect gift for my 3 1/2 year old grand nephew. The website gives very clear instructions and measurements, but I made a few alterations.

The road is made from a double layer of grey flannel wool.  The bright yellow felt was hand cut for the road lines. The numbers were cut with my Cuttlebug and By the Numbers dies from Papertrey Ink. All of the edges were bound with a blanket stitch on my sewing machine.


I added a little Stop sign with red felt and embroidery floss. Six pockets were stitched with yellow machine stitching and then the cars were added.

When finished playing with the cars, the caddy is folded in half .......

 folded again in thirds ..........

The front of the caddy has an appliqued racing car with 
flannel tires and button hub caps!! A piece of twill tape 
was inserted on one of the seams and velcro strips were
added to the strap and the front to hold the caddy closed.
The finished car caddy is 5" x 5" when folded ..... 
just the right size for little hands.

Thanks for visiting today!
Karen C.

Thursday, January 3, 2013

Christmas Birds and Gift Wraps

Two of my grand nieces live in New Zealand, so their packages were finished and sent by the end of November. I made each of them a fabric pouch with a handmade tag and bracelet. You can see that post here. In order to send them I made little boxes with patterned card stock (Stampin'Up). The red ribbon was added and then a felt flower accent was made with Pure Poppy felt (Papertrey Ink) and white felt. Two sizes of flowers were cut from Beautiful Blooms II dies. A green layer of leaves was cut from one of the Lovely Layers dies. Tiny Tags dies and stamps were used to create the small tag.


Mattie loves owls, so that was my inspiration for choosing 
the patterned paper. When I saw this pattern for an 
ornament, I made a felt owl for the family`s Christmas tree.

Kraft, Pure Poppy & Vintage Cream felt; Ric Rac Border die (Papertrey Ink);  
orange and brown felt; embroidery floss; amber rhinestones (from my stash)


This is the package I made for Polly. It also contains a 
fabric pouch, tag and bracelet. The patterned paper is 
accented with a large satin cranberry bow and a tiny tag.

I made another felt ornament ... this time I used a 
combination of patterns to create the red and white bird.
Pure Poppy & Vintage Cream felt (Papertrey Ink);  
embroidery floss; white button (from my stash)


Thanks for visiting today!
Karen C.

Tuesday, January 1, 2013

Fabric Pouches, Bracelets and Tags

 This is a long  and photo heavy post!  
There's a variety of projects today - machine and hand sewing; 
handmade bracelets (2 versions) and tags. Hope you enjoy!!

For the Littles
One of my brothers has two daughters and they are the mothers to two daughters each. That means there are 4 little girls (ages 4, 4, 2, 1 1/2 yrs.) I found this tutorial for these fabric pouches and thought that they would  be a cute way to package personalized bracelets that I made each of the girls.

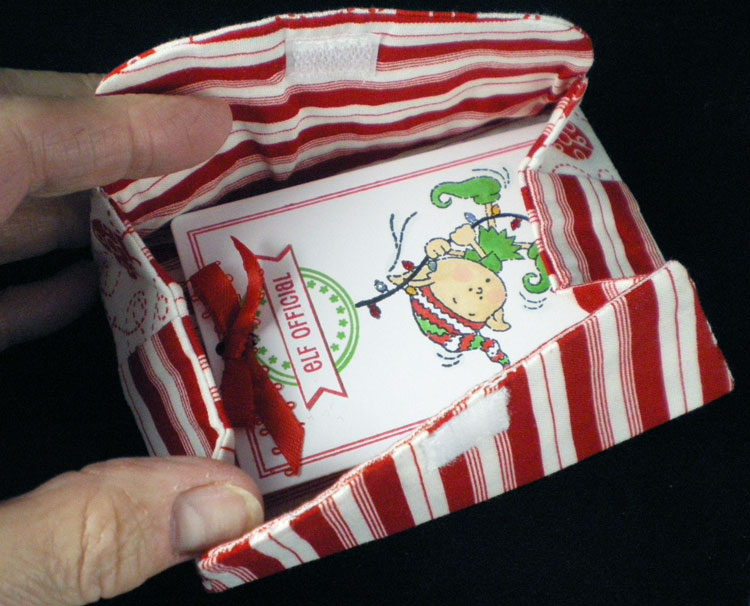
Red and white lady bugs and striped fabrics were chosen for the pouches.

Even though the pouches are closed with velcro, I added 
a 'double' button (red on top of a white one) as an accent.

Back of the fabric pouch:


Here`s a peek inside!!


I made a little tag for each pouch. The red ribbon actually 
holds the bracelet which is attached at the back of the tag.
Button Boutique stamps, Button Card die
Pure Poppy, New Leaf inks (Papertrey Ink); 
Memento Tuxedo Black ink; 
Merry Pursuits stamps (Close To My Heart);
Santa's Notes (Neat & Tangled Stamps);
Copic Markers 


Four Tags for Four Little Girls

Four Bracelets for the Girls
  
Personalized Bracelet
Little ones always love to see their own names on special items. 
* Since all four girls have names that are uncommon, I decided to make them personalized bracelets. I used a set of round letter beads in black and white. 
* The red and white heart beads were in the same package, so that set the stage for the overall colour scheme. I threaded red and white seed beads and the letter beads onto an elastic beading thread so it will be easy for the girls to put on their own jewelry.

For the Moms:
 After seeing how cute the fabric pouches turned out, I decided to make another set for all of the 'moms'... one for my sister-in-law and one for each of my nieces (mothers of the littles.)

I used a combination of 4 fabrics ... this is closer to the pattern description given in the original tutorial. A Raspberry Fizz button (Papertrey Ink) was added to the front.
 A Peek Inside
I used another version of the Button Card tag inside the pouch.


Supplies (Papertrey Ink)
Stamps: Background Basics: Medallions, Button Boutique, 
               Holiday Button Bits, Background Basics: Postmarks; 
 Inks: Raspberry Fizz, Summer Sunrise 
Dies: Button Up #2, Button Card

On the back of the tag .... bracelets made for PTI Stamp-a-Faire.

 'Family Bracelets' (instead of Friendship bracelets!!)
You can see a blog post about these bracelets here.
Thanks for visiting today.
Karen C.

Friday, September 21, 2012

Inspired by SAF:: Friendship Bracelets

Papertrey Ink held a "Stamp-a-Faire Summer Camp" event on July 21st, 
highlighting many techniques, videos and tutorials and encouraging 
crafters to enter cards and projects for each of the challenges. Even 
though I had planned to participate, I didn't get my projects finished 
in time for  the challenge deadlines!!  I will be highlighting lots of 
projects - all inspired by the Stamp-a-Faire videos and techniques. 
I invite you to join me all this week, for a look back at the challenges.
 
Nichole Heady showed how we could use paper supplies to make Beaded Friendship Bracelets. She used a special paper pad and dies to create the beads, but since I didn't have these I used this tutorial and template and from a 2008 blog post. 


 This was the last challenge that I completed as it required a few steps. 
I stamped computer paper with Background Basics: Medallions using Raspberry Fizz and Summer Sunrise. The paper was trimmed according to the template.


I made 30 beads - all identical, and then sealed them with clear nail polish.
I visited a local bead shop to look for co-ordinating beads and accessories (pink and white beads). I also found some silver flowers and end caps for the bracelet, as well as the clasp, crimp beads and jump rings. Since I have never made jewellery before, this was a real learning experience for me!!


I made 3 bracelets, but still have supplies to make a few more!! I used 5 paper beads for the first bracelet along with the pink and white beads and silver accents.
I found that it was a little short, so 6 paper beads were used on the remaining two bracelets.


Here's a close up of some of the details. The paper beads are fairly light because of the white background. I would definitely recommend a darker paper for future bead projects, so that the designs would be more noticeable.


And finally .... three bracelets ready to wear. These would be fun for a group of young friends....
I'm thinking my nieces might enjoy these!! Several of them are very 'crafty', so I know they would appreciate them.

Details: (PTI, unless noted)
Stamps - Background Basics: Medallions
Inks - Raspberry Fizz, Summer Sunrise


This is the 5th project in this series.
Additional Stamp-A-Faire projects can be viewed here. 

I have linked this post to Sew Darn Crafty #84 at Sew Many Ways.
 
Thanks for visiting today.
Karen C.

Tuesday, May 1, 2012

Garden Delights!!

Debbie Olsen Design

Happy May Day!!

  I have always loved the card Debbie Olsen created for Papertrey Ink's May 2011 Product Release.  You can find the details about her card here .
  
It has so many layers and details that make me think of a happy spring/summer day!!  I wanted to make a card using some of the same elements. 


I started by using the bright green card base and embossing it with 
the Curlique folder. Then I layered lots of PTI goodies onto the base:  


Seed Packet: die cut from white card stock and then stamped with Polka Dot Basics and Summer Sunrise ink. The oval frame (Postmarks) was stamped in Clover Meadow ink. The sentiment (a gift for you) is from Tiny Tags II.

Garden Variety Seed Frame:  cut and stamped onto white card. The sentiments are all from Button Boutique. The frame was then mounted onto the Button Card (also stamped with more Polka Dots)

The Flower Fusion #2 stamp and die, along with the Flower Fusion stem/leaves from Flower Fusion #1 create the main focal point. The center of the flower is stamped with Canyon Clay ink using an image from Flower Fusion #4.  I stamped the leaves on both sides of the card stock and curled them up so they stand away from the stem. You can see all the dimension above.


Picket Fence:  stamped with Background Basics: Wood grain and the flowers and grass from Garden Variety. The addition of some butterflies and Baker's twine create another layer of detail. I also added pearls to the center of the flower and the butterflies.

The inside of the card uses more of the flower images from Flower Fusion #2 and the sentiment from Flower Fusion #1 finishes the inside of the card.

Card Details:
Stamps -  PTI: Flower Fusion #1, #2, #4;  Background Basics: Wood grain; Polka Dot Basics, Garden Variety, Postmarks, Tiny Tags II, Button Boutique
Inks -  PTI Summer Sunrise, Canyon Clay;  CTMH: Clover Meadow; Memento Tuxedo Black
Papers -  PTI: Summer Sunrise, Stamper's Select White; SU: Whisper White;  
Best Occasions "Brights" Card Stock Pack
Dies -  PTI:  Button Card Die,  Seed Packet Frame, Seed Packet,   
Flower Fusion #2, Flower Fusion Stem, Picket Fence,
Stampin'Up "Beautiful Wings" Embosslits
Other - The Twinery Bakers Twine; Kaisercraft pearls; Sizzix Curlique Embossing folder; 
Sakura Clear Gelly Roll pen; corner rounder