Welcome to my crafty blog... a "garden" of colourful cards, quilting, sewing projects, knitting...and what ever else happens along the way!!


Showing posts with label PTI Blog Hop. Show all posts

Wednesday, November 25, 2015

Papertrey Ink November 2015 Blog Hop

 Blog-hop-logo
I'm finally getting organized enough that I can participate in 
this month's  Blog Hop at Papertrey Ink.  
After we returned from my son's wedding in October, 
I spent time working on lots of projects around the house 
and let my crafting and blogging slide! 
This month's photo inspiration gave me the incentive 
to try a few ideas for Christmas cards and tags.

Blog Hop Inspiration


I tried a variety of techniques, stamps and dies to create 3 projects:

Shaker Tree Ornament: 
I liked all of the baubles in the inspiration photo, so I thought 
I would create a decoration using the Shaker Ornament Set of dies. 
I didn't have any "Simply Chartreuse" sequins in my stash, so I 
used a different green along with teal and silver star and circle sequins.
I smooshed Hawaiian Shores and Tropical Teal inks onto an 
acrylic block and then added water before applying it to 
the white die cut ornament. 
I dipped the die cut into Versamark and then added 
Clear Sparkle embossing powder.
The sentiment (Rustic Wreath) the tip and upper hanger 
of the ornament were embossed with silver EP
Originally I was going to use this on a card, but decided to finish off 
the back and use it as a real Christmas Tree Ornament. I stamped the 
backing with Hawaiian Shores and Polka Dot Basics. 
The Oval Frame (Framed Out #8) was created using the same smooshing technique; stamped with a star (Framed Out #7) and Tropical Teal ink 
and then heat embossed with the same sparkle EP as I used on the front. 
The sentiment is from Rustic Wreath and the date from Tinsel and Tags.


Tag
My second project did not come together the way I wanted it to. 
The tag image (Tinsel and Tags) was embossed with silver EP 
but it wasn't as clear as I had hoped. I die cut and stamped 
the house to add to the top of the circle image.
I added a Tropical Teal Doily (Doily Details) 
and  tag (Tag Sale #4) stamped with Simply Chartreuse, 
Hawaiian Shores and Tropical Teal confetti (Birthday Style).


 This was my least favourite project, 
but I thought I would include it, 
since it gave me some ideas for my card. 
Since I had all of my supplies out from 
Tinsel and Tags Kit, I made one final project.

Card:  
This was my third project and the one that I like the best.

Ink and Paper: 
Simply Chartreuse, Tropical Teal, Hawaiian Shores
Additional Inks: 
 Soft Stone, Kraft
Stamps and Dies: 
Tinsel and Tags Kit; Square Shaker - Confetti Die;
Other Supplies: 
Stamper's Select White Card Stock; Striped Impression Plate;
 copic marker; Silver Glitter Gel pen

Thanks for staying with me until the end!! Enjoy the rest of the Blog Hop!!
Karen C.

Tuesday, August 25, 2015

Papertrey Ink August 2015 Blog Hop

 Blog-hop-logo

It's time for this month's blog hop challenge at Papertrey Ink.
The inspiration photo is all about colour and textiles:  
August Blog Hop Inspiration

I was drawn to the row of yarn and a 
rainbow of colours to create this birthday card:


I started by die cutting rows of holes with the Stitching Lines die on Stamper's Select White card stock.
The sentiment (Purls of Wisdom) was stamped with Dark Chocolate Ink.
Extra texture was added with the Canvas Impression Plate.
Seven colours of embroidery floss were stitched in rainbow order along the stitching lines.

The needle and thread from Stitched with Love was stamped with Raspberry Fizz ink. The needle was stamped with Versamark onto a separate piece of card stock, then heat embossed with Silver Embossing powder, fussy cut and glued over the original stamped image
I die cut the spool and heart (Stitched with Love) and stamped them with Kraft and Raspberry Fizz inks. Before applying the heart to the spool, I covered it with Versamark and heat embossed it with Clear Embossing powder.
The front panel was adhered to a Classic Kraft card base.

Thanks for visiting today. Enjoy the Blog Hop!
Karen C.

Saturday, July 25, 2015

Papertrey Ink July 2015 Blog Hop

Blog-hop-logo


I was able to finish and photograph a card for 
this month's blog hop at Papertrey Ink. 
I love the colours and designs from the inspiration photo: 
butterflies, browns and pinks and that create a vintage look.
 http://nicholeheady.typepad.com/.a/6a00d8341c64e753ef01b7c7b3d24b970b-pi

I started by creating a mask so that I could stamp Text Style  
with Kraft ink onto the center of a white card base.  
In order to "frame" this circle, I cut a larger circle and 
used the negative on the outside and the circle mask 
over the text. Using Kraft ink, I sponged a 1/4"  frame.
The Canvas Impression Plate was used on the card front. 
Two corners were rounded and Vintage Tea Dye ink (Chamomile) 
was sponged around the edges. I wish I had used the Kraft ink 
along the edges instead, but I will know the next time I use this colour combo!!
The sentiment (Fillable Frames #4) was stamped in Dark Chocolate ink.

The butterfly (Butterfly Dreams) was stamped onto 
white card stock with Memento Rich Cocoa ink 
and then coloured with copics. I fussy cut the butterfly, 
covered it with Versa Mark ink and then clear embossed 
it twice to get a shiny effect. I then mounted it onto a 
Beautiful Dreams die cut from white card stock. 
Brown embroidery floss was added behind the butterfly 
to create the antennae. Three brass adhesive dots were 
added over the body of the butterfly. 
I cut the die 3 more times from Kraft card stock, 
coloured the edges with a copic marker and then 
layered them over the text circle. The coloured 
butterfly was added on top with a thin strip of 
foam tape so that the wings would curl out.

Thanks for visiting today. Enjoy the Blog Hop!
Karen C.

Thursday, June 25, 2015

Papertrey Ink June 2015 Blog Hop

 Blog-hop-logo
It's time for another Blog Hop Challenge at Papertrey Ink. 
The simplicity of these gray stripes paired with cream and 
orange flowers just speaks volumes in regards to card inspiration. 
Experiment with stamped flowers or die-cut florals.  Add stripes 
using delicate Sheer Basics striped vellum overlays or cover plates.
Blog hop inspiration

I used these colour and design details to create my card:
Card Base:
Stamper's Select White; Canvas Impression Plate
Stripes:  
Distressed Stripes with Soft Stone ink
Sentiment Frame Panel: 
Pretty Peonies stamp and die; 
VersaMark; Gold Embossing Powder
Sentiment: 
Spring Hills; Kraft ink

Flowers:  
from my stash; copic markers
Leaves: 
Simply Chartreuse card stock; 
MFT Leafy Flourish die

Thanks for visiting today.
Karen C.

Monday, May 25, 2015

Papertrey Ink May 2015 Blog Hop

 
It's time again for another Papertrey Ink Blog Hop. 
When I first saw this inspiration photo I kept wondering 
how to translate square coloured blocks into a card.


I kept coming back to the idea of a rainbow quilt - 
blocks of colourful squares assembled into a "paper quilt"!
I stamped one of the quilt blocks from Quilter's Sampler 
onto Stamper's Select White card stock with 
Memento Tuxedo Black ink.  I hand cut each one 
so that I could remove some of the stitching lines 
and then glued them onto graph paper. 
This allowed me to keep everything aligned.

Using a variety of copic markers, I coloured 
30 squares in a rainbow colour scheme. 
The finished quilt was mounted onto another piece 
of white card stock to create a border. 
This was mounted onto a 4" x 4 3/4" Soft Stone card base.

After all of the work involved in making the quilt, 
I didn't want to cover it up, so I stamped the main 
sentiment (Purls of Wisdom) onto a vellum banner 
using Versamark, then embossing with black EP. 
A yellow star button from my stash was accented 
with black embroidery floss and then added 
to the banner over one of the yellow quilt blocks.

Supplies (PTI, unless noted)
Stamps - Quilter's Sampler, Purls of Wisdom
Inks - Memento Tuxedo Black, Versamark
Papers - Stamper's Select White, Soft Stone, Vellum, graph paper
Dies - Double-ended Banner die
Other - Yellow Star button; Black embroidery floss; Canvas Impression Plate; 
copic markers; Stampendous Detail Black Embossing Powder

Thanks for visiting today. Enjoy the Blog Hop.
Karen C.

Wednesday, March 25, 2015

Papertrey Ink March 2015 Blop Hop & MIM #206

I'm slowly getting back into my craft room after a fun vacation.
I'm looking forward to playing with my paper and ink!!

I loved this month's inspiration photo for 
Papertrey Ink's Blog Hop: Aqua and Yellow ... 
Blog inspiration
... but I was also intrigued  by Danielle Flander's  
Make It Monday video: Stamping  and Mixing Patterns ....
so I combined the two challenges to make a baby card!!

I started by cutting the Cover Plate: Comic Strip die 
from Aqua Mist and Stamper's Select White card stock.
The aqua frame was glued to a white card base.
Using the tips and techniques from this week's MIM, 
several stamp sets and ink colours were chosen to 
stamp patterns onto the 5 white card stock pieces.
I used Aqua Mist and Lemon Tart inks, with an accent 
of Spring Moss on the Polka Dot panel.

Top Left Panel - Birthday Style, Polka Dot Basics
Top Right Panel  - SAF 2014: 1940's; Bitty Background Blocks;
Buttoned-Up  #2 die;  Coaster Board; aqua embroidery floss


Center Panel  - Background Basics: Gingham 
Wreath for All Season's (sentiment) - Versafine Onyx Black ink
Block Alphabet Dies - Aqua Mist card stock


Bottom Left Panel  -  Autumn Pattern Pieces
Bottom Right Panel   - Crackled; Friendship Jar Spring Fillers; copic markers
Memento Tuxedo Black ink; Versafine Onyx Black ink; Tropical Teal ink


Thanks for visiting today. Enjoy the Blog Hop.
Karen C.

Wednesday, February 25, 2015

Papertrey Ink February 2015 Blog Hop

Blog-hop-logo

When I saw the inspiration picture for this blog hop, 
I knew I had to find some time to play along!! 
(You can see all of the details here.)
Blog Hop Inspiration

My husband and I are heading out this morning for a trip to visit my youngest son and his fiance in Vancouver and then on to a ten day trip to Hawaii. We're so looking forward to some warm days and sunny skies!!
My husband was packing and I was in my craft room making this card!


I started with a piece of water colour paper and LOTS of different colours of ink pads to create the background piece. I smooshed various inks onto an acrylic block, added some water and then painted the paper with a brush. 
It was fun playing watching the magic happen!!

Before assembling the card, I sprayed the background paper with Stampin'Up Vanilla Shimmer Smooching Spritzer. It creates a subtle effect, but is so pretty.  
I cut this paper into a standard 4 1/4" x 5 1/2" piece and still had a strip left over. I turned this 'leftover' into a sentiment banner by cutting a Double-ended Banner die, stamped with a sentiment from Delightful Dahlias with Smokey Shadow ink.
The Quatrefoil Cover Plate was cut from Stamper's Select White card stock and layered over the background paper.

I cut the leaf and flower dies (Pretty Peonies) from water colour paper, heat embossed with white embossing powder and then used the same technique as above to colour the images. I layered several die cuts in order to create dimension and then added them to the sentiment banner.
Supplies (PTI unless noted)
Stamps - Pretty Peonies, Delightful Dahlias
Inks - Lemon Tart, Harvest Gold, Sweet Blush, Hibiscus Burst, Aqua Mist, Spring Rain, Blueberry Sky, Winter Wisteria, Royal Velvet, Smoky Shadow; Versamark
Paper - Stamper's Select White; Watercolour paper;
Dies - Cover Plate: Quatrefoil; Pretty Peonies Die collection; Double-ended Banner Die
Other -SU: Vanilla Shimmer Smooching Spritzer; Recollections: Fine White Embossing Powder.

Thanks for visiting today. Enjoy the blog hop!!
Karen C.


Tuesday, November 25, 2014

Papertrey Ink November Blog Hop: Winter Hills

It's time for another Papertrey Ink Blog Hop Challenge. 
This is my second card for this month's blog hop. 
I've been busy making Christmas/Holiday cards, so this 
challenge really pushed me to make another card using  
SNOWFLAKES (this month's theme).

* Winter Hills is the perfect stamp for a Holiday card. I stamped the rectangular scene with Memento Tuxedo Black ink and coloured it with copic markers. A clear Gelly Roll pen was used to accent the snowy hills, the outside frame and some 'snow dots' in the sky. The image was cut around the frame and then mounted onto a piece of black card stock. 

* A piece of white card stock was partially cut with the Tag Sale #8 die, stopping before the top. I used an exacto knife to finish cutting the edges to create a longer panel. Polka Dot Basics was stamped with Versamark and then heat embossed with silver EP. The framed image was glued to this panel.
* The card base was stamped with a sentiment (Holiday Wishes; Versafine Black Onyx) and then impressed with the Linen/Canvas Impression Plate, before attaching the finished focal panel.


* Fancy Flakes die was cut from white card stock and sponged with Aqua Mist and Tropical Teal inks. The star was heat embossed with silver EP.

Card Interior
Sentiment: Holiday Wishes 
Snowflake: Winter Penguin
Inks: Tropical Teal; Versafine Black Onyx

Supplies (PTI, unless noted)
Stamps - Winter Hills, Holiday Wishes, Polka Dot Basics
Inks - Tropical Teal, Aqua Mist; Versamark; Memento Tuxedo Black; 
Versafine Onyx Black.
Papers - Stamper's Select White, True Black
Dies - Tag Sale #8, Fancy Flakes die
Other - copic markers; Linen/Canvas Impression Plate; SU Silver Embossing Powder
Sakura Clear Gelly Roll Pen.

Thanks for visiting today.
Karen C.

Papertrey Ink November 2014 Blog Hop

It's time for another Papertrey Ink Blog Hop. 
This month's theme is SNOW.
It's currently snowing outside, so this is a very timely challenge!! 
I made a Holiday card using PTI stamps, dies and card stock.

* Two Stitched Circles were cut: Pure Poppy and Stamper's Select White. 
* A snowflake (Peace Be Still) was stamped onto the red circle with Versamark and then embossed with white embossing powder.  
* A small clear adhesive gem accents the center of the snowflake.

* Contrasting embroidery floss, using a blanket stitch, highlights the edges of the circles. This was the most time consuming part of the process.
* A card base of  Stamper's Select White was impressed with the Linen/Canvas Impression Plate and then two corners were rounded with a  corner rounder punch. The sentiment (Love Lives Here : Holiday) was stamped with Pure Poppy Ink.

Card Interior
Snowflake: Peace Be Still 
Sentiment: Love Lives Here : Holiday

Supplies (PTI, unless noted)
Stamps - Peace Be Still, Love Lives Here: Holiday
Inks - Pure Poppy; Versamark
Papers - Pure Poppy, Stamper's Select White
Dies - Stitched Circles
Other - Linen/Canvas Impression Plate; Recollections White Embossing Powder; 
clear adhesive gem; red and white embroidery floss.

Thanks for visiting.
Karen C.

Monday, August 25, 2014

Papertrey Ink August 2014 Blog Hop


 August blog hop inspiration
It's time for Papertrey Ink's monthly Blog Hop Challenge (details here) Nichole Heady provided this inspiration photo from Kate Spade's stationary line and challenged us to make a postcard style project. Here are some of the other suggestions:
  • Create a bold border using the chisel tip of a marker
  • Gold embossed polka dots!
  • A gold embossed sentiment on a crisp white card.
  • A simple color scheme  - white with  a splash of colour
  • Create a fun and festive envelope liner for your card.

I made a little note card and envelope.
I used the Striped Hibiscus Burst Patterned Paper to make an envelope liner. 
You can see the note card  peeking out of the envelope!!

I choose a simple colour scheme
Stamper's Select White Card Stock
with a "splash" of Hibiscus Burst 
Gold Embossing Details 
Postcard Style: Library Card Tag Die

The Library Card Die was cut once as a full card and then a narrow piece of white card stock and another of striped paper was cut from the bottom portion to avoid the tag die hole and allow me to create the top focal panel. 

 
Gold Embossed Polka Dots: Polka Dot Basics
Gold Embossed Circle (Label Basics)
Gold Embossed Butterfly (Butterfly Dreams) + copic markers
Hibiscus  Burst Striped Patterned Paper (layered under the polka dot panel)

Gold Embossed SentimentPostmarks
 

Enjoy the Blog Hop!!
Karen C.

Saturday, January 25, 2014

Papertrey Ink January 2013 Blog Hop Challenge

Think Pink!!  

This month's Papertrey Ink Blog Hop Challenge: create a card using 
a pink monochromatic colour scheme with the option to use neutrals.
 
My nephew and his wife are expecting a baby girl 
in March, so I decided to make a card for the new arrival.

Card Base: 
Sweet Blush card stock
 Background: 
Fine Linen & Sweet Blush inks; Irresistibly Ikat stamps; Stamper's Select White card stock


Focal Image: 
Sweet Baby stamps/dies; Sweet Blush and Lavender Moon inks
Sentiment Panel: 
Framed Out #5 stamps/die; Mega Mixed Messages; Tiny Tags II; Sweet Blush & Kraft inks
Other Supplies:  
Close To My Heart Mini Pearls; Stampin Up Tiny Tag Punch; Pink satin ribbon.

Thanks for visiting. Enjoy the Blog Hop!!
Karen C. 

Thursday, December 26, 2013

Papertrey Ink December 2013 Blog Hop


Blog-hop-logo
I hope everyone had a Merry Christmas. We enjoyed good food and time with family yesterday, along with a warm, cozy fire beside our Christmas tree. 

http://nicholeheady.typepad.com/.a/6a00d8341c64e753ef019b03081610970c-pi


Today's Blog Challenge at Papertrey Ink involves the 
use of string on cards or packages. I've included two 
little pillow boxes and tags that I made for Christmas 
gift cards ... one for my husband and the other for my 
son. I used Pure Poppy Baker's Twine on each and tied 
them up with a little bow. Nothing too fancy or unique, 
but the string just adds that 'finishing' touch for a masculine gift.


Celebrate the Season
* I die cut festive striped paper (Pebbles Inc.) with the Pillow Box Die

* The little tag was made by stamping white card stock with Framed Out #5 and New Leaf ink. I trimmed the tag with a craft knife and then sponged the edge with more green ink. The sentiment and holly image (Framed Out #8) were added to the center of the tag. 
* I cut a second tag from Pure Poppy card stock and trimmed the bottom using a border punch. I've seen this layering technique for tags, so thought I'd give it a try. Baker's Twine was tied around the length of the pillow box and then the tag was added with an additional piece of twine.

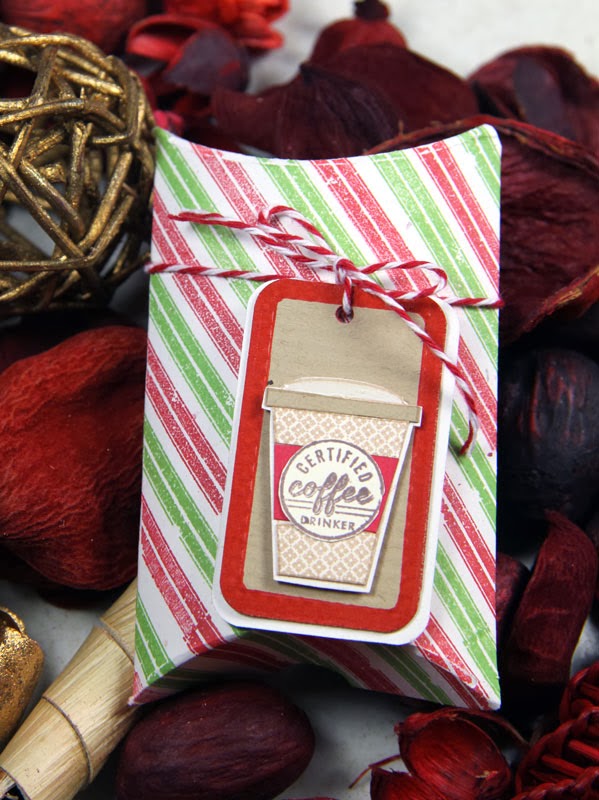
Certified Coffee Drinker 
My husband loves coffee, so a gift card to Tim Horton's was on his list!

* The coffee cup (Heart-to-Heart #1) was perfect for the front of this tag.  
* I stamped a pattern from Bitty Blocks Backgrounds in Kraft ink onto a piece of card stock, then used it to paper piece the top and bottom of the coffee cup. 
* Pure Poppy card stock was used on the center of the cup, then "Certified Coffee Drinker" (Latte Love) was stamped, cut with a circle punch and added.
* Glossy Accents creates a 'clear bubble' top on the lid of the cup.
* A rectangle of Kraft card stock was impressed with the Aida Impression Plate, and outlined with a red marker. The coffee cup was added with 3D Foam Dots.
* A larger second tag was cut from a heavy cream cardboard, stamped with a sentiment (Latte Love) using New Leaf, Pure Poppy and Dark Chocolate inks. 

* On the back, I stamped an invitation: Let's get together for coffee!!


* The pillow box was made with Rustic White card stock and 
stamped with Distressed Stripes (New Leaf and Pure Poppy inks)
Both tags were added to the pillow box with Baker's Twine.
Supplies: Papertrey Ink, except the patterned paper used on the first pillow box.

Thanks for visiting today. Enjoy the Blog Hop!
Karen C.