Welcome to my crafty blog... a "garden" of colourful cards, quilting, sewing projects, knitting...and what ever else happens along the way!!


Friday, January 25, 2013

Papertrey Ink January 2013 Blog Hop Challenge

Blog-hop-logo 
Here is your chance to try black as a background yourself!  
Pair it up with a bold geometric design or a brightly colored bouquet.  
Heat embossing looks so elegant when used on a black background. 
Don't forget how well white ink will show up as well.  Just pull out some 
black card stock and have fun experimenting with a brand new look!

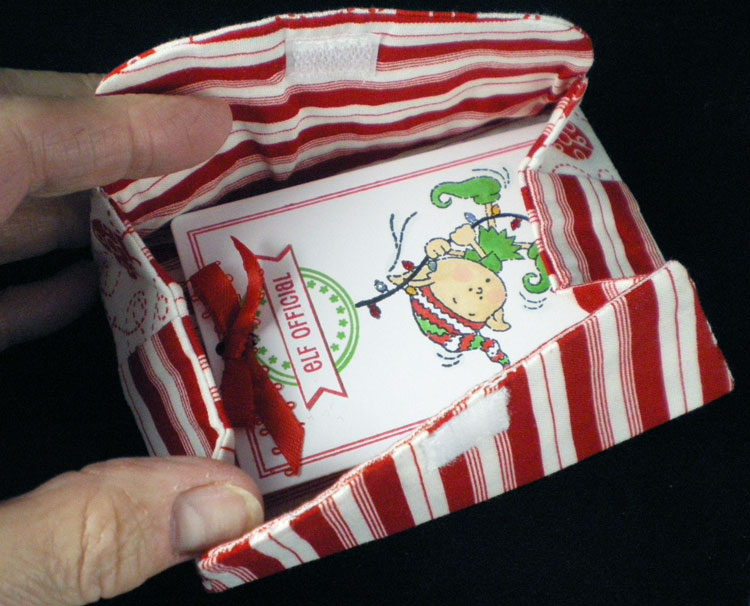
I originally was going to make a Valentine's Day Card with this bicycle image
from Everyday Button Bits and mount it onto a black textured card base.


After several attempts, this image panel 'morphed' into a gift card holder using the Seed Packet Die. I plan on giving this to my husband for Valentine's Day .... 
I will include a Tim Horton's coffee card and a current cycling magazine. 
He's a cyclist and loves his coffee fix, so this will be a great gift for him.

PTI Supplies
Stamps - Everyday Button Bits, Heart-2-Heart #4 (inner 'spokes'), Flower Fusion #7 (black tires), Tag Its #1 (circle seal) & #11 (heart border) 
Inks - Pure Poppy, Fresh Snow
Card Stock - True Black, Stamper's Select White, Pure Poppy
Dies - Half & Half; Seed Packet; Tiny Tags;
Extras - Wood grain IP, Pure Poppy Baker's Twine
 Other Supplies:
Memento Tuxedo Black ink; copic markers; Pentel Silver Gel Pen;  circle punches;
Sizzix Hearts Embossing folder; Versa Mark; Martha Stewart Lady Bug Embossing Powder; Stampendous Detail Black Embossing Powder;


 I still wanted to make a card for Valentine's Day, so here's my attempt at the Chalkboard Art Technique using a combination of stamps. 
* I started with a True Black card stock panel and various sentiments. 
* Once I was satisfied with the sentiment arrangement, I picked up three groups of stamps with 3 acrylic blocks and stamped them using Versamark. This allowed me to keep the exact placement that I wanted.

PTI Stamps:
Peace, Love & Joy (Love, symbol); Tag Its #12 (cherish); Tag Its #3 (thoughts of you);
Heart-2-Heart #9 (heart banner);  Fillable Frames Additions 2 (you're in my heart; forever & always);  
Tag Its #11 (XOXO border) 

* I then embossed them with Stampendous Detail White Embossing Powder.  
* Fresh Snow ink was used to re-stamp the sentiments to create the shadow effect. I also stamped the border with Fresh Snow ink and then created border lines with a Uni-ball Signo White Gel pen. 
* Four white brads were added to the small decorative symbols. 
* Finally more white ink was sponged over the panel blackboard effect. 
* The Linen Impression Plate was used to add texture to the "blackboard".

* The red glitter heart was made by securing Scor-tape on a piece of red card stock, die cutting the Heart-2-Heart #3 die and then sprinkling the tape with Jewel Glitter Ritz Fire Engine Red Micro Fine Glitter. This was mounted with foam dots.


* The front panel was mounted onto the card base (Stamper's Select White card stock), stamped with Background Basics: Wood grain and Pure Poppy ink. 
* The edge of the card was sponged with Soft Stone ink. The last detail was added in the top left corner - a triple bow using Pure Poppy Baker's Twine.

This was a real challenge for me ... 
I always hated smudgy blackboards when I was a teacher and the above 
pictures all look out of focus!! Guess that's the intent of the technique, but 
I just want to get in there and clean it up!!  (*wink*)  I'm not sure that this  
'trend' is one that I will be repeating!! Wonder if my hubby will like it!?

Thanks for visiting today. Enjoy the rest of the Blog Hop!!
Karen C.

Sunday, January 20, 2013

MIM #100: Packaging Cards with Oversized Embellishments

Papertrey Ink's "Make It Monday" videos are always such an inspiration. I haven't played along for a while, but had time today to get inky.  Dawn McVey showed a variety of ways to package some of those cards that just don't fit neatly into a regular envelope. She challenged us to create a unique packaging for such a card. You can view her video here.
I've had this card in my stash for a while, so thought I would try to make a specialty envelope for it. The bow and three pink beads add some thickness to the card that would make it a little 'lumpy' to send in a regular envelope. I often send these types of cards in padded envelopes, but today I have a different idea for this one!!
  I posted the full details for this card here. 

Here's the "envelope"
Envelope Front
PTI Supplies 
Card stock - Autumn Rose & Rustic White
Ink - Autumn Rose; Fancy Flourishes stamps
From my stash
2 doilies; green satin ribbon; white gel pen; 
EK Success: Dotted Scallop border punch
Envelope Back

Here's how I made it: 
I started with a piece of 6" x 10 1/4" card stock. I scored it at
 2 1/8" & 2 1/4"                6 5/8" & 6 3/4".
The bottom was scored at 3/8" & 1/2". 
These score lines allow for the extra thickness of the card details. 
If you have a thicker card, you could adjust these measurements as necessary.
I then cut the two front sections along one of the bottom score lines.

I folded along all of the score lines and then added the 
doilies, stamping, faux stitching and border details.

Once the card was placed inside, the bottom flap was folded 
up to hold it in place and then the ribbon/bow was added. 

Thanks for visiting today.
Karen C.

Friday, January 18, 2013

Thank You : Rainbows and Repeats


Rainbow-Scheme-5

 I started making this card a few weeks ago for a Make it Monday Challenge (#99) at Papertrey Ink.  It sat on my messy desk but I finally finished it this week.
This challenge provided 6 different colour combinations and required us to use a repeating image. I chose these colours from Nichole's list and used the flower background stamp from Tin Types.


The card base and stamped panels use Stamper's White Select card stock. Scarlet Jewel card stock was used to create the large mat, the scalloped mat on the sentiment panel and the two vertical strips.

Details from left to right:
* Simply Chartreuse
* Summer Sunrise - the pattern can be seen in between the 2 strips of Scarlet Jewel. I used copic markers and coloured the space in order to further emphasize this colour,
* Canyon Clay
* Autumn Rose
* Vineyard Berry  
    (Close To My Heart)


Sentiment panel
The oval was cut from Framed Out #8 die and then the border was stamped with the co-ordinating stamp set. The sentiment (Through the Trees) was stamped with Vineyard Berry and then masked so that I could stamp the splotchy image from Grunge Me (using Summer Sunrise ink). Big Scalloped Ovals from Spellbinders was used to die cut the decorative mat. (It was impressed with the Vineyard IP before mounting it over the striped panel with foam dimensional dots.) An amber rhinestone star was added to this panel to give a little sparkle!!

Thanks for visiting today.
Karen C.

Sunday, January 6, 2013

Tiny Tots Cardigan


Sirdar Snuggly Tiny Tots Yarn Pattern Design 1744

I originally started knitting this cardigan after the birth of my grand niece in August. I didn`t get it finished for her baby shower, so I decided it would make a great Christmas gift..... and then I left it to the last minute to finish!! I was knitting and sewing until Christmas Eve and then hand delivered it on Christmas Day!!  I made the 6-12 month size, so little Emily should be able to wear it over the next few months.


The pattern and yarn were purchased at my local knit shop:
Sirdar Snuggly Tiny Tots Baby Fashion DK: Cherry Pink.
I made a version of the sweater that had a simple banded neckline rather than the shawl collar as shown in the pattern image above. I love the little ruffle trim ... such a sweet girly sweater for a sweet little girl.

 
I'm linking this post to Sew Darn Crafty Party at Sew Many Ways here.

Thanks for visiting today.
Karen C.

Saturday, January 5, 2013

Car Caddy

I was very busy in my sewing room this December. I found  a tutorial for this Car Caddy  and knew it would be a perfect gift for my 3 1/2 year old grand nephew. The website gives very clear instructions and measurements, but I made a few alterations.

The road is made from a double layer of grey flannel wool.  The bright yellow felt was hand cut for the road lines. The numbers were cut with my Cuttlebug and By the Numbers dies from Papertrey Ink. All of the edges were bound with a blanket stitch on my sewing machine.


I added a little Stop sign with red felt and embroidery floss. Six pockets were stitched with yellow machine stitching and then the cars were added.

When finished playing with the cars, the caddy is folded in half .......

 folded again in thirds ..........

The front of the caddy has an appliqued racing car with 
flannel tires and button hub caps!! A piece of twill tape 
was inserted on one of the seams and velcro strips were
added to the strap and the front to hold the caddy closed.
The finished car caddy is 5" x 5" when folded ..... 
just the right size for little hands.

Thanks for visiting today!
Karen C.

Thursday, January 3, 2013

Christmas Birds and Gift Wraps

Two of my grand nieces live in New Zealand, so their packages were finished and sent by the end of November. I made each of them a fabric pouch with a handmade tag and bracelet. You can see that post here. In order to send them I made little boxes with patterned card stock (Stampin'Up). The red ribbon was added and then a felt flower accent was made with Pure Poppy felt (Papertrey Ink) and white felt. Two sizes of flowers were cut from Beautiful Blooms II dies. A green layer of leaves was cut from one of the Lovely Layers dies. Tiny Tags dies and stamps were used to create the small tag.


Mattie loves owls, so that was my inspiration for choosing 
the patterned paper. When I saw this pattern for an 
ornament, I made a felt owl for the family`s Christmas tree.

Kraft, Pure Poppy & Vintage Cream felt; Ric Rac Border die (Papertrey Ink);  
orange and brown felt; embroidery floss; amber rhinestones (from my stash)


This is the package I made for Polly. It also contains a 
fabric pouch, tag and bracelet. The patterned paper is 
accented with a large satin cranberry bow and a tiny tag.

I made another felt ornament ... this time I used a 
combination of patterns to create the red and white bird.
Pure Poppy & Vintage Cream felt (Papertrey Ink);  
embroidery floss; white button (from my stash)


Thanks for visiting today!
Karen C.

Tuesday, January 1, 2013

Fabric Pouches, Bracelets and Tags

 This is a long  and photo heavy post!  
There's a variety of projects today - machine and hand sewing; 
handmade bracelets (2 versions) and tags. Hope you enjoy!!

For the Littles
One of my brothers has two daughters and they are the mothers to two daughters each. That means there are 4 little girls (ages 4, 4, 2, 1 1/2 yrs.) I found this tutorial for these fabric pouches and thought that they would  be a cute way to package personalized bracelets that I made each of the girls.

Red and white lady bugs and striped fabrics were chosen for the pouches.

Even though the pouches are closed with velcro, I added 
a 'double' button (red on top of a white one) as an accent.

Back of the fabric pouch:


Here`s a peek inside!!


I made a little tag for each pouch. The red ribbon actually 
holds the bracelet which is attached at the back of the tag.
Button Boutique stamps, Button Card die
Pure Poppy, New Leaf inks (Papertrey Ink); 
Memento Tuxedo Black ink; 
Merry Pursuits stamps (Close To My Heart);
Santa's Notes (Neat & Tangled Stamps);
Copic Markers 


Four Tags for Four Little Girls

Four Bracelets for the Girls
  
Personalized Bracelet
Little ones always love to see their own names on special items. 
* Since all four girls have names that are uncommon, I decided to make them personalized bracelets. I used a set of round letter beads in black and white. 
* The red and white heart beads were in the same package, so that set the stage for the overall colour scheme. I threaded red and white seed beads and the letter beads onto an elastic beading thread so it will be easy for the girls to put on their own jewelry.

For the Moms:
 After seeing how cute the fabric pouches turned out, I decided to make another set for all of the 'moms'... one for my sister-in-law and one for each of my nieces (mothers of the littles.)

I used a combination of 4 fabrics ... this is closer to the pattern description given in the original tutorial. A Raspberry Fizz button (Papertrey Ink) was added to the front.
 A Peek Inside
I used another version of the Button Card tag inside the pouch.


Supplies (Papertrey Ink)
Stamps: Background Basics: Medallions, Button Boutique, 
               Holiday Button Bits, Background Basics: Postmarks; 
 Inks: Raspberry Fizz, Summer Sunrise 
Dies: Button Up #2, Button Card

On the back of the tag .... bracelets made for PTI Stamp-a-Faire.

 'Family Bracelets' (instead of Friendship bracelets!!)
You can see a blog post about these bracelets here.
Thanks for visiting today.
Karen C.