Welcome to my crafty blog... a "garden" of colourful cards, quilting, sewing projects, knitting...and what ever else happens along the way!!


Showing posts with label C.C.Designs. Show all posts

Friday, November 18, 2016

Giftts for Baby

My son and daughter-in-law are expecting their first baby 
at the end of November, so I've been busy making a 
variety of things for the new baby. 
Today I'm sharing a Baby Shower card and envelope
using a variety of stamps and dies.


I cut a white rectangle using 
Lawn Fawn's Stitched Rectangles and 
then repeatedly stamped it with 
a heart (Sweet Baby) using 
Sweet Blush, Lovely Lady, Hibiscus Burst 
and Raspberry Fizz, to create an ombre look.
I cut another rectangle and stamped it with 
Vintage Jadeite using Background Basics: Gingham, 
securing this piece at the bottom of the card front.

Flower Power (C.C.Designs) was stamped 
with Memento Tuxedo Black Ink and coloured 
with copic markers. The focal panel was 
matted with Lovely Lady card stock. 

The sentiment ( ) was stamped with 
Vintage Jadeite onto white card stock 
and also mounted onto a pink mat, 
then dimensional foam tape.
  
BABY (Polka Dot Parade Alphabet) was added. 
Several letters together to create dimension. 
Stamping Bella pink dots accent the card front.


Another white rectangle was die cut for the interior of the card. A row of hearts was stamped across the bottom and the sentiment (Hanging Out) was added.

The envelope front was stamped with the 
same sentiments as the card front and then the
teddy bear from Polka Dot Parade #4 was added.


Supplies (PTI unless noted)
Stamps - C.C. Designs: Itzie Inkie Flower Power; 
Background Basics: Gingham; 
Polka Dot Parade Alphabet, Polka Dot Parade #4, 
Sweet Baby (heart), Hanging Out (sentiment)
Inks - Sweet Blush, Lovely Lady, Hibiscus Burst, Raspberry Fizz, 
Vintage Jadeite, Fine Linen
Paper - Stamper's Select White, Lovely Lady
Dies - Polka Dot Parade Alphabet Die Collection,  
Polka Dot Parade #4; Lawn Fawn Stitched Rectangles
Other - Copic markers; Stamping Bella Pink Dots;

Thanks for visiting today.
Karen C.

Tuesday, November 15, 2016

Pumpkin Wreath Birthday

My daughter-in-law celebrated her birthday 
in late October, just before Hallowe'en, 
so a Pumpkin themed Birthday Card was perfect!

I was inspired by this card  from Amy Sheffer. 
I stamped Rustic Wreath with Memento Tuxedo Black ink 
and coloured with copic markers onto a 
square white card front (Lawn Fawn: Stitched Square).
The sentiment (Autumn Hills) was stamped with Pinefeather ink.
 
The pumpkins (C.C. Designs) were stamped, 
coloured with copics and fussy cut, 
before adding them to the wreath. 
One of the pumpkins was 'popped up' with 
foam dimensional tape. 
A few sequins from my stash were also added. 
The front panel was then attached to a square card base
accented with Canyon Clay Patterned Paper. 


Canyon Clay ink was used to stamp the sentiment 
(Stylish Sentiments: Birthday) 
and then highlighted with leaf images from Rustic Wreath.

Thanks for visiting today.
Karen C.

Friday, February 26, 2016

Emily Happy 3rd Birthday

Things have been very quiet on my blog for the last few months. 
My son was married last October and I finally have a chance to 'catch up'!  
I have lots of cards to share
so let's get started with a birthday card for my grand niece.
 

I fussy cut the stamped and coloured AUGUST HONEY (C.C. Designs)
and then attached it to Fabulous Frames.
I stamped the floral scene and butterfly (Sweet Spring) onto white 
card stock and then sponged blue ink to create the skyline. 
For added interest, I die cut Stitched Lines across the 
lower edge of the frame and then added embroidery floss. 
A rectangluar sentiment panel was stamped with the frame 
from Luck of the Irish and a sentiment from It's a Jungle.

Supplies (Papertrey Ink, unless noted)
Stamps - C.C. Designs: AUGUST HONEY; Close To My Heart: March Word Puzzle
Luck of the Irish; It's a Jungle; Sweet Spring, Natural Beauties;
Inks - Hibiscus Burst, Raspberry Fizz, Autumn Rose, New Leaf, Summer Sunrise, Spring Rain. 
Close To My Heart: Blush, Grey Wool; Twilight; Memento Tuxedo Black 
Papers - Stamper's Select White; Recollections: Bold Basics Patterned Paper Pack 
Dies - Fabulous Frames dies; Stitched Lines
Other - copic markers; embroidery floss; 

Inside:


Big Birthday Wishes; Polka Dot Parade Alphabet stamps & dies; 
Autumn Rose ink and card stock; Nestabilities 

Finished Card & Envelope: 
 Heart-2-Heart #1 & #2; Garden Variety,  
Polka Dot Parade Alphabet
Thanks for visiting today.
Karen C.

Tuesday, January 14, 2014

A Magical Birthday

My sweet grand niece, Polly, turned 3 this week 
so I made her a fun shaker card to celebrate! 


I started by stamping and heat embossing the sentiment with 
Versamark and black embossing powder onto white card stock. 
* The *star* (Framed Out #6) was stamped repeatedly onto the card front 
with Canyon Clay, Summer Sunrise, Harvest Gold, Limeade Ice, New Leaf Ink. 
* The Woodgrain Impression Plate was used to create texture. 
  The corners of the card front and card base (Summer Sunrise)
were rounded to give a softer look to the finished card.

* The Tag Sale #8 die was cut and stamped to match the background. 
* An acrylic "window" and small yellow seed beads were used to create 
the shaker element. This was adhered to the front with foam tape.
* Kenya Ketto (Stamping Bella) was stamped, coloured with copic 
markers and then fussy cut. I positioned her so that the wand  
(with a star accent) overlaps the window and points to the sentiment.  
This was also attached with foam dimensional tape.

* Inside: 
* White card stock was stamped with a border 
of *stars* and the sentiment (Polka Dot Parade #5). 
* The number '3' was die cut from patterned paper;
'rd' (Movers & Shakers) was stamped with New Leaf ink.

Card Details  (PTI, unless noted)
Stamps - Stamping Bella: Kenya Ketto; C.C.Designs: Magical Birthday; 
Framed Out #6, Polka Dot Parade #5, Movers and Shakers Sentiments,
Inks - Memento: Tuxedo Black; Versamark; 
Canyon Clay, Summer Sunrise, Harvest Gold, Limeade Ice, New Leaf
Paper - Summer Sunrise, Stamper's Select White; Recollections: Bold Brights Paper Pad.
Dies - PTI: Tag Sale #8 Die, By the Numbers
Other Supplies - Stampendous Detail Black Embossing Powder; copic markers; corner rounder;
Woodgrain Impression Plate;   acrylic sheet;  seed beads,  amber adhesive star; 3D Foam Tape.

Thanks for visiting today.
Karen C.

Monday, January 6, 2014

Happy Birthday Payton!

Happy New Year!! 
It's January 2014 and time to start another year of crafty celebrations. 
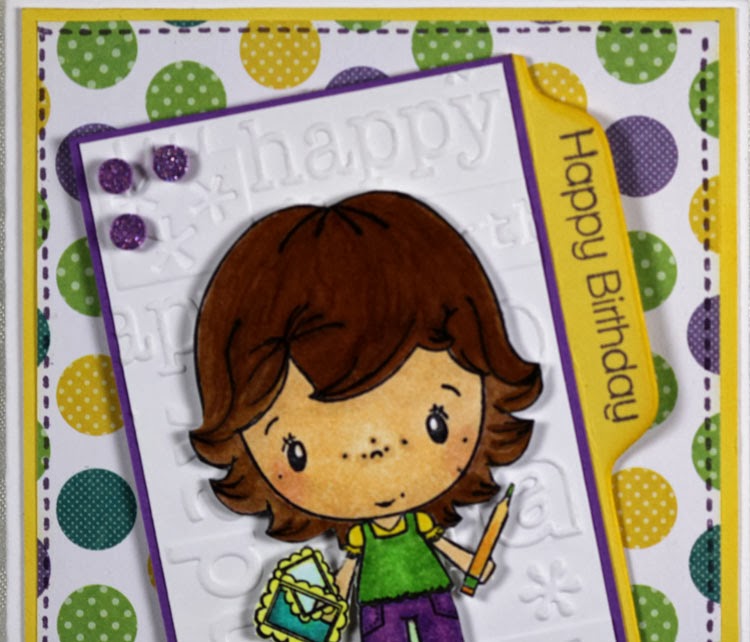
 My first card of 2014 was made for my grand niece's 5th Birthday.


 * Payton loves drawing and colouring, so I used this 
sweet stamp from C.C.Designs - Honey Lesa on her card.
* I used the colour scheme from the patterned paper 
to choose the copic markers to colour Lesa'a clothing. 
* The image was fussy cut and then mounted onto white card 
stock (embossed with a "Happy Birthday" embossing folder). 
* A purple mat was added to a Harvest Gold strip, cut with Edgers #5 Die. 
* The sentiment (It's a Jungle Out There) was stamped with Winter Wisteria. 
* Three purple dots accent the top corner of the main panel. 
* To finish the front, a piece of patterned paper was mounted onto a
Harvest Gold mat and a white card base. The patterned paper was 
outlined with faux stitching (Sew Simple Borders) using Plum Pudding ink.

* Inside:  Sentiment (Mum's the Word) and candles (Birthday Style)
in colours from the front paper. (I added Hibiscus Burst as the 5th colour) 
* The small circle image (Postmarks) highlights the birthday girl's age!!


Card Detail   (PTI, unless noted) 
Stamps -  C.C. Designs: Honey Lesa; Sew Simple Borders, It's a Jungle Out There, 
Mum's the Word, Birthday Style, Postmarks
Inks - Summer Sunrise, Winter Wisteria, Hibiscus Burst, Harvest Gold, New Leaf;
 Memento: Tuxedo Black; Close To My Heart: Twilight
Paper - Stamper's Select White, Harvest Gold, Recollections: Purple,Bold Basics Patterned Paper Pad
Dies - Edgers #5 Die, Birthday Style
Other Supplies - Cuttlebug: Happy Birthday Embossing Folder, copic markers;  
Stamping Bella: Purple Dots; 3D Foam Tape

Thanks for visiting today.
Karen C.

Thursday, July 18, 2013

Baby Girl Shower Gifts

     My nephew and his girlfriend are expecting their first baby in late August. While they were visiting in early July we had a family gathering/baby shower for them. I had lots of fun making a card, tags and a baby banner with my stamps and paper. I also made a fabric bag to hold one of the gifts, but it will make a perfect little tote bag for the new mama as well!!

Banner
The largest gift really needed something extra special, so I made a 'baby girl' banner with pinks and light purple card stock. I purchased little fabric butterflies from the Dollar Store and used them at each of the corners. I also left extra ribbon  at each end so it could be used in the baby's room as a decoration.
This was the first banner I've ever made, so I experimented with various techniques!! It has lots of dry embossing, stamping and die cuts, but unfortunately you can't see that clearly in the above picture. I used Limitless Layers 1 3/4" Circles and Modern Alphabet Lower Case dies (Papertrey Ink), layered on top of Spellbinders Nested Pennants. The daisies were cut with a EK Success Border Punch.

Card  
I stamped the card front with Background Basics: Tin Types using Lemon 
Tart ink, then embossed the card front (Stamper's Select White -PTI) with an embossing folder (Elegant Bouquet - Stampin' Up) to create some interest.
Each of the flowers and leaves were coloured with copic markers, before adding the sentiment (Hanging Out - PTI) and the focal panel. (C.C.Designs Itzie Inkies Flower Power). Some green patterned paper (from my stash) and 4 mini pearls were added to the main panel. I used the end of a ticket (Just the Ticket Border Die) to stamp the word ADORABLE from Tiny Tags II and then attached it behind the top of the focal panel.


The envelope was also decorated with 'BABY'  (Polka Dot Alphabet - Close To My Heart) and 'For your ... Girl' ( Baby Words: Stampendous) and the butterfly from Sweet Spring (PTI).

Butterfly Tag
I cut Tag Sale #4 die with Soft Moss card stock and then stamped  'sweet baby GIRL' (Sweet Spring & Sweet Baby) three times around the outer edge with Winter Wisteria ink. Three daisies were added to the top and accented with Dot Sparkles. The butterfly (Butterfly Dreams) was cut twice - one pink card stock and one vellum. The vellum  was stamped with Hibiscus Burst ink and then attached along the `body`to create a dimensional look.
C

Fabric Bag & & Tag
I had this precious fabric in my stash and it was perfect for a gift bag. I love all the images (butterflies, frogs, castles, hearts, princes and princess) and words included on the fabric. Bright pink fabric was used for the handles and the trim around the upper band. 


I added a big yellow button to the front of the bag - 
it was the perfect place to attach this gift tag:

 I made this gift tag for one of the Papertrey Ink Stamp-a-Faire 2012 challenges: Homemade Embellishments. You can see the original post with details  here.

The complete baby shower set/gifts were a real hit with everyone. Now we`re all anxiously awaiting the arrival of another little sweet baby girl in our family!!

Thanks for visiting today.
Karen C.

Saturday, June 15, 2013

Balloon Trevor x 2

    One of my grand nephews turned 4 in early June, so I set out to make 
a card that would be easy to mail. I have another grand nephew who 
will be three in August, so I decided to make a second card with the same details. I like the idea that I have a head start on a late summer birthday!!

* I started by stamping Balloon Trevor (C. C. Designs), colouring with copic 
     markers and then fussy cutting. Trevor's shirt was also stamped onto
     patterned paper and fussy cut so I could paper piece it. 
* The balloon portion was stamped 3 more times, coloured with a variety 
     of copic markers (greens, blues, reds, yellows) and fussy cut.
* Before positioning the balloons and Trevor, I embossed the Kraft card 
    front with the Wood grain Impression Plate. The sentiment (Say It In Style -
      Close To My Heart) and suffix (th) were also stamped onto the card front, 
    then a Pure Poppy number die cut was added. 

* The picket fence was cut from polka dot paper; the grass border die 
     (My Favorite Things) was cut, then added to the bottom of the card. 
     Small brass adhesive pearls accent each of the pickets on the fence.

* A rectangle of Rustic White card stock was added to the inside of the 
    card and then stamped with several sentiments. (Stylish Sentiments: Birthday;
      Mega Mixed Messages; Fillable Frames #7) using Pure Poppy, Blueberry Sky 
    and Rich Cocoa inks. The stitching line (Sew Simple Borders) around 
    the edge was added with blue ink.


Happy Birthday - Take 2!!

* I used patterned paper for one of the balloons. The dark chocolate polka
    dot paper was stamped with Background Basics: Woodgrain before cutting
    the picket fence.
A green copic marker was used on the grass to add some texture border.

The inside uses stamps and dies from Heart-2-Heart #5.

Card Details (PTI, unless noted)
Stamps - Balloon Trevor (C.C. Designs);  Say It In Style (Close To My Heart) ; 
Background Basics: Woodgrain, Sylish Sentiments: Birthdays, Mega Mixed Messages, 
Fillable Frames #7, Sew Simple Borders, Heart-2-Heart #5hakers;
Inks - Memento Tuxedo Black, Rich Cocoa; Pure Poppy, Blueberry Sky, New Leaf, Harvest Gold, Kraft
Papers - Classic Kraft, Rustic White, Pure Poppy;   Patterned Papers (Recollections)
Dies - Picket Fence,  Block Numbers; Grass Border die (My Favorite Things)
Other - copic markers; brass adhesives; 3-D foam dots

Tuesday, May 21, 2013

Camera Birgitta Birthday Tag and Gift Bag

My sister-in-law is a real photography buff, so I used that theme for a tag on a birthday gift. After I finished the tag, I thought a gift bag would be a great way to co-ordinate everything!
 Tag:
 
 * I used the Boutique Accessories Card die and cut it twice - once with card stock and once with Limeade Ice patterned paper. The edges were stamped with two different sentiments from Tiny Tags and Tiny Tags II.
 *The original Camera Birgitta image had shorts and a sleeveless top, so by combining two images and doing some extra colouring, I was able to make a more appropriate look for an early spring tag.  
Birgitta was created by stamping the image onto Bella card stock, colouring with copic markers and then fussy cutting the top half (head and torso). The bottom (pants and shoes) were stamped with another image (Autumn Trevor)  and then fussy cut. The pants were paper pieced and the shoes were coloured with copic markers.
 *Grass (MFT border die) and a little ladybug were added to the bottom of the tag and three blue Stamping Bella dots to the top corner.

PTI Supplies, unless noted:
Stamps -  Swiss Pixie Camera Birgitta &amp and Autumn Trevor (C.C. Designs);
Tiny Tags I   & II
Inks - Blueberry Sky; Memento Tuxedo Black
Paper - Bella White; Limeade Ice; Limeade Ice Leaves Paper
Dies - Boutique Accessories Card die; Grass Border die (MFT)
Other Supplies -  copic markers; Berry Sorbet Twill Ribbon; Stamping Bella Dots;


Gift Bag:
     I measured the gift so that I could create a custom size container to hold it. I used Blueberry Sky gingham paper and white card stock. The top edge of the bag was cut with Adorning Accents Edgelits die (Stampin'Up) and Limitless Layers oval was used to cut the handle opening. The gift  bag was accented with an eyelet border die (Limeade Ice ) and Berry Sorbet circles.

Side view of the gift bag shows how I attached the ribbon on the tag, by punching a small hole below the oval opening.
PTI Supplies, unless noted:
Paper - Blueberry Sky Gingham Patterned Paper, Limeade Ice Leaves Paper; Berry Sorbet
White Card Stock (Recollections)
Dies -   Adorning Accents Edgelits Die (Stampin' Up)  Eyelet Border; Limitless Layers 2.25" Ovals;

Tag and Gift Bag


Thanks for visiting today.
Karen C.

Wednesday, February 6, 2013

Workshop Birthday Cards

Several relatives have birthdays in January, but after the holidays I found that I  had little energy for card making. It was a great time to `shop`my card stash and these two cards seemed perfect for my niece and her daughter. (They live in New Zealand, so bright colours  and flowers are good choices for their "summer" birthdays!!).  Both cards were made at a workshop I attended at my local scrap booking store. All I had to do was finish off the interior sentiments!!

This is the card I used for Polly`s birthday - she just turned 2 !! 
* Turquoise textured Bazzill cardstock was used for the 6"x 6" card base. 
* It incorporates several mats (green and pink) along with two patterned fabric pieces, pink dotted ribbon, narrow turquoise ribbon and clear buttons. 
* The focal image (Swiss Pixie Heidi Among the Flowers - C.C. Designs) was coloured with copic markers. The birthday sentiment is from Close To My Heart.

Card Interior

I stamped sentiments from PTI`s Movers & Shakers Sentiments. I also added her age at the bottom near the fence.(Swiss Pixie Butterfly Fence - C.C. Designs stamp)

Kristin`s Card:

* This 6" x 6" card uses a olive green card base and layers of patterned paper and chocolate brown card stock. 
* The focal image (Emma - Lulu Collection: Stamping Bella) is paper pieced and mounted onto a scalloped brown mat. 
* Flowers from my stash were added with a brown brad in the center.

 Card Interior:
* The inside of the card was decorated with vines and flowers that I  drew 
with green and red markers.  
* Two flowers were cut from patterned paper with a circle punch and mounted 
onto red card stock on top right corner.  
* Flowers (Flower Fusion #1 & #3) were stamped on either side of  the sentiments  (Flower Fusion #1 & #9)

Thanks for visiting today.
Karen C.

Tuesday, September 4, 2012

Little Emma

I've  had this image coloured for some time and finally made a birthday card. The colour scheme and papers make me think of  "Back to School".

Autumn Emma  (C.C. Designs)  is sitting on the bench, perhaps waiting for a birthday surprise?  Both the bench and Emma were stamped on Bella White card stock, coloured with copic markers, and then fussy cut.  Her shirt was pieced with a snippet of patterned paper from  PTI Library Ledger Collection. Additional patterns from the same paper pack were used for the main front panel and two of the Nestabilities layers. The solid card stock (Bahama Blue) was used for contrast for one of the final layers.The sentiment (Fillable Frames #1) was stamped with Chocolate ink. The card base is Rustric White card stock.

Here's a close up of the various layers.
The strip of paper under the mats was created by stamping the 
numbers from Mini Scrapbooking Series: Tabs using Chocolate ink. 
The brown ink was also used to sponge the edges of several of the layers.  A 
brown button was tied with Rustic Twine and added to the card. The grass
 from Garden Variety was stamped below the bench using Pool Party ink.

Card Details: PTI (unless noted)
Stamps = C.C. Designs: Autumn Emma, Bench;
Fillable Frames #1,  Garden Variety, Mini Scrapbooking Series:Tabs.
Inks = Memento Tuxedo Black, Chocolate; SU Pool Party
Papers = Library Ledger Collection, Rustic Cream Bella: White;  Core'dinations: Bahama Blue
OtherNestabilities Label #9; Copic markers; corner rounder; brown button; Rustic Twine

Thanks for visiting today.
Karen C.