Welcome to my crafty blog... a "garden" of colourful cards, quilting, sewing projects, knitting...and what ever else happens along the way!!


Showing posts with label Packaging. Show all posts

Thursday, March 30, 2017

Botanical Silhouettes

I love coordinating tags, paper and embellishments  for gift giving.
Sometimes gifts can be difficult to wrap in a traditional way - an odd size or shape means that you have to think 'outside the box' to make it work. 
I created a trio of gift wraps for my sister-in-law's birthday gifts, 
using Botanical Silhouettes and Distressed Stripes stamps, along with a simple white bag and card stock and turquoise tissue paper and card stock.

After wrapping the main gift with tissue paper, I used some extra paper to make a 'pom pom' flower to act as a topper. A green ribbon and stamped tag finishes (Tremendous Tags die cut) the design.


A white bag was stamped with images from Botanical Silhouettes using Hawaiian Shores, Aqua Mist, Summer Sunrise, Canyon Clay and Simply Chartreuse. A small butterfly (Butterfly Dreams)  was stamped in Harvest Gold, Summer Sunrise and Canyon Clay. A strip of Hawaiian Shores was die cut with the Large Scallop Border Die, folded over the top of the white bag and then tied with a small piece of green Baker's Twine.

The sentiment (Botanical Silhouettes) was stamped 
with Hawaiian Shores and Canyon Clay.


The Pillow Box die was cut from white card stock and then stamped with a variety of colours using Distressed Stripes. A green ribbon was added.

Thanks for visiting today.
Karen C.

Saturday, March 7, 2015

Delightful Dahlia - Mistified!!

The first thing I wanted to try with my new MISTI 
(Most Incredible Stamping Tool Invented) 
was the multi-step flowers from Delightful Dahlia stamp set. 
I've never been able to line these images up - until now!! 
And because it was so awesome, I decided to make a card set 
using a design by Nichole Heady ((from this post)


All together I stamped 12 large and 12 small flowers - 
each with the three step stamps!!
I think I was making up for lost time with this set!!

PINK FLOWERS:
Inks: Pure Poppy, Hibiscus Burst & Sweet Blush inks.
 White adhesive pearls accent the flower centers.
Leaves: Fine Linen ink.
(full strength and stamped off once to create a shadow effect.)
Sentiments: Dark Chocolate ink.
Card bases: Hibiscus Burst . 
 All white panels were impressed with the Canvas Impression Plate.

 Sentiment: Mum's the Word

Sentiment:  Mini Blooms

Sentiment: Delightful Dahlias Additions
The inside of the cards were lined with white 
card stock and stamped with the small dahlia. 
Here's a sample of one of the card interiors: 


Sentiment: Big Birthday Wishes


 GOLD FLOWERS
 Inks: Summer Sunrise (full strength); 
Summer Sunrise (stamped off once) and Harvest Gold.
Card bases: Harvest Gold 
All other details are the same as the pink set above. 
Sentiment:  Mum's the Word

Sentiment: Mini Blooms

 Sentiment: Delightful Dahlias Additions


Sentiment: Delightful Dahlias

  I decided to give this set of cards to my future daughter-in-law when we visited with them earlier this month. I created a little gift box and tag to co-ordinate with the set.

The box was created with one piece of Hibiscus Burst card stock 
and some trial and error!! I wished I had made note of the measurements so I could refer to them if I wanted to make this again, but I was in a hurry to finish this before we left on our trip. All six cards and envelopes fit nicely into the box.

A Tag Sale #8 was used to create the tag 
and a white ribbon and bow are the finishing touches. 

 I stamped the outline image from the original Delightful Dahlias 
onto a piece of white card stock (cut with the 2nd die from Tag Sale #8) 
with Memento Tuxedo Black ink, so I could colour with copics. 
The leaves (Sending You) were added with Spring Moss ink.
The sentiments (Just For You) are stamped with Dark Chocolate ink.
I used the Linen Impression Plate to create some interest and 
then added this panel to patterned paper tag.

Wow! This was a long post!! 
Thanks for joining me today.  
 Karen C.

Monday, August 18, 2014

Something Old, Something New

Today's post is a little different, incorporating some "old" cards that I found in my stash and some "newly" decorated envelopes to go with them!!

Like many stampers, I have a collection of cards tucked away and somewhat forgotten. This summer I spent time cleaning and organizing in my craft room. My space was in so much chaos, I just didn't feel like creating. I knew that I had to get a handle on all of the new and old products and projects that were piling up. At the same time, I needed a variety of birthday and anniversary cards for family members. As I was going through the saved cards, I picked out a few that I thought would work and then set about making a "new" envelope to give the card a fresh look.


Something Old #1: 
I made several of these cards and kept one in my stash. (details here) 
It was a perfect time to use it for my grand niece's first birthday in August.
Gigi Giraffe: Clear Dollar Stamps
Card Interior

Something New: Envelope #1
PTI:
Circle Scribbles and Polka Dot Alphabet
 Hibiscus Burst. Limeade Ice, Harvest Gold, Winter Wisteria


Something Old #2:
I had made a slider card using the 3 image panels below. 
I didn't like the way it looked, so I re-worked the pieces to create 
a card with extra sentiment pages for my 4 year old grand nephew. 
He's into pirates so this was a real hit with the birthday boy!

Card Front
PTI:
Card Base: Kraft Card stock
Stamping Up
Card Front: Ahoy, Matey; Matey Wheel  
Chocolate Chip & Pacific Point Card Stock
Watercolour pencils

Center Pages
Close To My Heart
Friendship Word Puzzle; Friendship Alphabet
Moonstruck, Cranberry inks
PTI
Rustic Cream Card Stock,
Sew Simple Borders, Dark Chocolate


Interior Page & Back
Close To My Heart
Birthdays, Good Times
PTI
Canyon Clay, Dark Chocolate inks

Something New: Envelope #2
PTI:
Up, Up & Away
Tiny Treats: Valentine; Fresh Snow Ink;
Close To My Heart
Charm Alphabet; Outdoor Denim ink;  
Memento Tuxedo Black;
Copic Markers


Something Old #3: 
 This was a card from my stash -  I used it for my niece's anniversary.
 Stamps
High Hopes Stamps: Hopeful Ant  
  TPC Studios: Playful Expressions

 Close To My Heart
Black & Cranberry Inks; Cranberry Card Stock

My Mind's Eye Patterned Paper
Scalloped Border Punch 
  Watercolour Pencils; Cranberry Ribbon

Something New: Envelope #3
PTI:
No Strings Attached, Tag It's #5
Background Basics: Medallions 
Close To My Heart
Cranberry, Olive inks

Envelope Flap: Medallions  

Thanks for visiting today.
Karen C.

Thursday, December 26, 2013

Papertrey Ink December 2013 Blog Hop


Blog-hop-logo
I hope everyone had a Merry Christmas. We enjoyed good food and time with family yesterday, along with a warm, cozy fire beside our Christmas tree. 

http://nicholeheady.typepad.com/.a/6a00d8341c64e753ef019b03081610970c-pi


Today's Blog Challenge at Papertrey Ink involves the 
use of string on cards or packages. I've included two 
little pillow boxes and tags that I made for Christmas 
gift cards ... one for my husband and the other for my 
son. I used Pure Poppy Baker's Twine on each and tied 
them up with a little bow. Nothing too fancy or unique, 
but the string just adds that 'finishing' touch for a masculine gift.


Celebrate the Season
* I die cut festive striped paper (Pebbles Inc.) with the Pillow Box Die

* The little tag was made by stamping white card stock with Framed Out #5 and New Leaf ink. I trimmed the tag with a craft knife and then sponged the edge with more green ink. The sentiment and holly image (Framed Out #8) were added to the center of the tag. 
* I cut a second tag from Pure Poppy card stock and trimmed the bottom using a border punch. I've seen this layering technique for tags, so thought I'd give it a try. Baker's Twine was tied around the length of the pillow box and then the tag was added with an additional piece of twine.

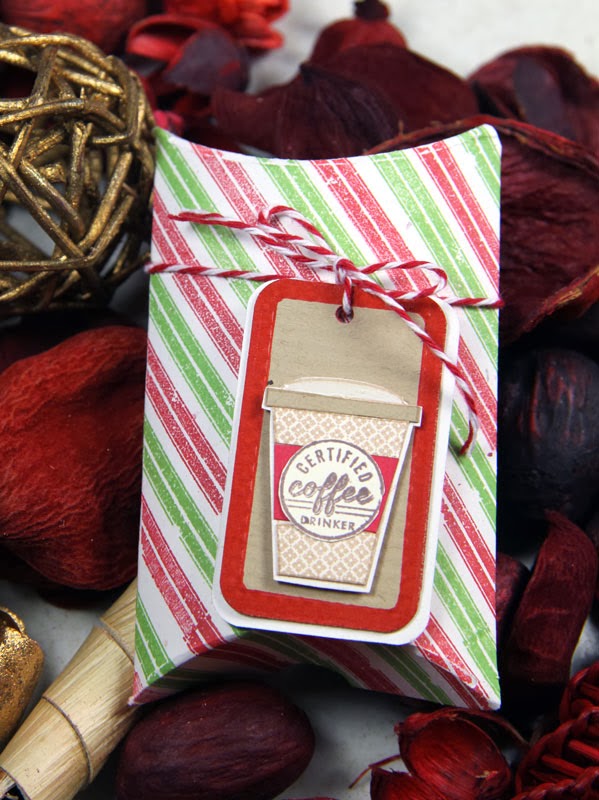
Certified Coffee Drinker 
My husband loves coffee, so a gift card to Tim Horton's was on his list!

* The coffee cup (Heart-to-Heart #1) was perfect for the front of this tag.  
* I stamped a pattern from Bitty Blocks Backgrounds in Kraft ink onto a piece of card stock, then used it to paper piece the top and bottom of the coffee cup. 
* Pure Poppy card stock was used on the center of the cup, then "Certified Coffee Drinker" (Latte Love) was stamped, cut with a circle punch and added.
* Glossy Accents creates a 'clear bubble' top on the lid of the cup.
* A rectangle of Kraft card stock was impressed with the Aida Impression Plate, and outlined with a red marker. The coffee cup was added with 3D Foam Dots.
* A larger second tag was cut from a heavy cream cardboard, stamped with a sentiment (Latte Love) using New Leaf, Pure Poppy and Dark Chocolate inks. 

* On the back, I stamped an invitation: Let's get together for coffee!!


* The pillow box was made with Rustic White card stock and 
stamped with Distressed Stripes (New Leaf and Pure Poppy inks)
Both tags were added to the pillow box with Baker's Twine.
Supplies: Papertrey Ink, except the patterned paper used on the first pillow box.

Thanks for visiting today. Enjoy the Blog Hop!
Karen C.

Tuesday, May 21, 2013

Camera Birgitta Birthday Tag and Gift Bag

My sister-in-law is a real photography buff, so I used that theme for a tag on a birthday gift. After I finished the tag, I thought a gift bag would be a great way to co-ordinate everything!
 Tag:
 
 * I used the Boutique Accessories Card die and cut it twice - once with card stock and once with Limeade Ice patterned paper. The edges were stamped with two different sentiments from Tiny Tags and Tiny Tags II.
 *The original Camera Birgitta image had shorts and a sleeveless top, so by combining two images and doing some extra colouring, I was able to make a more appropriate look for an early spring tag.  
Birgitta was created by stamping the image onto Bella card stock, colouring with copic markers and then fussy cutting the top half (head and torso). The bottom (pants and shoes) were stamped with another image (Autumn Trevor)  and then fussy cut. The pants were paper pieced and the shoes were coloured with copic markers.
 *Grass (MFT border die) and a little ladybug were added to the bottom of the tag and three blue Stamping Bella dots to the top corner.

PTI Supplies, unless noted:
Stamps -  Swiss Pixie Camera Birgitta &amp and Autumn Trevor (C.C. Designs);
Tiny Tags I   & II
Inks - Blueberry Sky; Memento Tuxedo Black
Paper - Bella White; Limeade Ice; Limeade Ice Leaves Paper
Dies - Boutique Accessories Card die; Grass Border die (MFT)
Other Supplies -  copic markers; Berry Sorbet Twill Ribbon; Stamping Bella Dots;


Gift Bag:
     I measured the gift so that I could create a custom size container to hold it. I used Blueberry Sky gingham paper and white card stock. The top edge of the bag was cut with Adorning Accents Edgelits die (Stampin'Up) and Limitless Layers oval was used to cut the handle opening. The gift  bag was accented with an eyelet border die (Limeade Ice ) and Berry Sorbet circles.

Side view of the gift bag shows how I attached the ribbon on the tag, by punching a small hole below the oval opening.
PTI Supplies, unless noted:
Paper - Blueberry Sky Gingham Patterned Paper, Limeade Ice Leaves Paper; Berry Sorbet
White Card Stock (Recollections)
Dies -   Adorning Accents Edgelits Die (Stampin' Up)  Eyelet Border; Limitless Layers 2.25" Ovals;

Tag and Gift Bag


Thanks for visiting today.
Karen C.

Saturday, March 30, 2013

Buttons & Brooches

I  wanted to add a little gift to a parcel I was sending off to one of my grand nieces. Since she studied dinosaurs in pre-school, she has been fascinated by them. I had a sheet of Dinosaur Shrinky Dinks in my stash, so I made this set 
 of brooches and buttons. the Button Card die and Boutique Additions Card Die Collection were used to create packaging for them.

Boutique Accessories - Broochess
Supplies - PTI, unless noted
Stamps - Friendship Jar & Friendship Jar: Spring Fillers; Sew Simple Borders
Inks - Royal Velvet; Berry Sorbet
Paper - Harvest Gold;  Recollection: Easter Paper
Dies - Boutique Accessories Card Die Collection


Buttons

Supplies - PTI, unless noted
Stamps - Button Boutique 
Inks - Royal Velvet;  Berry Sorbet
Paper - Harvest Gold, Berry Sorbet;  Recollection: Easter Paper
Dies - Button Card; Buttoned Up Die #2 
Other - 1/2" & 5/8" square punches; embroidery floss

Thanks for visiting today.
Karen C.

Friday, February 1, 2013

Pillow Box Stamping: MIM #102

When I first saw the new "Make It Monday" Challenge" (Pillow Box Stamping) 
at Papertrey Ink, I wasn't sure if I would play along -  I don't have the 
Pillow Box die or a Silhouette/Cameo machine to cut the design.   But ... 
I found a ready made pillow box in my stash and took it apart so I could 
use it as a template.  After making several of the boxes with white card 
stock, this die has gone to the top of my wishlist!! 

I had so much fun stamping the rainbow of stripes onto the card stock and decorating them to co-ordinate with some cards I already had in my stash.  
I used Distressed Stripes for all of theses, but varied the colours of ink.


#1:  Birthday Wishes
I made this card for the 2012 Stamp-A-Faire Challenge (view card details here) 

The same colour scheme was used to stamp diagonal stripes on the Pillow Box - Hawaiian Shores, Aqua Mist, Summer Sunrise, Harvest Gold & Simply Chartreuse. 
I also added stripes in  Raspberry Fizz and Berry Sorbet for some extra pizzazz!! 

In order to co-ordinate the card and gift packaging I stamped a  
Tremendous Tags die cut with the flowers from Botanical Silhouettes 
and added a sentiment from Year of the Flowers Collection. 
A green satin ribbon and bow finishes the package. 
My sister-in-law's birthday is coming up, so this set will be perfect for her!!


#2. Rainbow Wishes
When I stamped these stripes, the colours totally reminded 
me of Skittles or Tutti Frutti gum!!  I'm going to use this 
box to hold a sweet treat for my son on Valentine's Day!!

Inks: Hibiscus Burst, Raspberry Fizz, Harvest Gold, 
  Summer Sunrise, New Leaf, Spring Moss
Other: Just for You stamps; 1 3/4" circle punch; yellow grosgrain ribbon 


#3.  Red - Black - White Valentine Wishes
Here's another variation of the pillow box using red and black 
stripes and images. I'm going to add some Valentine candies to 
this package for my husband. It will co-ordinate with the card 
and card holder that I made for the January 2013 Blog Hop. (here)

Inks: Pure Poppy, Soft Stone, Memento Tuxedo Black
Stamps: Distressed Stripes; Heart-2-Heart #11; Tag- Its #11; Love Potion
Other: Tremendous Tags die; Pure Poppy Baker's Twine; red satin ribbon 


Stamping Tip:

Ashley's tip in the video was very helpful in creating 
a continuous look from the front to the back of the box. I stamped the box while it was flat and made sure that the colours matched at the folds. I used a piece of paper to mask one side at a time.... creating a 'chevron' effect on the sides of the pillow box. It took a little extra effort but I was pleased with the final results.  I can see lots of these in my future!!
Making these pillow boxes was so addictive!! 


Thanks for visiting today. 
Karen C. 


Friday, January 25, 2013

Papertrey Ink January 2013 Blog Hop Challenge

Blog-hop-logo 
Here is your chance to try black as a background yourself!  
Pair it up with a bold geometric design or a brightly colored bouquet.  
Heat embossing looks so elegant when used on a black background. 
Don't forget how well white ink will show up as well.  Just pull out some 
black card stock and have fun experimenting with a brand new look!

I originally was going to make a Valentine's Day Card with this bicycle image
from Everyday Button Bits and mount it onto a black textured card base.


After several attempts, this image panel 'morphed' into a gift card holder using the Seed Packet Die. I plan on giving this to my husband for Valentine's Day .... 
I will include a Tim Horton's coffee card and a current cycling magazine. 
He's a cyclist and loves his coffee fix, so this will be a great gift for him.

PTI Supplies
Stamps - Everyday Button Bits, Heart-2-Heart #4 (inner 'spokes'), Flower Fusion #7 (black tires), Tag Its #1 (circle seal) & #11 (heart border) 
Inks - Pure Poppy, Fresh Snow
Card Stock - True Black, Stamper's Select White, Pure Poppy
Dies - Half & Half; Seed Packet; Tiny Tags;
Extras - Wood grain IP, Pure Poppy Baker's Twine
 Other Supplies:
Memento Tuxedo Black ink; copic markers; Pentel Silver Gel Pen;  circle punches;
Sizzix Hearts Embossing folder; Versa Mark; Martha Stewart Lady Bug Embossing Powder; Stampendous Detail Black Embossing Powder;


 I still wanted to make a card for Valentine's Day, so here's my attempt at the Chalkboard Art Technique using a combination of stamps. 
* I started with a True Black card stock panel and various sentiments. 
* Once I was satisfied with the sentiment arrangement, I picked up three groups of stamps with 3 acrylic blocks and stamped them using Versamark. This allowed me to keep the exact placement that I wanted.

PTI Stamps:
Peace, Love & Joy (Love, symbol); Tag Its #12 (cherish); Tag Its #3 (thoughts of you);
Heart-2-Heart #9 (heart banner);  Fillable Frames Additions 2 (you're in my heart; forever & always);  
Tag Its #11 (XOXO border) 

* I then embossed them with Stampendous Detail White Embossing Powder.  
* Fresh Snow ink was used to re-stamp the sentiments to create the shadow effect. I also stamped the border with Fresh Snow ink and then created border lines with a Uni-ball Signo White Gel pen. 
* Four white brads were added to the small decorative symbols. 
* Finally more white ink was sponged over the panel blackboard effect. 
* The Linen Impression Plate was used to add texture to the "blackboard".

* The red glitter heart was made by securing Scor-tape on a piece of red card stock, die cutting the Heart-2-Heart #3 die and then sprinkling the tape with Jewel Glitter Ritz Fire Engine Red Micro Fine Glitter. This was mounted with foam dots.


* The front panel was mounted onto the card base (Stamper's Select White card stock), stamped with Background Basics: Wood grain and Pure Poppy ink. 
* The edge of the card was sponged with Soft Stone ink. The last detail was added in the top left corner - a triple bow using Pure Poppy Baker's Twine.

This was a real challenge for me ... 
I always hated smudgy blackboards when I was a teacher and the above 
pictures all look out of focus!! Guess that's the intent of the technique, but 
I just want to get in there and clean it up!!  (*wink*)  I'm not sure that this  
'trend' is one that I will be repeating!! Wonder if my hubby will like it!?

Thanks for visiting today. Enjoy the rest of the Blog Hop!!
Karen C.