Welcome to my crafty blog... a "garden" of colourful cards, quilting, sewing projects, knitting...and what ever else happens along the way!!


Showing posts with label Sewing Projects. Show all posts

Tuesday, November 22, 2016

More Baby Gifts

My daughter-in-law asked me to make a 
Diaper Clutch/Changing Mat, similar to this design.
 I used two coordinating prints, 
a bright orange for trim and yellow 
terry cloth to make the clutch/diaper pad. 
When it is opened the two flaps have pockets 
that can hold a diaper on one side and baby wipes 
on the other. The yellow terry cloth was layered 
over several pieces of flannelette and the 
printed fabric before quilting them together.


Since I had leftover Owl fabric and terry cloth, I made two bibs.


Extra terry cloth was used to make a hooded bath towel. 
It was trimmed with the dotted fabric. 
Two more bibs were also made with this printed fabric.


I found a pattern on Pinterest here for this cute 
Sunshine & Ribbon Toy, so I used the leftover 
yellow terrycloth and other scraps from 
my fabric stash to make this for the baby.

Thanks for visiting today.
Karen C.

Sunday, November 20, 2016

Baby Swaddle and Burb Cloths

I've been sewing and knitting for my grand daughter 
who will be making her debut at the end of November. 
Here are the first of some items I made.

Baby Swaddle 
I used  this pattern to make a 
flannelette swaddle for the new baby.
I used a combination of 2 prints and 
a light pink solid for the swaddle.


When the swaddle is open, you can see
the little pouch where the baby is placed. 
The two "wings" fold around the front of 
the baby to create a cozy wrap.


Receiving Blanket


I used the same colourful print on one side 
and a light pink for the backing. 
Bright pink decorative stitching holds 
the two layers together.


Burb Cloths
I really liked the shaped design of this pattern 
and used it to make 6 burb cloths with various
flannelette prints and solids.


I used a dark pink on the backing and then added the same fabric as an accent band.


The second burb cloth uses a white flannelette backing.


This burb cloth uses a light pink for the backing and an accent band on the front. 


Dark pink backing and accent band.


Another dark pink backing and band.


A bright green backing and accent band.


Thanks for visiting today.
Karen C.

Thursday, October 27, 2016

Quilted Gift Bag & Potholder

If you saw this post about my son's wedding, 
you will recognize the fabrics for this project! 
I wanted to use all of the bits and pieces of material 
leftover from the art folders and bibs.
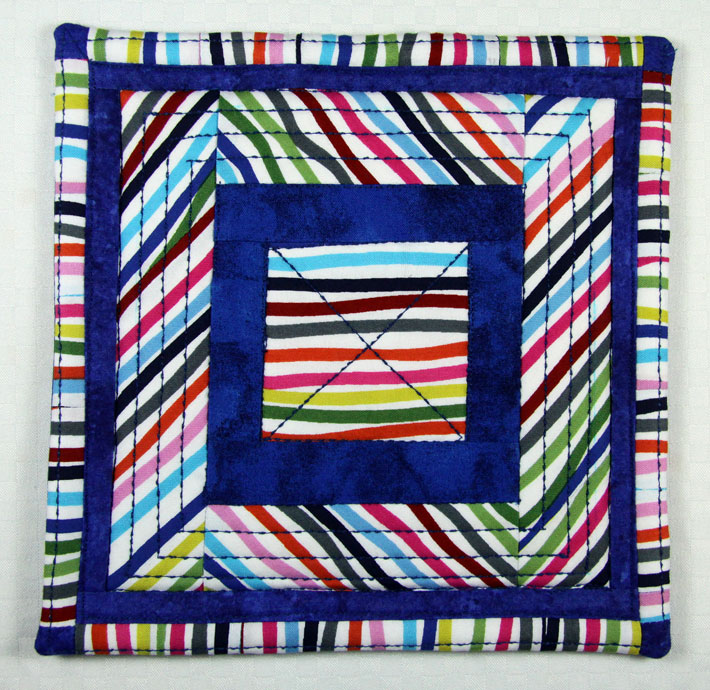
I decided to make a quilted tote bag and pot holder 
for my new daughter-in-law. 
Since I wasn't able to attend any bridal showers 
(Vancouver is a looong way from home!)  
I packed this bag with towels and some extra treats 
to give Lea and Ian when we arrived for their wedding.

I started by cutting a square of blue fabric that 
became the center of the design. 
From there I added strips of printed and blue fabric 
and then small triangles of the printed material. 
Blue and printed borders finished the front design. 
To complete the bag each piece (front, back and sides) 
were machine quilted and then handles and a lining 
were added. This makes the bag very sturdy and durable.

A large red button creates a colurful focal point on the front.

I made a quilted potholder with the last of the 
printed and blue fabrics. I used a wool quilt batting 
and a decorative machine stitch to quilt each of the sides  
before stitching them together.
Side one of the Potholder

Side 2 of the Potholder
Thanks for visiting today.
Karen C.

Thursday, September 1, 2016

Fabric Projects for the Wedding

Lea and Ian invited family and friends to their wedding and reception. 
Since there were so many little ones at the wedding, 
Lea wanted something to entertain them throughout the evening. 
I made 16 Art Folders, using the royal blue colour for the 
main body of the art folders and accenting with a 
colourful print trim and flap. Each child had their name 
added to the front of the folder using 
Papertrey Ink's Polka Dot Alphabet Die Collection
I used Heat'n Bond applied to the back of white cotton, 
so the names could be easily attached with a hot iron!
A tall stack of Art Folders
A few finished folders with names added.
Inside of the art Folders, with a pocket for 
colouring pages and slots for a variety of crayons.

The Art Folders were placed at the tables, 
ready for the little ones.


There were also 9 infants at the wedding, 
so I used the same fabrics to make bibs for them.
One side was made with the colourful print and 
the other side with a solid blue fabric.
5 Bibs with this combination:
Variation #1

As I started to run out of large pieces of fabric 
I made a few variations with bits and pieces!
Variation #2

Each infant had a bib and a little package of 
teething toys on the table. A small name tag was attached.
Papertrey Ink: Tremendous Tags die
My Favorite Things: Document It - December (circle frame)
Variation #3
I still needed a few more bibs, so I used a blue fabric for the front, 
terry cloth for the back and added an appliqued bow tie for 2 of the boys!

Thanks for visiting today.
Karen C.


Tuesday, August 23, 2016

More Bowl Cozies


I showed some bowl cozies and placemats
that I made for my sister-in-law, in this post.
 
 Here is another set 
I made for my son's girlfriend.
I used a black and white leaf print for the inside 
and a black and white polka dot for the outside.

Thanks for visiting today.
Karen C.

Thursday, July 18, 2013

Baby Girl Shower Gifts

     My nephew and his girlfriend are expecting their first baby in late August. While they were visiting in early July we had a family gathering/baby shower for them. I had lots of fun making a card, tags and a baby banner with my stamps and paper. I also made a fabric bag to hold one of the gifts, but it will make a perfect little tote bag for the new mama as well!!

Banner
The largest gift really needed something extra special, so I made a 'baby girl' banner with pinks and light purple card stock. I purchased little fabric butterflies from the Dollar Store and used them at each of the corners. I also left extra ribbon  at each end so it could be used in the baby's room as a decoration.
This was the first banner I've ever made, so I experimented with various techniques!! It has lots of dry embossing, stamping and die cuts, but unfortunately you can't see that clearly in the above picture. I used Limitless Layers 1 3/4" Circles and Modern Alphabet Lower Case dies (Papertrey Ink), layered on top of Spellbinders Nested Pennants. The daisies were cut with a EK Success Border Punch.

Card  
I stamped the card front with Background Basics: Tin Types using Lemon 
Tart ink, then embossed the card front (Stamper's Select White -PTI) with an embossing folder (Elegant Bouquet - Stampin' Up) to create some interest.
Each of the flowers and leaves were coloured with copic markers, before adding the sentiment (Hanging Out - PTI) and the focal panel. (C.C.Designs Itzie Inkies Flower Power). Some green patterned paper (from my stash) and 4 mini pearls were added to the main panel. I used the end of a ticket (Just the Ticket Border Die) to stamp the word ADORABLE from Tiny Tags II and then attached it behind the top of the focal panel.


The envelope was also decorated with 'BABY'  (Polka Dot Alphabet - Close To My Heart) and 'For your ... Girl' ( Baby Words: Stampendous) and the butterfly from Sweet Spring (PTI).

Butterfly Tag
I cut Tag Sale #4 die with Soft Moss card stock and then stamped  'sweet baby GIRL' (Sweet Spring & Sweet Baby) three times around the outer edge with Winter Wisteria ink. Three daisies were added to the top and accented with Dot Sparkles. The butterfly (Butterfly Dreams) was cut twice - one pink card stock and one vellum. The vellum  was stamped with Hibiscus Burst ink and then attached along the `body`to create a dimensional look.
C

Fabric Bag & & Tag
I had this precious fabric in my stash and it was perfect for a gift bag. I love all the images (butterflies, frogs, castles, hearts, princes and princess) and words included on the fabric. Bright pink fabric was used for the handles and the trim around the upper band. 


I added a big yellow button to the front of the bag - 
it was the perfect place to attach this gift tag:

 I made this gift tag for one of the Papertrey Ink Stamp-a-Faire 2012 challenges: Homemade Embellishments. You can see the original post with details  here.

The complete baby shower set/gifts were a real hit with everyone. Now we`re all anxiously awaiting the arrival of another little sweet baby girl in our family!!

Thanks for visiting today.
Karen C.

Thursday, February 7, 2013

Payton's Apron

One of my grand nieces celebrated her 4th birthday in January. I made this appliqued apron for her. She likes to bake with her mom, so I thought this would be a fun personalized gift.
McCall's 6476
A variety of fabrics were used for the appliqued designs, and were
stitched with a blanket stitch on my sewing machine to finish the edges.
Machine Appliqued Teapot
Machine Appliqued Tea Cup
A pink button is the cherry on top of  the cupcake!!
Machine Appliqued Cup Cake

CupCakes and Tea Cup
Tea for Two
Along with the apron, I sent Payton 2 books: Mmm, Cookies`  by 
Canadian author Robert Munsch and  Fancy Nancy `Tea For Two`.
(Her mom`s name is Nancy, so I knew she would get a chuckle out of that title!!)
Nancy told me that when the parcel arrived, Payton put the apron 
on and asked if they could have a tea party. She must have liked it, 
because she didn`t take it off until bedtime!!

This is the birthday card I included with her gifts. I made this `Little Emma`card (C.C. Designs) for my stash last fall.  Details for this card can be found here.


I finished the card interior with a few Papertrey Ink stamps and inks:

Card Interior
Inks - Hawaiian Shores, Kraft, Hibiscus Burst; Memento Rich Cocoa
Stamps - Movers & Shakers Sentiments, Natural Beauties
 It`s Official, Background Basics: Woodgrain
Other - circle punch,  3D Foam Dots


I am linking this to Sew Darn Crafty 
Linky Party Week 101 at Sew Many Ways. 

Thanks for visiting today.
Karen C.

Sunday, February 3, 2013

Polly's Birthday Purse

One of my grand nieces turned two in January. I decided to make a little quilted purse for her. I started with the ladybug fabric and then found some 'swirly' red and white fabric at Fabricland that was a good match.

I had a purse pattern for a larger version, using 6 'wedges' of 
fabric, but I tweaked it to make this mini purse with 5 pieces!! 
The red button is 'decorative' ... Velcro was used to hold the purse closed.

I started by cutting 3 wedges from each of the two fabrics so that I 
could play around with the placement of the colours. Here's the first 
combination using two ladybug panels and three of the swirly fabrics.


I finally decided on this arrangement, since I wanted the ladybugs 
to stand out and the darker fabric was planned for the handles.


I used more of the red/white swirls for the back of the purse. 
(the inside was lined with ladybugs)


I used a thin layer of quilt batting and used the  'stitch in the ditch' method between the wedges to hold the layers together. I also stitched in the center 
of each wedge, using white thread on the ladybugs and red thread on the 
swirls. The extra stitching holds everything together very neatly.

On the back of the purse I used the same 
stitching design to hold the layers together.

Polly's Birthday Purse

Polly has been busy 'shopping' with her purse and this little fabric pouch that I made as part of her gift at Christmas. (Details about the pouch here.) 


Christmas Fabric Pouch
      

 It's so nice to hear when the little ones love something that I make for them.

 
I am linking this to Sew Darn Crafty Party Week 100 at Sew Many Ways. 

Thanks for visiting today.
Karen C.