Welcome to my crafty blog... a "garden" of colourful cards, quilting, sewing projects, knitting...and what ever else happens along the way!!


Showing posts with label Make It Monday. Show all posts

Wednesday, March 25, 2015

Papertrey Ink March 2015 Blop Hop & MIM #206

I'm slowly getting back into my craft room after a fun vacation.
I'm looking forward to playing with my paper and ink!!

I loved this month's inspiration photo for 
Papertrey Ink's Blog Hop: Aqua and Yellow ... 
Blog inspiration
... but I was also intrigued  by Danielle Flander's  
Make It Monday video: Stamping  and Mixing Patterns ....
so I combined the two challenges to make a baby card!!

I started by cutting the Cover Plate: Comic Strip die 
from Aqua Mist and Stamper's Select White card stock.
The aqua frame was glued to a white card base.
Using the tips and techniques from this week's MIM, 
several stamp sets and ink colours were chosen to 
stamp patterns onto the 5 white card stock pieces.
I used Aqua Mist and Lemon Tart inks, with an accent 
of Spring Moss on the Polka Dot panel.

Top Left Panel - Birthday Style, Polka Dot Basics
Top Right Panel  - SAF 2014: 1940's; Bitty Background Blocks;
Buttoned-Up  #2 die;  Coaster Board; aqua embroidery floss


Center Panel  - Background Basics: Gingham 
Wreath for All Season's (sentiment) - Versafine Onyx Black ink
Block Alphabet Dies - Aqua Mist card stock


Bottom Left Panel  -  Autumn Pattern Pieces
Bottom Right Panel   - Crackled; Friendship Jar Spring Fillers; copic markers
Memento Tuxedo Black ink; Versafine Onyx Black ink; Tropical Teal ink


Thanks for visiting today. Enjoy the Blog Hop.
Karen C.

Friday, November 28, 2014

Make It Monday # 190: Stamping Plaid Backgrounds

I haven't played along with Papertrey Ink's Make It Monday for a while; sometimes I don't have the right supplies, sometimes I just over think the process and then I don't have enough time to create a project!!   This week's challenge was a perfect chance to make another card for my Christmas/holiday stash, using Distressed Stripes as the basis for my plaid design.

* I had cut a journal card for another project from a piece of caramel card stock and was left with a "frame" that I had saved in my scrap box. I used this piece to stamp the plaid effect using Pure Poppy, Pinefeather and Limeade Ice inks. Because I was only stamping the frame section it was easy to use the Distressed Stripes stamp and just ink a small section of the stamp as needed.


* The frame was applied to the front of a cream coloured card base.
* The tree (Polka Dot Parade #8) was die cut and then stamped with the co-ordinating stamps using Pinefeather ink.  I die cut the tree several times and then layered them to create dimension. 
* The star was sponged with Pure Poppy ink and added to the top of the tree. 
* The sentiment (Love Lives Here: Holiday) was also stamped with Pinefeather. 

I liked how this turned out, so I made a second card!! It's a fairly flat card, so should be great for mailing. I used a different sentiment for the front (Love Lives Here: Holiday) and stamped the card interior. (see below)


Card Interior
The top of the interior panel was stamped with the plaid pattern 
and a sentiment and baubles were added. (Love Lives Here: Holiday)

Supplies (PTI, unless noted)
Stamps - Polka Dot Parade #8, Distressed Stripes, Love Lives Here: Holiday
Inks - Pure Poppy, Limeade Ice, Pinefeather
Papers - Recollections: Caramel; The Paper Company: Blonde Columns
Dies - Journal Card; Polka Dot Parade #8


Thanks for visiting today.
Karen C.

Saturday, June 28, 2014

MIM #169: Vellum Overlay

Danielle Flanders demonstrated the use of vellum 
overlays in this week's Make It Monday #169.
(video here).


* I started by stamping a vertical design using stars (It's Your Day) and the postal marks from Postmarks onto a 5" x 3 5/8" panel of Stamper's Select White. (Blueberry Sky and Limeade Ice inks)
* This was mounted onto a 5 1/4" x 3 7/8" card base.


* Tag Sale #5 was cut from Blueberry Sky card stock, and then heat embossed with Polka Dot Basics and embossing powder.

 * The vellum overlay was created by cutting another tag, embossing the Shooting Star (Close To My Heart) and sentiment (Four Square) with embossing powder.
* I stamped the shooting star onto a piece of Limeade Ice Bitty Dot patterned paper, fussy cut it and then mounted it behind the vellum layer. It's very subtle, but it does emphasize the small star. 
* Three candy dots (SU) were added to the bottom of the vellum tag.

* Several strands of Baker's Twine (light blue, dark blue, lime green) were tied onto the tag, then mounted onto the stamped panel with 3D foam tape.


* An accent star was made with Limeade Ice Bitty Dot Patterned Paper and the smallest Star Print die. The center of the star was stamped with Dot Spot and then heat embossed with white embossing powder. 
* A punch was used to make 3 small blue stars. These were stacked onto the green star to give dimension. The finished star was mounted with 3D foam tape.


* The inside of the card was stamped with the star 
and sentiment from Stylish Sentiments: Birthdays. 
One of my brothers will celebrate a birthday in July; 
this will make a perfect card for him!!


PTI Supplies (unless noted)
Stamps - Postmarks, Polka Dot Basics, Dot Spot, Four Square; Stylish Sentiments: Birthdays
Shooting Star & It's Your Day (Close To My Heart) 
Inks - Blueberry Sky, Limeade Ice, Versamark
Paper - Stamper's Select White, Blueberry Sky, Limeade Ice Patterned Paper; Vellum (SU)
Dies - Tag Sale #5, Star Prints
Other - Stampendous White Detail Embossing Powder, Baker's Twine; Candy Dots (SU)
small star punch; copic markers; 3D foam tape

Edited July 31, 2014
I decided to make a matching envelope for my brother's birthday card, 
using the same colour scheme and a variety of images from Postmarks.
The lettering is a Close To My Heart alphabet set.(Charm).

Hope you have a great week-end. Thanks for visiting today.
Karen C.

Saturday, June 21, 2014

MIM #168: Chalk, Stamps & Texture

Melissa Phillips demonstrated a really fun effect in this week`s Papertrey Ink Make It Monday  video #168: Combining Chalk, Stamps and Impression Plates. 
 I had forgotten that I had some blending chalks until I was cleaning up in my craft space today, so decided to try the challenge. Here`s what I did with my chalks, stamps and an impression plate!!
* Polka Dot Basics was stamped with Aqua Mist onto a 5 1/2" x 3 1/2" Stamper's Select White card base. The sentiment (Spring Hills) was stamped at the top with Smokey Shadow ink. The top right hand corner was rounded.

Floral Panel:
* 3 1/4" x 3 1/4" panel  of Stamper's Select White card stock was textured with the Stitching Impression Plate. (square effect)
* Several colours (light and dark pink, yellow, green, aqua) from Inkadinkadoo's Soft Tones Blending Chalks were applied to the  panel.
* Flowers and leaves (Mini Blooms) were stamped with Hibiscus Burst, Sweet Blush, Harvest Gold, Aqua Mist and Soft Moss inks.
The stamped panel was mounted onto an Aqua Mist mat.


Embroidery Hoop and Butterfly
* The embroidery hoop (Stitched with Love) was stamped with Versamark ink onto a piece of vellum (SU), embossed with white embossing powder, and then cut with the matching embroidery hoop die. The hoop was mounted onto the main panel with 3D foam tape.
* Aqua Mist Satin Ribbon was knotted and attached to the top of the hoop.

* The butterfly (Heart-2-Heart #6) was die cut and stamped with 
Harvest Gold and Grey Wool inks (Close To My Heart).
* The heart die (Flip Flops) was cut from white card stock three times. 
These were stacked together and then coloured with Hibiscus Burst ink, 
added to the butterfly image, then positioned onto the vellum.
* I repeated some of the elements from the front of the card on the inside.
The sentiments (Take Three:Spring) were added with Smokey Shadow ink.

Thanks for visiting.
Karen C.

Saturday, June 7, 2014

MIM #167: DIY Notebooks

“Find magic in the little things"  - Isa Zapata

Erin Lincoln demonstrated a "little bit of magic" in the latest episode 
of Papertrey Ink's Make It Monday. Video link: MIM #167: DIY Notebooks. 
The decorated notebooks are so adorable and so much fun to make. 
I know I'm going to make more. Don't you think they 
would be great for Christmas stocking stuffers? I'm going to 
have to check my Christmas stamps for more ideas!!

I wanted a notebook with a bright and cheery spring time look, 
so I chose a colour scheme of white, yellow, light green and pink.
PTI Supplies, unless noted.
Notebook Cover: Stamper's Select White card stock; Stitching Impression Plate
Frame & Lines: Label Basics;  Sweet Leaf Ink (Close To My Heart)
Butterfly & Hearts: Heart-2-Heart #10 stamps and die; 
Hibiscus Burst ink; Grey Wool (CTMH)
Sentiment: It's Official
Back Cover: Recollections Patterned Paper Pad
 
The Button Card die was the perfect size for the notebook pages.

Inside Pages
I was able to cut 9 pieces from one piece of 8 1/2" x 11"  
card stock, although I didn't use all of them in the notebook. 
I used a thinner card stock (Recollections
so the individual pages are not as thick as PTI's cardstock.


6 White Pages 
I used the same details as the notebook front.


8 Yellow Pages & 8 Pink Pages 
Label Basics stamp, Harvest Gold inks, Hibiscus Burst
Sentiments: LLD Journal It - Top Ten (My Favorite Things)
 Grey Wool ink (CTMH); 


9 Green Pages 
Label Basics stamp; Sweet Leaf & Grey Wool inks (CTMH)
Sentiments: Monthly Moments: Library Card.


Green Pages
I chose 3 sentiments and stamped each of them on 3 pages.

Thanks for visiting today.
Karen C.

Tuesday, July 30, 2013

Summertime Anniversary

I have several family members who celebrate wedding anniversaries during July and August. This is the card I made for one of my nieces and her husband. The top portion of the card uses multiple stamps to create a background, so I am linking this post to Papertrey Ink's Make It Monday #127:  Double Backgrounds.

* The light blue card stock was stamped with Spring Rain ink and three different stamps from Polka Dot Basics. I wanted to create a feeling of water and sky - the polka dots reminded me of 'bubbles'!!  This layer was also impressed with Tin Types Impression Plate.
* The sentiment was a combination of a Close To My Heart stamp (Free Spirit) and the ANNIVERSARY stamp from Pretty Peonies. The edges of the blue card stock were also stamped with Sew Simple Borders in Blueberry Sky.
* I used a Bo Bunny paper pad (Double Dots) to make the sun and flip flops, along with the matching stamps (Back Pocket Basics) and dies.
* The card front was mounted onto a Kraft card base.

* I wanted to place the flip flops on a 'wooden dock', so I used a combination of the Background Basics: Woodgrain stamps and Impression Plate. After stamping and impressing the card stock, I cut it into strips and then sponged the edges of each with Kraft ink. They were glued back together on the lower portion of the card front. A brown dot was added to each corner.


* I carried the water theme to the inside of the card. I mounted a blue panel to the card base and then cut a smaller piece that was embossed with a Cuttlebug Embossing folder. I swiped the ink pad over the raised portion and the cut edge of this section and then adhered it to the lower edge. 
* The Mini Blooms die collection has 2 dies that reminded me of star fish. I die cut these out of the yellow dotted paper, inked the edges and then added them to the 'water'. The center of each 'star fish' was stamped with a small stamp from Framed Out #6.
* The sentiment (Embroidered Blooms) was stamped with blueberry Sky.
 
Card Details (PTI, unless noted)
Stamps - Polka Dot Basics, Background Basics: Woodgrain, Back Pocket Basics, Sew Simple Borders, Pretty Peonies, Embroidered Blooms; Close To My Heart: Free Spirit
Inks - Spring Rain, Blueberry Sky, Kraft, Simply Chartreuse, Harvest Gold, Berry Sorbet;
Memento Rich Cocoa
Papers - Kraft; Recollections: Blue, Caramel; Bo Bunny: Double Dots Soft Shades
Dies -  Back Pocket Die Collection, Flip Flop Die Collection, Mini Blooms
Other - Tin Types Impression Plate, Woodgrain Impression Plate; Cuttlebug D'vine Swirls Embossing Folder; 3D Foam Dots; 7/8" circle punch

Thanks for visiting today.
Karen C.

Sunday, July 21, 2013

Make It Monday #125: Defined Watercolours

Erin Lincoln hosted this week's Make It Monday #125: Defined Watercolour.
I wasn't planning on a card for this challenge but when I found a set of watercolour paints and paper in the craft section of the newly opened Target store, I decided to give it a try!! There's so many watercolour inspiration for card making, so I knew I would use it more than once!! Here's my first attempt at this watercolour technique using Spiral Bouquet.

* I used Erin's method to colour the flower heads and then stamped over 
them with Berry Sorbet, Harvest Gold and Twilight (Colorbox). Each flower 
was accented with a mini pearl.
* The stems were added and accented with Limeade Ice.
They came out a bit messy, so I decided to stamp the sentiment  
(Embriodered Blooms with Royal Velvet ink) over them. Now I'm not 
sure if it draws attention to the stems or camouflages them!!

 * I mounted the oval focal panel onto a strip of Rustic White card stock that was stamped with polka dots (Off Beat Backgrounds: Waltzingmouse Stamps) with Limeade Ice ink. A panel of Berry Sorbet was impressed with the Cane Prints IP, and then stitched to the card base (also stamped with polka dots)
* Green grosgrain ribbon was also layered under the focal panel before attaching it to the card front.


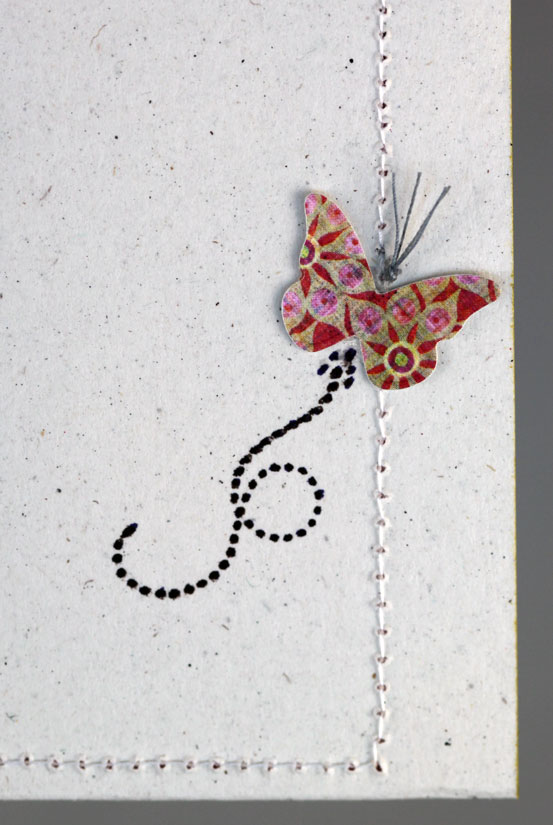
* The final detail was a butterfly (SU: Beautiful Wings). Using several layers of papers (Harvest Gold, Limeade Ice and a pink patterned paper from my stash)  I sewed the layers together on my sewing machine and left the threads hanging to resemble the butterfly's antennae.


Inside of card front

An Unexpected Detail: 
When  I machine stitch a front panel, I usually do it before I mount it onto the card base. But this time I had attached the Berry Sorbet card stock and then decided to add the machine stitching. That meant that the stitching was visible on the inside.
My solution?  I pulled all of the thread ends through to the back (inside card) added a butterfly, and used the thread ends as the antennae again. The thread ends were coloured with a grey copic marker.


Card Details  (PTI, unless noted)
Stamps - Spiral Bouquet; Embroidered Blooms; Waltzingmouse Stamps: Off Beat Backgrounds
Inks - Berry Sorbet, Harvest Gold, Limeade Ice, royal Velvet; Colorbox: Twilight
Papers - Rustic White, Berry Sorbet, Harvest Gold, Limeade Ice; Watercolour paper;
Dies - Spellbinders Classic Ovals
Other Supplies - Cane Print Impression Plate; Watercolour Paints; mini pearl adhesives;
Offray: Lemongrass Grosgrain ribbon; SU: Sizzix Beautiful Wings Embosslits; sewing machine

Thanks for visiting today.
Karen C.

Sunday, July 14, 2013

Rev Up the Fun! Motorcycle

This post has been linked to:
Papertrey Ink: Make It Monday #124 - Decorated Envelopes
Moxie Fab World: Birthday Card Challenge
       
Melissa Phillips from Papertrey Ink, demonstrated how she uses stamps and dies to decorate envelopes in this week's Make It Monday #124 video. I love the idea of carrying the theme of a card to the interior and the envelope.  I had just finished making a card for my brother's birthday and decided that a decorated envelope would be a great finishing touch!!

 Envelope Background:
* Watercolour Wonder - PTI Fine Linen, Hawaiian Shores, Soft Moss inks
* Off the Grid - Stampin' Up  (Memento: Rich Cocoa)


Stamp Details: (PTI Fine Linen, Hawaiian Shores, Soft Moss inks;  Memento: Rich Cocoa)
* Postmarks  - PTI stamps &die
* Tag Its #10 - PTI  balloons


Sentiments: (Memento: Rich Cocoa)
* Beary Special - Taylored Expressions
* Ad Sense - PTI (Limited Edition!)
   Spring Moss card stock; circle punch;    
* Block Alphabet Dies - PTI  
   (brown card stock)


Envelope - Back Flap

I repeated some of the details from the front of the envelope 
using Watercolor Wonder. The winged image from Postmarks &
a sentiment from Everyday Button Bits complete the back flap.

Card 

     When I saw the Stampin' Up set Rev Up the Fun!! I knew it would be great set for masculine birthday cards. My brother and sister-in-law have gone on many motorcycle tours of Canada, United States and even South Korea. They just returned from a tour of the eastern U.S. last month, so I decided to use the motorcycle image for his birthday card.

     I started by using Watercolor Wonder and several colours to stamp a background. Off the Grid (Stampin' Up) was stamped with Versamark and heat embossed it with gold embossing powder. The sentiment was stamped in the top corner with black ink. This panel was cut with a square nestabilities and then matted with Hawaiian Shores card stock. 


The motorcycle was stamped with Memento Tuxedo Black and then fussy cut. A few details were highlighted with copic markers and a clear glitter gel pen. It was mounted with 3D foam dots for added dimension. The 'dust' was accented with a gold gel pen on both front panels.


Two banners were die cut and mounted onto a white card base that was impressed with the Linen/Canvas Impression Plate.

Hawaiian Shores Banner -cut with Nested Pennants, impressed with the Linen/Canvas IP
White Banner - cut with Double-ended Banner Die, heat embossed with gold embossing powder and Off the Grid stamp. Turquoise and green candy dots were added.


A tire track stamp was also included in this SU set and I wanted to use it to make a frame for the sentiment on the inside of the card. After stamping it 
four times onto white card stock, I cut them out and mitered the corners. 
The inside dimensions of the frame were too small for the sentiment that I wanted to use, so I carefully trimmed it and then mounted it onto the inside 
of the card. I don't think it really looks like tire tracks anymore, but I do like 
the way it frames the sentiment (Stylish Sentiments: Birthday, Hawaiian Shores Ink).


Card Details   (PTI, unless noted) 
Stamps - Watercolour Wonder, Stylish Sentiments: Birthday; 
              Stampin' Up:  Rev Up the Fun!, Off the Grid
Inks - Fine Linen, Hawaiian Shores, Soft Moss;  Momento Tuxedo Black, VersaMark
Papers - Stamper's Select White, Hawaiian Shores
Dies - Double-ended Banner Die; Spellbinder's Nested Pennants and Classic Squares
Other - Linen/Canvas Impression Plate, Stampin' Up Candy Dots. Gold Embossing Powder; 
            3D Foam Dots; copic markers; Sakura Glitter Gel Pen - Clear & Gold

Thanks for visiting today.
Karen C.