Welcome to my crafty blog... a "garden" of colourful cards, quilting, sewing projects, knitting...and what ever else happens along the way!!


Monday, October 31, 2016

Twig Wreath Birthday


I have been trying to use the "ink smooshing technique" 
to create watercoloured backgrounds. 
 I find this a very difficult process, but I like the results 
on other people's card designs, so I keep on trying!! 
I used a combination of  orange, yellow, greens to make this 
background and then used it to finish a birthday card for one of my nieces.

I cut the center of the panel using the Twig Wreath Die. 
This was attached to a Rustic Cream card base. 
The sentiment (Birthday Style) was stamped with VersaMark ink 
and then heat embossed with Gold Embossing Powder. 
I cut several Twig Wreath die cuts in order to stack them 
and create added dimension. 
The wreath image was stamped and heat embossed on 
one of the layers before adding it to the top of the stack.


The floral arrangement on the wreath was made by 
die cutting and stamping various images from the Twig Wreath set. 
Summer Sunrise, Canyon Clay and gold embossed centers 
complete three flowers. 

The leaves and foliage were also stamped using those 
same colours along with Orange Zest, New Leaf and gold embossing. 
All of these pieces were arranged using foam adhesive tape.

Thanks for visiting today.
Karen C.

Saturday, October 29, 2016

Birthday Fiesta

Like many others, I always struggle with cards 
for the guys in my life. 
I decided to use the Circle Cover Plate 
to make a birthday card for my son, 
and after several attempts, here's the final product!
I cut the cover plate from Stamper's Select White, 
but after choosing the colour scheme I wanted 
to add some colour to the frame. 
I used Lemon Tart, Harvest Gold and Bright Buttercup 
to "smoosh" colour on the frame. 
The overall colour scheme was determined by the 
fun "Fiesta Stripes" (Reminisce) patterned paper.
The circles and other inserts were cut from 
Pure Poppy, New Leaf and the patterned paper 
and then inserted into the corresponding openings.

The focal panel was created by stamping the 
balloon strings (Everyday Button Bits) 
onto a yellow "smooshed" background with a blue mat. 
The three balloons were cut with a 5/8" circle punch 
and embossed with a Polka Dot Embossing folder. 
White highlights were added with a gel pen, and then 
they were 'popped-up' with foam dimensional tape.
The sentiment (Scene It: Celebration) 
was stamped with Star Spangled Blue (Close To My Heart) 
onto  Rustic Cream card stock. 
Using the shaped saying as a guide, 
I hand cut the sentiment panel, sponged the edges and 
then added it to the front with foam tape.
Supplies (PTI unless noted)
Stamps - Everyday Button Bits, Scene It: Celebrations
Inks - Lemon Tart, Harvest Gold, Bright Buttercup, 
CTMH: Star Spangled Blue
Paper - Rustic Cream, Stamper's Select White, New Leaf, 
Blue (from stash);
Reminisce: Fiesta Stripes
Dies - Circle Cover Plate
Other - Aida Cloth Impression Plate; 5/8" circle punch; 
Bright White Gelly Roll pen; Foam Adhesive tape;  
Cuttlebug: Polka Dot Embossing folder

Thanks for visiting today.
Karen C.

Thursday, October 27, 2016

Quilted Gift Bag & Potholder

If you saw this post about my son's wedding, 
you will recognize the fabrics for this project! 
I wanted to use all of the bits and pieces of material 
leftover from the art folders and bibs.
I decided to make a quilted tote bag and pot holder 
for my new daughter-in-law. 
Since I wasn't able to attend any bridal showers 
(Vancouver is a looong way from home!)  
I packed this bag with towels and some extra treats 
to give Lea and Ian when we arrived for their wedding.

I started by cutting a square of blue fabric that 
became the center of the design. 
From there I added strips of printed and blue fabric 
and then small triangles of the printed material. 
Blue and printed borders finished the front design. 
To complete the bag each piece (front, back and sides) 
were machine quilted and then handles and a lining 
were added. This makes the bag very sturdy and durable.

A large red button creates a colurful focal point on the front.

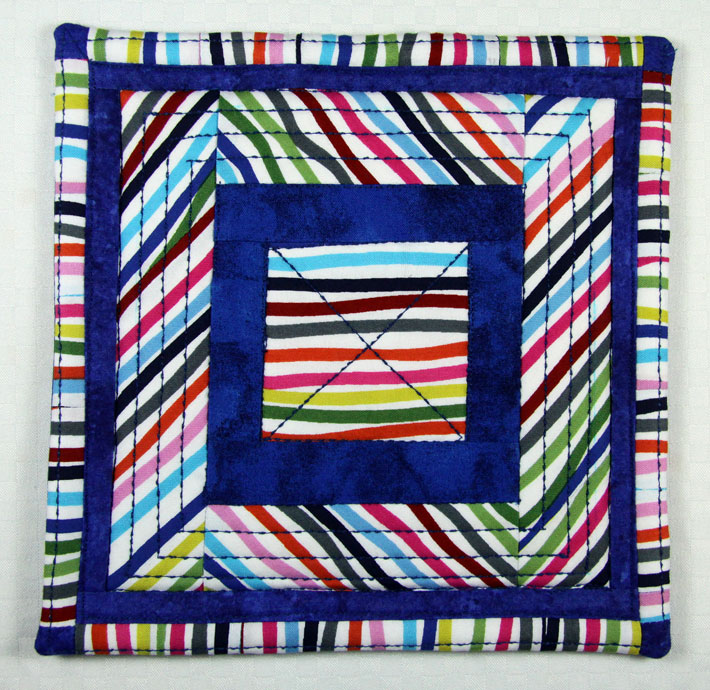
I made a quilted potholder with the last of the 
printed and blue fabrics. I used a wool quilt batting 
and a decorative machine stitch to quilt each of the sides  
before stitching them together.
Side one of the Potholder

Side 2 of the Potholder
Thanks for visiting today.
Karen C.

Thursday, September 1, 2016

Fabric Projects for the Wedding

Lea and Ian invited family and friends to their wedding and reception. 
Since there were so many little ones at the wedding, 
Lea wanted something to entertain them throughout the evening. 
I made 16 Art Folders, using the royal blue colour for the 
main body of the art folders and accenting with a 
colourful print trim and flap. Each child had their name 
added to the front of the folder using 
Papertrey Ink's Polka Dot Alphabet Die Collection
I used Heat'n Bond applied to the back of white cotton, 
so the names could be easily attached with a hot iron!
A tall stack of Art Folders
A few finished folders with names added.
Inside of the art Folders, with a pocket for 
colouring pages and slots for a variety of crayons.

The Art Folders were placed at the tables, 
ready for the little ones.


There were also 9 infants at the wedding, 
so I used the same fabrics to make bibs for them.
One side was made with the colourful print and 
the other side with a solid blue fabric.
5 Bibs with this combination:
Variation #1

As I started to run out of large pieces of fabric 
I made a few variations with bits and pieces!
Variation #2

Each infant had a bib and a little package of 
teething toys on the table. A small name tag was attached.
Papertrey Ink: Tremendous Tags die
My Favorite Things: Document It - December (circle frame)
Variation #3
I still needed a few more bibs, so I used a blue fabric for the front, 
terry cloth for the back and added an appliqued bow tie for 2 of the boys!

Thanks for visiting today.
Karen C.


Monday, August 29, 2016

Ian & Lea's Wedding

I'm finally posting some pictures from my 
son's wedding that took place in Vancouver on the 
Canadian Thanksgiving week-end (October 2015)

I made a variety of projects - 
both paper crafts and fabric crafts that 
I'll be sharing over the next few posts.

 Lea and Ian

The colour scheme was royal blue, with touches of fall colours.

Floral Arrangements
 I made a banner with white and blue card stock,
cutting letters and a heart using my Cricut machine.

The banner was positioned across the head table.

I made a wedding card that my other son and his girlfriend 
gave to the bride and groom.

 I used Papertrey Ink's Heart-2-Heart #9  
stamps and dies to make a clean and simple design.
I used Enchanted Evening ink and card stock 
along with Smokey Shadow ink for the sentiments.

It's hard to believe that they will be celebrating their 
first anniversary in just 6 weeks!!

Thanks for visiting today,
Karen C.

Tuesday, August 23, 2016

More Bowl Cozies


I showed some bowl cozies and placemats
that I made for my sister-in-law, in this post.
 
 Here is another set 
I made for my son's girlfriend.
I used a black and white leaf print for the inside 
and a black and white polka dot for the outside.

Thanks for visiting today.
Karen C.

Tuesday, August 16, 2016

Butterfly Wishes


Today I have a card and sewing project 
I made for my sister-in-law's birthday.

Bowl Cozy and Mini Placemat 
I used printed fabrics to make a 2 sets of bowl cozies
and mini place mats. I found a this tutorial for these on 
Pinterest and have made several sets for family members. 
They are a great solution for cooking your morning 
oatmeal in the microwave. No more problems when 
removing a hot steaming bowl from the microwave!!
I had extra material, so I used it to make 
two small place mats, 
just the right size for the bowl cozy.

I used the colour scheme from the bowl 
cozy fabric to create a birthday card.
The front panel was stamped with a 
variety of blue and green inks 
(Limeade Ice; Stampin' Up:Tempting Turquoise; 
Close To My Heart: Crystal Blue, Moonstruck Blue)
using Irresistibly Ikat.

Circle Scribbles die was cut from Limeade Ice,
then a butterfly (Butterfly Wishes) was die cut, stamped, 
coloured  and layered over the circle.
The sentiment (Wonderful Words: Birthday)  
was stamped onto a Double-ended Banner die 
and adhered to the card front.


Supplies (PTI unless noted)
Stamps -Irresistibly Ikat, Butterfly Dreams; Wonderful Words:Birthday, 
Stylish Sentiments: Birthday
Inks - Limeade Ice; Stampin' Up:Tempting Turquoise; Versamark;
Close To My Heart:Crystal Blue, Moonstruck Blue
Paper - Stamper's Select White, Limeade Ice
Dies - Circle Scribbles, Double Ended Banner die
Other - Copic markers; Clear Embossing powder; Embroidery floss; foam adhesive sheet

Thanks for visiting today.
Karen C.