Welcome to my crafty blog... a "garden" of colourful cards, quilting, sewing projects, knitting...and what ever else happens along the way!!


Sunday, September 16, 2012

Inspired by SAF: Ribbon Techniques

Papertrey Ink held a "Stamp-a-Faire Summer Camp" event on July 21st,
highlighting many techniques, videos and tutorials and encouraging 

crafters to enter cards and projects for each of the challenges. Even 
though I had planned to participate, I didn't get my projects finished 
in time for  the challenge deadlines!!  I will be highlighting lots of 
projects - all inspired by the Stamp-a-Faire videos and techniques. 
I invite you to join me all this week, for a look back at the challenges.

The second challenge involved unique uses of ribbons. You can view all of the design team's videos and instructions here on Nichole Heady's blog.

There were a variety of ribbon techniques presented but the one that really caught my attention was Betsy Veldman's Bitty Dot Ribbon Flowers.

It certainly was an interesting adventure when I brought out the candle and matches to 'melt' my ribbons!! My husband thought I had really lost it!!

I only had the Bitty Dot ribbon in Winter Wisteria, so I added the 
yellow satin ribbon from my stash to create the other 2 flowers.
Small adhesive pearls were added to the center of the flowers.

Card Details: (PTI, unless noted)
Stamps - Turning a New Leaf, Mehndi Medallion, Natural Beauties (sentiment)
Inks - Spring Moss, Simply Charteuse, Winter Wisteria
Papers - Stamper's Select White, Simply Chartreuse, Harvest Gold
Other Supplies - Winter Wisteria Bitty Dots 3/8" ribbon; Fabricland yellow 3/8" Satin Ribbon; 
EK Success Pinking Hearts Border Punch; Pearl adhesives: white& lilac.

This is the 2nd project in this series.
Other Stamp-A-Faire posts can be viewed here. 

Thanks for visiting today.
Karen C.

Saturday, September 15, 2012

Inspired by SAF: Make & Take Cards

Papertrey Ink held a "Stamp-a-Faire Summer Camp" event on July 21st, 
highlighting many techniques, videos and tutorials and encouraging 
crafters to enter cards and projects for each of the challenges. Even though 
I had planned to participate, I just didn't get anything finished in time for 
the challenge deadlines!!  I will be highlighting lots of projects - all inspired 
by the Stamp-a-Faire videos and techniques. I invite you to join me  all this 
week, for a look back at some of the fun challenges  and projects.

Nichole Heady introduced the day with a Make and Take card project using the floral set: Natural Beauties. (view video here) . I didn't have this set at the time, so I used the large floral image from Pretty Peonies.

Card #1:

Dots (Fillable Frames #11) were stamped in Summer Sunrise 
and the dandelions (Botanical Silhouettes) in Harvest Gold. 
Yellow pearl accents and a Vellum sentiment panel.

The inside of the card was stamped with sentiments from
 Movers and Shakers Sentiments and Pretty Peonies.  The 
small peony was stamped, then coloured with copic markers.

Card #2:
I wasn't happy with the first card, so I ended up making a 
second one.Maybe that's why I take so long to create projects!!

Dots were stamped with Canyon Clay and 
the  small flowers with Summer Sunrise.
Pink pearl accents and a Vellum Sentiment Panel.

Card Interior #2


Card Details: (PTI, unless noted)
Stamps - Pretty Peonies, Movers & Shaker's Sentiments, Fillable Frames #11, 
Botanical Silhouettes
Inks - Simply Chartreuse, Hibiscus Burst, Pure Poppy, 
Summer Sunrise, Harvest Gold, Canyon Clay
Papers - Stamper's Select White, Raspberry Fizz, SU White Vellum
Other Supplies - Adhesive Pearls

Thanks for visiting today.
Karen C.

Tuesday, September 4, 2012

Little Emma

I've  had this image coloured for some time and finally made a birthday card. The colour scheme and papers make me think of  "Back to School".

Autumn Emma  (C.C. Designs)  is sitting on the bench, perhaps waiting for a birthday surprise?  Both the bench and Emma were stamped on Bella White card stock, coloured with copic markers, and then fussy cut.  Her shirt was pieced with a snippet of patterned paper from  PTI Library Ledger Collection. Additional patterns from the same paper pack were used for the main front panel and two of the Nestabilities layers. The solid card stock (Bahama Blue) was used for contrast for one of the final layers.The sentiment (Fillable Frames #1) was stamped with Chocolate ink. The card base is Rustric White card stock.

Here's a close up of the various layers.
The strip of paper under the mats was created by stamping the 
numbers from Mini Scrapbooking Series: Tabs using Chocolate ink. 
The brown ink was also used to sponge the edges of several of the layers.  A 
brown button was tied with Rustic Twine and added to the card. The grass
 from Garden Variety was stamped below the bench using Pool Party ink.

Card Details: PTI (unless noted)
Stamps = C.C. Designs: Autumn Emma, Bench;
Fillable Frames #1,  Garden Variety, Mini Scrapbooking Series:Tabs.
Inks = Memento Tuxedo Black, Chocolate; SU Pool Party
Papers = Library Ledger Collection, Rustic Cream;  Bella: White;  Core'dinations: Bahama Blue
Other =  Nestabilities Label #9; Copic markers; corner rounder; brown button; Rustic Twine

Thanks for visiting today.
Karen C.

Sunday, September 2, 2012

Sweet Baby Emily

When my niece had a baby girl in August I made one card for the baby, to attach to her gift and a second card for the parents. Emily is their second child, so I addressed the card to the whole family, along with a gift - a frame engraved with the word 'family' - just perfect for their first family portrait. 

 I used Sweet Baby stamp and die set from Papertrey Ink for this card:

* The front panel was impressed with Simple Stripes Impression plate and then mounted onto a card base of Stamper's Select White using 3-D foam dots. 
* The giraffe was die cut, stamped in Harvest Gold with the corresponding image and then added to the card front with foam dimensionals. A narrow pink ribbon was attached to the neck and a pink felt heart was added. (Love Lives Here die) 
* A small black pearl was used for the eye.


* The sentiment panel was created with Perfect Patches die collection. 
* Pink ribbon was laced through the openings of the white rectangle in order to frame the sentiment (Hanging Out) stamped with Grey Wool (Close To My Heart).  
* A Stamping Bella pink adhesive dot gives a little sparkle to this panel and then mounted onto the Harvest Gold card stock.

The inside of the card: Movers and Shakers Sentiments


The envelope was addressed to the family with another 
 stamped giraffe and the sentiment from Take Three: Summer


Card Details: (PTI, unless noted)
Stamps - Sweet Baby, Hanging Out, Movers & Shakers Sentiments, Take Three: Summer
Inks - Harvest Gold, Hibiscus Burst; CTMH: Grey Wool
Paper - Stamper's Select White, Harvest Gold
Dies - Sweet Baby Die Collection, Perfect Patches, Love Lives Here
Other Details - Simple Stripes Impression Plate, 1/8" pink ribbon; pink felt; pink embroidery floss;
Stamping Bells Dots; black pearl

Thanks for visiting today.
Karen C.


Friday, August 31, 2012

Hanging Out (for Emily)

One of my nieces gave birth to her second child in August - a sweet little girl named Emily Charlotte. One of my favourite baby cards to make uses Papertrey Ink's set called Hanging Out. I've made several versions of this card - blue for boys, pink for girls. (You can view the other cards here.)  

Sometimes I have used patterned paper for the mat layer, but this time I kept it very simple with a plain pink card stock. The larger white mat layer has been impressed with the Simple Stripes Impression Plate for a little bit of texture.


This card was included in a gift for Emily, so I addressed the card to her!!
I created a complementary scene for the envelope, but this time I used her name in punched circles and attached them to the clothesline. The sunshine stamp is from Back Pocket Basics and the sentiment and butterflies (Sweet Spring) add some colour and whimsy to this envelope:


Card Details: (PTI, unless noted)
Stamps - Hanging Out, Tiny Treats:Valentine, Garden Variety, Sweet Spring; 
Background Bitty Blocks, Back Pocket Basics; SU: Rough Type
Inks -  Spring Moss, Hibiscus Burst, Harvest Gold, Winter Wisteria, Kraft,; 
Memento Tuxedo Black, Rich Cocoa; CTMH: Crystal Blue
Paper - Stamper's Select White, Hibiscus Burst
Dies - Hanging Out die collection; Clouds;
Other Supplies - Simple Stripes Impression Plate; Copic markers;  5/8" circle punch; 
CTMH Bitty Opaques Adhesive Pearls

Thanks for visiting today.
Karen C.


Tuesday, August 28, 2012

Stamper's First Aid!

Have you ever made a card that you wanted to re-do? That's what happened after I made this card for Papertrey Ink's July Blog Hop. You can see the full details and description here. 


There was just something about this card that I didn't like.
.... too much Berry Sorbet
.... not enough contrast/colours
.... the  funny little bow
.... the sentiment seemed to get lost on the patterned paper


So ... I decided to see if I could make
a quick fix by adding a little extra detail.

I cut out a strip of Simply Chartreuse
card stock using the Zig Zag Border
die and then switched out the thin
ribbon bow with a larger one.

And then after a few days .......
                     I still didn't like it!!


I decided the only way I was going to salvage this mess was a major re-do!! 
So I got out some of my favourite stamps and dies and here's the result!! 
And the best part? I love it! 
It has all of the details that I think were missing in my original card. 


Some close up pictures of the picket fence 
and seed frame from Garden Variety II.


The card base and patterned paper are the same as the original and I kept the Marigold image on the background, but added lots of other details to 'jazz' it up!! The Seed Packet was stamped with Text Style and Polka Dot Basics. The little Berry Sorbet bow and Seed Packet are hiding a little secret, too!


I added a several pieces Stamper's Floss (coloured with copic markers)
onto the top of the tag. When it is pulled out ... there's a birthday wish!!


The  bold 'happy', from Pretty Peonies, is stamped onto Tag Sale #1 
and the 'birthday' sentiment was added with Berry Sorbet ink.


Card Details:    (PTI, unless noted)
Stamps - Year of Flowers Collection, Year of Flowers Titles, Garden Variety, Garden Variety II, Polka Dot Basics, Text Style, Pretty Peonies,
Inks - Memento Tuxedo Black, Berry Sorbet, Lemon Tart, Simply Chartreuse, Tea Dye Duo inks
Paper - Vintage Cream, Stamper's Select White, Simply Chartreuse, My Mind's Eye: Follow Your Heart - Be Happy
Dies - Picket Fence, Seed Packet die, Seed Frame II die,  Button Card, Tag Sale #1,
Other Supplies - Cuttlebug Swiss Dots Embossing Folder; Wood grain Impression Plate, Berry Sorbet Topnotch Twill Tape, Close to My Heart Bitty Opaques Adhesive Pearls, Copic Markers, Karen Foster: Scrapper's Floss; 3-D Dots; sewing machine.

Thanks for visiting today.
Karen C.

Sunday, August 26, 2012

Lovely Layers Wedding

When my son was visiting in July, he asked me to make a card for a friend's wedding. I showed him this card using Lovely Layers with Aqua Mist and Golden Harvest that I had made.  It really is a beautiful stamp and die set for weddings and anniversaries ... so elegant. I made a few changes in the overall design and changed the colour scheme for this card:


Details:
The front panel was impressed with the Vineyard Impression Plate and then the large leaf die from Lovely Layers was used to cut the shape from the center of this panel. I carefully stamped the leaf image onto the white card base, by positioning the front panel opening where I wanted it to be on the finished card. The die cut was also stamped with Spring Moss and Simply Chartreuse and then placed on top of the front panel. 3-D foam dots were used to create lots of dimension on the focal image.

The other layers were created with the dies using Winter Wisteria card stock, stamped with Royal Velvet ink; and Lavender Moon and Winter Wisteria flowers on Soft Stone card stock.
The center of the flower has 9 mini lavender pearls for an elegant finishing touch.


The sentiment (Fillable Frames #2) was stamped onto Stamper's Select White card stock with Royal Velvet ink and then cut with the Word Window punch from SU. This was mounted onto a Spring Moss Modern Label (SU).
Two pearls were added to the label.


Inside:
The main sentiment is from Quilter's Sampler and 
the small 'wedding day' sentiment is from Tag-Its #5.

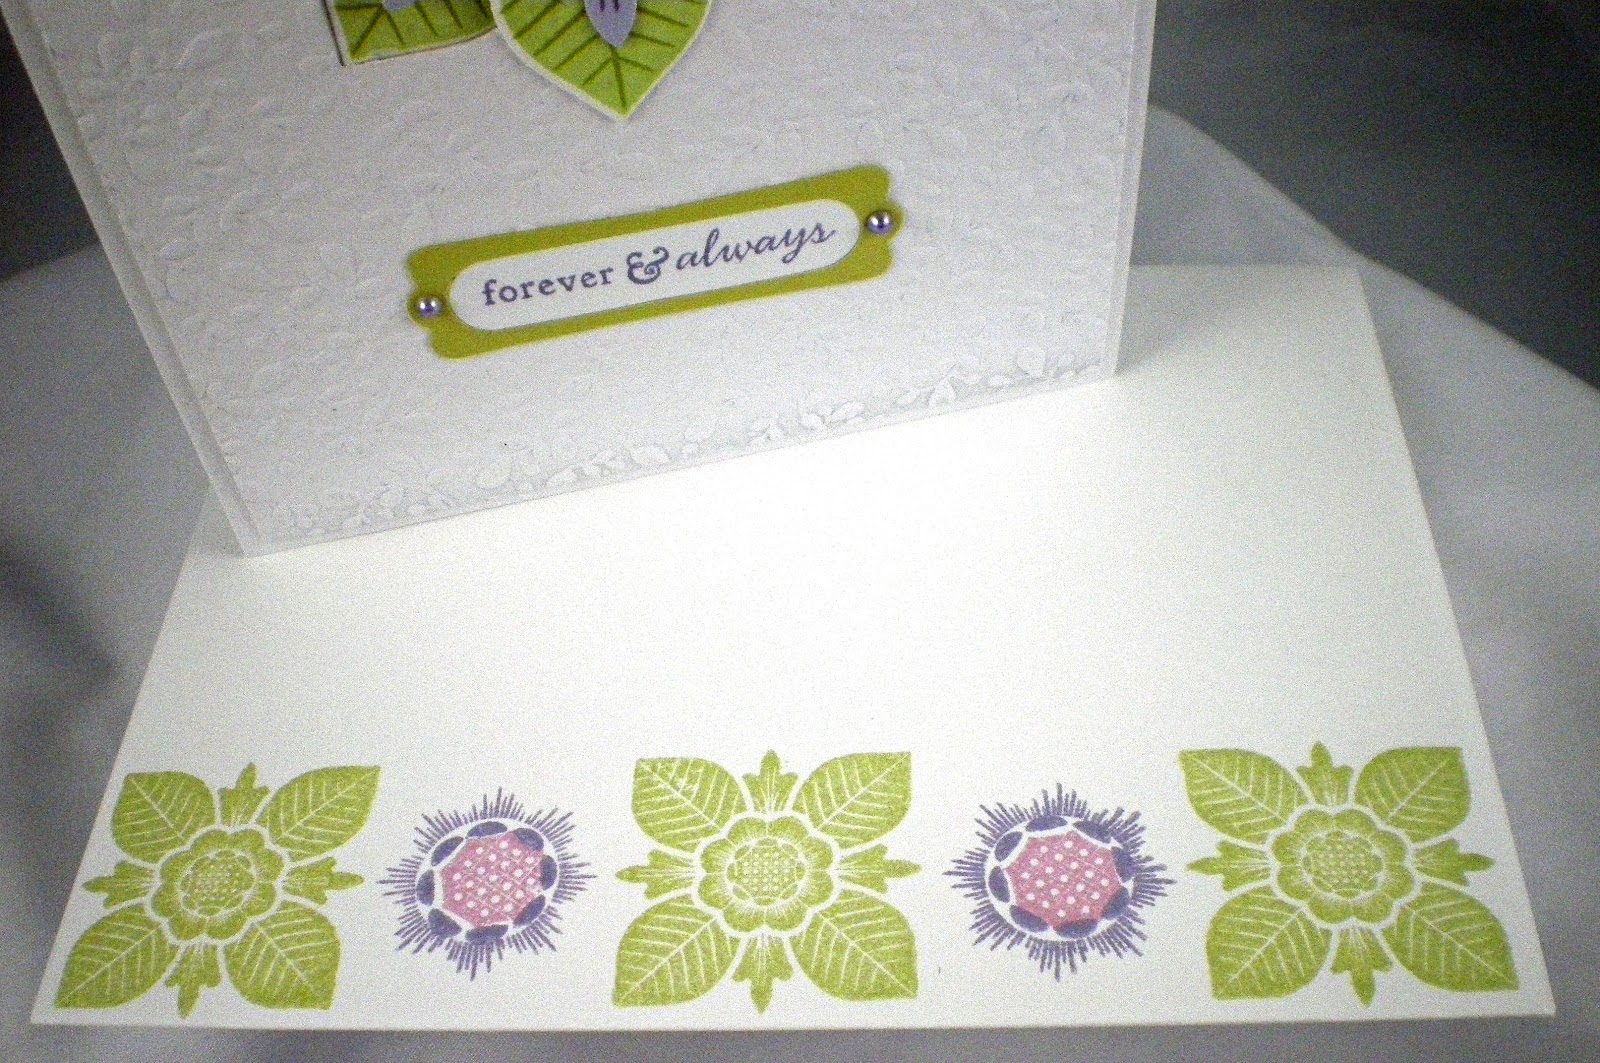
Envelope:
I also made a matching envelope, using the same colour 
scheme and stamps from Lovely Layers. I didn't know 
beforehand, but the wedding colours were lavender and 
green, so this wedding card was a perfect match for the event!!


Card Details: (PTI, unless noted)
Stamps - Lovely Layers; Fillable Frames Additions  #2, Quilter's Sampler, Tag-Its #5, 
Inks - Lavender Moon, Winter Wisteria, Royal Velvet, Spring Moss, Simply Chartreuse
Paper - Stamper's Select White, Winter Wisteria, Spring Moss, Soft Stone
Dies - Lovely Layers Die Collection
Other Supplies -  Vineyards Impression Plate; Stampin' Up Modern label & Word Window punches; 3-D Dots; pearl adhesives, Copic markers
Thanks for visiting today.
Karen C.