Welcome to my crafty blog... a "garden" of colourful cards, quilting, sewing projects, knitting...and what ever else happens along the way!!


Tuesday, November 23, 2010

Wreath for All Seasons

  WINTER BIRTHDAY

I have another card with more snowflakes!!    It must be all the winter weather  we've been having lately. Seems like all my cards  this week have some snowy details.

I used Papertrey Ink's Wreath for All Seasons and added some snowflakes and glitter to the wreath and background paper for a unique winter look. This set is so versatile - it can be used for so many different occasions.

Here's the birthday card for my niece. She lives about 4 hours away from me so I wanted to make this card and get it into the mail this week - her birthday is at the end of November.
  I stamped the berries on the wreath in two tones of lavender/purple and added glitter to the background paper with embossing powder and glamour dust. The photo doesn't seem to show all the glitz, but it is very sparkly IRL!


Card Details:
Stamps: PTI Wreath for All Seasons, Vintage Picnic Sentiments
Inks: Close to My Heart Chocolate, Lilac Mist; Stampin'Up Lovely Lilac; Versamark.
Paper: Brazzill  "Love Potion" ; Creative Imaginations "Snowflake".
Other Supplies: Stampin'Up Iridescent Ice Embossing powder; DecoArt Glamour Dust; SU punches; white mini pearls; Nestabilities Inverted Scallops;  

Have a great day. Thanks for visiting!

Sunday, November 21, 2010

Peace Be Still

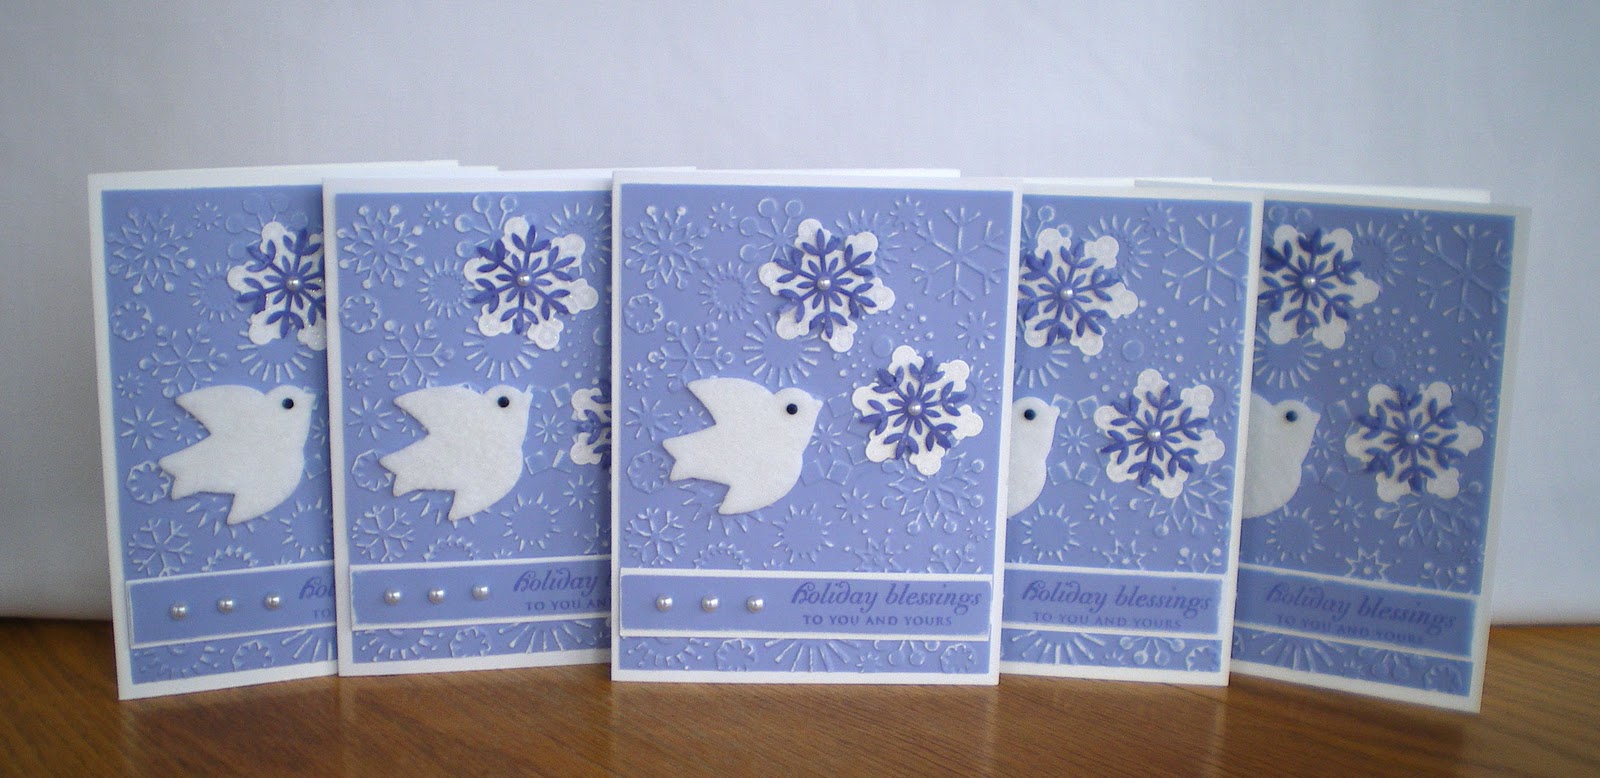
It's another snowy Sunday here in North Western Ontario - a good day for a fire in the fireplace, some crafty time and a "snowy" Christmas card!!
I've been trying to get started on my Christmas cards .... and here is my first set. I tried a variety of ideas using my new set from Papertrey Ink -  Peace Be Still, and after several attempts (4 days of trial and error!!)  this is the one that I liked the most.  Once I  finished the 'prototype',  the others came together within 1 hour!    
Yeah  ....  so now I have a set of 5 cards for my stash.


I used a colour scheme of white, a light blue-purple (indigo) and dark purple.
I cut the dove from white felt and added a small black pearl for the eye. The two snowflakes were made by stamping Versamark on  one of the snowflake die cut from the Peace Be Still set and embossed with Iridescent Ice from Stampin'Up. A Martha Stewart snowflake punch was used  to make two additional snowflakes that were glued to the white die cuts.


A sentiment from Holiday Wishes was stamped in purple onto the matching background card stock and then mounted onto white card stock. 
The Cuttlebug snowflake embossing folder was used to add some detail to the indigo card stock and then it was sanded to reveal the white paper core. Pearls were added to the sentiment panel and the snowflakes for a final touch.


The inside of the card uses another sentiment from Holiday Wishes and a snowflake from Peace Be Still.


Card Details:
Stamps:  Peace Be Still, Holiday Wishes
Inks: Versamark; Stampin'Up Lovely Lilac
Paper: The Paper Company Indigo Two-Tones card stock; Stampin"Up Whisper White card stock
Other Supplies:  Peace Be Still Die Collection; White and black pearl accents; white felt;  Stampin'Up Iridescent Ice Embossing Powder; Martha Stewart Glacial Snowflake punch.


Hope you're all enjoying a great week-end. Thanks for visiting.  I have a few other projects to work on this week, so will be back soon to share!

Tuesday, November 16, 2010

Honey - The Birthday Girl

 This week All That Scraps Weekly Wednesday Challenge was to create a birthday card. 
Here's the card I made for my sweet little grand niece who turned 2 on November 10th. She lives in New Zealand (it's spring there) so I thought the C.C. Design's August Honey would be perfect. Such a cute little girl with lots of  "flower power"!!


I started with a variety of Rainbow Sherbet patterned papers from Stampin'Up and added some of the solid card stock in Tempting Turquoise, Green Galore and Apricot Appeal. Honey was coloured with my copic markers and even though I don't have a lot of colours I did try to use the three main ones from the papers on her clothing and accessories. 

After colouring Honey I carefully cut her out and attached the image to a piece of oval dotted paper. This was matted onto the turquoise paper and then sewn with my machine for added detail.The larger printed paper was mounted onto Apricot Appeal and sewn as well - then applied to the turquoise card base.

I used matching buttons tied with scrapper's floss ( the floss was coloured with copics).
A small flower punch was used to create 3 turquoise flowers that were attached to the apricot flower and held together with a brad. A small pearl was added to Honey's hair accessory.

Turquoise ribbon and a small sentiment panel  (Papertrey Ink) finishes the card front .


I wanted to co-ordinate the inside of the card, so I added a bit of 'grass' to the bottom of the card and then added more punched flowers in the various colours. Stickles were used to create the flowers' centers. 

I found the birthday poem on the internet, and printed it in a matching colour. Finally I sewed the inside panel to the card base - all ready for sweet little Mattie!


Card Details:
Stamps: C.C. Designs August Honey; Papertrey Ink Just the Ticket
Inks: Memnto Tuxedo Black; Close to My Heart  Garden Green & Ocean.
Papers: Stampin'Up Rainbow Sherbet designer papers and Cardstock.
Other Supplies: Stampin'Up Fresh Favourties I buttons, Scrapper's Floss; ribbon; brad, mini pearl, copic markers; Creative Memories oval cutting system; sewing machine; Stampin'Up Boho Blossom punch; EK Success border punch; EK success flower punch; Stickles; Prima flower.

Monday, November 15, 2010

Crafting on a Snowy Day!


Here is what we woke up to on Sunday morning!!   I guess it's officially winter in North Western Ontario!!  Notice that shovel by the garage - it's going to see a work out for the next few months (at least 5 or 6 months- yes we have snow here until March or April!!)

It's certainly earlier than the last few years though. My husband has put away the lawn tractor and pulled out the snow blower.

So.... I decided to go to work in my crafty room and here's my latest project - a gift that is all packaged and ready for my sister-in-law's birthday tomorrow.

Recently I received some yummy goodies from Papertrey Ink - somehow I ordered two sets of Heather Nichol's Mini Scrapbook Series.Journaling Circles, so I decided that since my SIL is an avid scrapbooker, she might like a new journaling option.

I put the stamps into the CD case and then created "cards" for the front and back of the plastic box used to package the stamps. Here's what all the bits and pieces looked like before I packaged them together.

The "front"  is shown on the far left; the CD case with the  assembled stamp set is in 
the middle and the stamped embellishments created for the back "card" are on the right.
This won't need to be  "wrapped" , since  "cards" will hide the "real"gift - the stamp set!   Everything was placed into the plastic box with a brown ribbon and bow for the finishing touch!


FRONT:  
I started with a piece of beige parchment card stock and stamped Text Style I in Vintage Touch Tea Dye Duo and a border print from Tin Types using a bright pink ink. The edges were distressed using more of the Tea Dye Duo and then mounted onto a cinnamon spice card stock. The other details on the card include the Library card, with various  stamps from the Mini Scrapbook Series: Tabs and Library Ledger. I used the Journaling Circle and the Limitless Layers to make the circle embellishment. The flower was made with the dies from Beautiful Blooms - cut, stamped with more Text Style I and Tea Dye Duo. I added some pink die cuts as well to give a little colour. The center of the flower and the accent on the journaling circle are little copper pearls.   

          Here's a closer look at the BACK

 These images are ready to add to a scrapbook! My SIL has two grandsons and 1 grand daughter, so I added a blue and pink circle - thought she could use them for a scrapbook that includes the wee ones.

Limitless Layers was used to cut mats for all of the circles and then  a few little "jewels" were added to some of them. Non- permanent glue was used to temporarily hold the circles onto the background paper.


 Project Details:
Stamps: PTI: Mini Scrapbook Series: Tabs, Library Ledger,  Journaling Circles; Library Card; Text Styles I & Tin Types background stamps.
Inks: CTMH Black, Cranberry, Moonstruck, Garden Green; Memento Cottage Ivy; Stampin'Up Pixie Pink; PTI Vintage Touch Tea Dye Duo.
Paper: Recollections white, beige parchment; cinnamon brown.
Other Supplies: mini pearls, rhinestone accents; ribbon; Limitless Layers dies; Beautiful Blossoms die; EK success border punch.


BIRTHDAY CARD

Here is the Pull Up Tag card that I made earlier for my SIL's birthday. It uses various stamps from Close to My Heart, Clear Dollar Stamps and Stampin' Up. The paper has lots of floral pattern and colour, so I didn't need to do too much embellishing!!

I cut out a small flower from the paper and attached it to the front, then added a little white pearl. The photo corners were punched out and attached to the corners


When the tag is pulled up, you can see the various birthday sentiments - one on the tag from Stampin'Up, along with a flower stamp and a smaller sentiment in the 'window' - both from Clear Dollar Stamps.
Card Details: 
Stamps: CTMH What a Great Day!;  Clear Dollar Stamps Tag It!, Spring Trimmings; Stampin"up Blooming with Love, Pretty Petals background stamp.
Inks: CTMH Cranberry; Garden Green. 
Papers:  designer paper - can't remember the manufacturer!
Other Supplies: pearl, ribbon, markers.


Here's a few more snowy pics to enjoy, taken in our back and side yards.!!  Have a great day!!


Monday, November 8, 2010

Birthday Boys -Maple Leaf Style

Hello again! I still have a few cards to show from my husband's birthday in October. These are cards that my two sons gave him for his birthday.

Hockey is a very popular sport in our city - lots of NHL players hail from Thunder Bay - we've had Stanley Cup visits for three years with various hometown boys - Eric Staal from the Carolina Hurricanes, Jordan Staal from the Pittsburgh Penguins and Patrick Sharpe from the Chicago Blackhawks

BUT.....my DH is a life long die hard fan of the Toronto Maple Leafs hockey team. From September to May, the television is tuned into the TML hockey games - in hopes that they will make the Stanley Cup playoffs.  The colours of blue and white are always a good starting point for a card for my DH... then throw in some maple leaf images and he's a happy guy!!


The first card uses a C.C.Design stamp called  Balloon Trevor.The base of the card uses Rustic cream card stock and has been stamped with PTI's Polka Dot Basics I and a border of maple leaves.

Trevor was stamped in Memento Tuxedo Black onto white card stock and coloured with copic markers, before cutting the image out. I also paper pieced the shirt for some added pattern. The balloon was stamped on white card stock, cut out and applied to the original stamped image. A punched maple leaf in blue was added to the balloon and Crystal Effects was painted on for a glossy accent.  


The blue argyle patterned paper behind the image was used for some contrast. The birthday sentiment was added with a vertical stamp. Finally, I used a piece of PTI's Pure Poppy baker's twine and tied it around a piece of blue and white striped ribbon.

On the inside of the card I used three 'tickets' and sentiments from PTI's Just the Ticket. I love this set - it's so versatile. for added contrast, I mounted  each of them on blue card stock.

Card Details:
Stamps: C.C. Designs: Balloon Trevor; Studio g: leaf border; Close to My Heart Happy Birthday Sentiments;  PTI: Polka Dot Basics I, Just the Ticket
Inks: Memento Tuxedo Black; Close to My Heart Cranberry, Moonstruck Blue.
Paper: Rustic Cream; white, blue card stock; patterned paper from my stash.
Other Supplies:  copic markers; Crystal Effects;  maple leaf punch; PTI Just the Ticket Die; Pure Poppy Baker's Twine; blue striped ribbon;  corner rounder punch;


The second card uses Autumn Trevor image, stamped,  coloured and cut out as I did above. 
I used a Cuttlebug folder to create the swirls on the shimmery grey cardstock (I think it looks like ice).  The punched maple leaf, the blue semi circle and the red/white line represents center ice. The small red dots are from Stamping Bella.

The birthday sentiment has been stamped on white card stock, and then matted on a small circle of blue card stock.


A white card stock panel was stamped with a sentiment from Close to My Heart, faux stitching was done with a blue marker and another maple leaf was added to the corner. 


Card Details:
Stamps: C.C. Designs: Autumn Trevor; Close to My Heart Happy Birthday Sentiments & September Word Puzzle.
Inks: Memento Tuxedo Black; Close to My Heart Red &  Moonstruck Blue.
Paper: white, blue card stock;Brazzill Grey Shimmer card stock.
Other Supplies:  copic markers;  maple leaf punch; Cuttlebug embossing folder; Stamping Bella dots.


I have lots of projects to come - just have to find the time to upload and edit some pictures!! 
Have a great day! See you Soon! 

Monday, November 1, 2010

Baby Boy Gift Tag - Gigi the Giraffe


BethieJ's Challenge Week #4:
Papertrey Ink - Just the Ticket
   

     I made this tag for a baby shower last week,  for my niece's sweet baby boy, Nathan.  I had previously made cards for Nathan and his parents, so I decided that a gift tag would be just right for the occasion.

This card also meets the requirements of a challenge on the Papertrey Ink forum, hosted by BethieJ.


I used three PTI dies for the tag - the Library Tag Card die forms the base and the Tag Sale #1 die was used for the stamped image. The border die Just the Ticket was used across the bottom of the tag.

The image is Gigi the Giraffe from Clear Dollar Stamps and has been coloured with copic markers in yellow and blue. (I used this image to make a little girl's birthday card in pink and yellow here - so sweet and easy to colour). 

    The sentiment is from the stamp set Just the Ticket. I added the tiny blue buttons to each side of the sentiment panel and tied them with yellow embroidery floss.


Card Details:
Stamps: Clear Dollar Stamps: Gigi the Giraffe;  PTI Just the Ticket
Inks: Memento Tuxedo Black; CTMH Moonstrck Blue
Papers: Recollections Blue card stock, gingham and dotted blue patterned paper
Other Supplies: PTI dies: Just the Ticket, Library Card, Tag Sale 1;  gingham ribbon; blue marker; small blue buttons; yellow embroidery floss.

Thanks for stopping by!!

Sunday, October 31, 2010

Birgitta Witch

Happy Halloween!  
I really like the Swiss Pixies from C.C. Designs.  Here is the sweet 'witch' Birgitta, that I made for my nephew's daughter.


     I stamped the images in Memento Tuxedo Black on Bella card stock so that I could use my copic markers. I don't have a lot of colours, and I`m still in the learning stages with the various blending techniques.
     After I stamped  Birgitta,  I masked her and then stamped the bench. The pumpkins were stamped individually as I wanted to be able to place them on the card separately. Once the colouring was finished , the images were cut out and applied to the background card stock. I used a nestabilities die to cut the background and then sponged it with Autumn Terracotta.
The black card stock has been embossed with the Swirls Cuttlebug folder. I thought it would look like a night time scene!I
     The little black gingham bow was embellished with two hanging `tiny tags` from Stampin`Up.  I also used my glitter pen to add some sparkle to Brigitta`s wings, the spider webs on her outfit and the pumpkins. Finally the green card base was used  to lightened up the overall look. `Happy Halloween`was stamped on the inside.

Card Details:
Stamps: C.C. Designs Swiss Pixies Halloween Birgitta, Bench, Pumpkins;  Stampin` Up Tiny Tags
Inks: Memento Tuxedo Black;  CTMH  Autumn Terracotta, Olive
Papers: Recollections Black; Brazill Cream, Green
Other Supplies: Nestabilities die; Stampin` Up Tiny Tags Punch; Copic markers; Cuttlebug embossing folder; gingham ribbon; black copic fine line marker; Glitter pen (clear)