I'm really loving my butterfly dies and these soft colours - must be the thought of warm summer breezes, morning sunshine. Even though it is only February I am already looking forward to all those summer delights!!
Here's a card that creates those happy thoughts! I made this for one of the members from the Papertrey Ink Post Its blog group.
Happy Birthday Denise!!
Here's a card that creates those happy thoughts! I made this for one of the members from the Papertrey Ink Post Its blog group.
Happy Birthday Denise!!
I used lots of butterflies on this card. The largest one in Aqua Mist was created using the PTI Signature Series: Butterfly die that I also embossed with a Cuttlebug Swiss Dot folder. The rest of the butterflies were cut and embossed using this cute little Sizzix Embosslit called Beautiful Wings. I used the largest image in Lemon Tart and the smallest image in Aqua Mist and Lemon Tart.
Here's a close up of the card from a side view - showing all the details. I didn't have matching mini pearls, so I coloured white ones with my copic markers to create the aqua ones in the sentiment panel and the yellow-green ones for the body of the buttterfly. Can you see the little antennae on the yellow butterfly? I cut very thin strips of the Old Olive paper and attached them to the back of the die cut.
Here's the rest card details:
Stamps: PTI Big Birthday Wishes
Inks: SU Old Olive
Papers: PTI Lemon Tart, Aqua Mist, Polka DotParade Patterned Paper; SU Old Olive, Confetti White (card base)
Other Supplies: PTI Signatue Series: Butterfly die; Nestabilites Inverted Scallops; Swiss Dot Embossing folder; Kaisercraft white mini pearls; copic markers; Stampin'Up Sizzix Embosslit Beautiful Wings
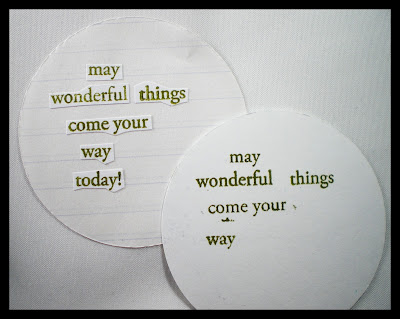
This is how I created the sentiment panel on the card. I started with one of the sentiments from Big Birthday Wishes (shown in the top left hand corner) You can see the original stamped image is made up of two lines. But I wanted to use it in the circle format with the butterflies, so I started by cutting up each individual word and arranging them on a scrap paper circle to get the right placement (shown in the bottom right hand corner.
This shows my first attempt at stamping the sentiment (bottom right hand side).
I tried inking each individual word and stamping it in the appropriate place, but... as you can see.... big inky messes were made instead!! That's when I remembered about masking the stamp with tape, inking it up, removing the tape and then stamping the remaining inked portion. So that's what I eventually did for the final card, and voila! No inky messes on my card!!


10 comments:
Way to go Karen! I can't get over how fun and so very delightful this card is! The butterfies are so lovely. I am such a sucker for teensy, whinsey bits of gorgeousness in particular. Stellar masking. It really worked a treat as your card is so pristine. This card is such a genuine beauty!
Wowza Karen - amazing! I love that you used Polka Dot Parade! The butterflies are exquisite, and this lay-out is just total perfection.
Oh Karen, your card is lovely! I love the butterflies and colors you used!
I totally forgot I had that paper !! Love all the butterflies, and the little antennae are genius !!
I am seriously in love with this card!! The butterfly with the flourish is wonderful :)
Lovely card, the butterflies are placed perfectly.
Aww... I love the little bitty butterflies. So cute!
I love the little butterfly die! Beautiful card!
Beautiful card, Karen! I love all the details you added with the different embossing you did!
Loved this card! Thank you SO much!! It hangs in a VERY proud spot on the fridge!!!
Post a Comment