Welcome to my crafty blog... a "garden" of colourful cards, quilting, sewing projects, knitting...and what ever else happens along the way!!


Monday, September 27, 2010

Happy Birthday, Son!

     I'm finally back in my craft room after more than 2 weeks away!! We flew into San Francisco on September 8th and then "sailed away" on the Sea Princess for a 10 day Alaskan cruise. Once back in San Francisco we toured this fascinating city - and also visited Napa and Sonoma Valleys for some wine tasting delights!

 STAR BIRTHDAY! 
It was my younger son's birthday yesterday and these are the two cards I made for him - one from DH and me and the other from his older brother.  
I made my own background paper by using PTI's Star Prints on the top and and Distressed Stripes on the bottom portion of the card front with a purple and green colour combo!! 


The Spiral Notebook Page Die was stamped with the lined page from School Time and then sentiments from Star Prints and Fly Away were added. I "tucked" this into the Library Pocket Die and then added the rest of the details - faux stitching with a gel pen, a stamped and cut star, a sentiment and the small Stamping Bella white Dot.The circle of purple card stock was added to the top left hand corner in order to highlight the white 'star' button that has been tied with purple ribbon.

Supplies:
Stamps: PTI Star Prints, Distressed Stripes, School Time, Fly Away
 Inks: CTMH Clover Meadows,  SU Lovely Lilac.
Card stock: Recollections
Other: PTI Sprial Notebook Page Die, Library Pocket Die, Stamping Bella Dot, button, ribbon, white gel pen.


 SURF'S UP ........ 
Ian lives and works in Halifax Nova Scotia on the east coast of Canada. When he first moved there he started surfing - - -  I still can't believe that he surfs all year long - - - even in the coldest wintery months!! This card certainly celebrates his adventurous spirit. 

Stampin' Up  "Extreme Surfer" and "Surf's Up" were used for the front image and sentiment. After stamping the image I added a fine glitter to the 'waves" under the surfer. The red saddle stitched ribbon and Stamping Bella 'dots' add some colour to the front of the card. I also used a button and some embroidery floss from my stash.
     

On the inside of the card I used PTI's Just the Ticket stamps and border die leaving a space on the right side for his brother to add a comment. The lower section looked a little 'bare' so I added the wave stamp from Surf's Up and matted it with the Ocean colour.

Supplies:
Stamps: SU Extreme Surfer, Surf's Up, PTI Just the Ticket
 Inks: CTMH Holiday Red, Ocean
Paper: K & Company, Brazill card stock
Other:  PTI Just the Ticket border Die, circle punch, corner rounder punch,Stamping Bella Dot, button, Dots & Dashes ribbon, embroidery floss, DecoArt Glamour Dust, glue pen, white gel pen.

Sunday, September 5, 2010

Vintage Inspiration Notebook


Happy Sunday to Everyone!!
     It's Labour Day Weekend here in Canada, so everyone I know is in great spirits ... Monday is a "sleep in" day!   Even though I have retired from teaching, Labour Day still means the end of summer's lazy days and the beginning of cooler, shorter ones.  We're having family over for a barbeque today - just hope the weather is sunny and warm. It's been very cool, rainy and windy here the last few days.

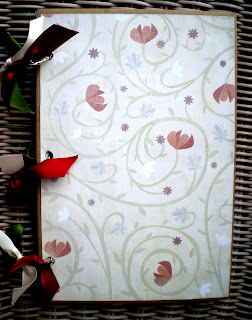
     I wanted to update my Inspiration Notebook - I've been collecting card sketches and other ideas for cards in a little notebook that I bought at the dollar store. The only problem... it was getting full and I had no way of expanding it. So I cut it apart and used binder rings to create a notebook that I will be able to expand over time. 

     I started by covering two pieces of heavy cardboard (6 1/4" x 9 1/4")  with brown paper  
(inspiration from  PTI August Blog Hop Challenge).  This patterned paper has been in my stash for a long time, but I've never been able to make it 'work'. Since I have quite a few 12" x12" sheets it was a good choice...if I 'messed' up I wouldn't be destroying my only piece of patterned paper!!   As you can see it's fairly subtle with very muted colours.  It just needs some zing!

Back of Notebook

     I was was so impressed with Betsy Veldman's  botanical collage and her Moxie Talk on the Moxie Fab blog, I decided to experiment!! 
  
Front of Notebook
     
     I don't usually make cards and paper projects with a 'vintage' look, but I kind of like it... I want to try it again, now that I have figured out some of the techniques!! 

     Betsy comments that this trend is "popping up in home decor, stationery and paper crafting products" and  "the look is layered, full of details...lots of times with text and ledger backgrounds".  

     So I pulled out all kinds of stamps, punches, accessories and kept adding to the front cover until I was happy with the results.


I made a Pocket on the inside 
covers for both the front and the back.

Inside there is a section for different styles of 
cards with instructions and "mini" samples.

And another section has some card 
sketches that I would like to try or 
ones that I have made and really like.


Project Details:
Stamps: PTI - It's Official; Library Card; Mini Scrapbook Series: Tabs. Stampin'Up - Rough Type; Tiny Tags; Vintage Vogue. Close to My Heart (CTMH) Air Mail. Hampton Art- "K"
Inks: CTMH - Black, Cranberry, Olive, Indian Corn Blue. PTI - Vintage Touch Tea Dye Duo.
Papers: Recollections Olive & Cranberry. Patterned Paper - Karen Foster "Bouquet"
Other Supplies: Scalloped Border Punch; SU Tiny Tags punch; Boho Blossoms punch; circle punches. PTI- Spiral Notebook Die. Embroidery floss; binder rings; ribbons; Prima flower; brad; Marvy markers; cardboard; brown paper bag.

Thursday, September 2, 2010

Baby Flower Power

     Happy Thursday to everyone!  I have a couple of cute cards today using Itzie Inkies Flower Power from C.C. Designs. Our local scrapbook store DAT'S has started carrying a number of stamp lines, so it's always fun to see what's new when I go in shopping!! I couldn't resist this image - several of my nieces and nephew are having babies and I knew it would see lots of ink!!
     I mentioned earlier that one of my nieces had her first - a little boy - in early August. She and her husband didn't want to know the baby's gender, so it was a surprise to all!  I wanted to be ready for the big day, so I made 2 cards for them - one for a boy and one for a girl. Here's the one I gave to the new parents of sweet little Nathan.


And here's the one I still have!!   Another niece is expecting her second child in December (it's a girl) so I have a card ready to pop in the mail!! 

      I started with a pastel plaid background paper that has greens, blues, pinks and yellows for both cards and just varied the colours for the card stock and the embellishments. I used this same pastel plaid for a retirement card I made for a friend (using PTI's Up, Up & Away). It's amazing how much mileage I'm getting out of this paper pack!

     I stamped and coloured the little monkey and flower with my copics and then cut it out with nestabilities. I then stamped, coloured and cut out the large daisy so I could pop it up on dimensionals. The little 'bug'  has glitter wings - I used a glue pen and DecoArt Glamour Dust for some sparkle! I also added a touch of sparkle on the daisy centers with some Stickles. 

      I found this sentiment on the internet and printed it out in a matching colour before cutting it and a coordinating mat with one of my nestabilities.


Card Details:
 Stamps: C.C. Designs Itzie Inkies Flower Power; Clear Dollar Stamp - sentiment; Stampin'Up Love Bug
Inks: Memento Tuxedo Black; SU Pixie Pink; CTMH Garden Green, Blue 
Papers: SU; papers from my stash!
Other Supplies: Copic markers; Nestabilities; DecoArt Glamour Dust; glue pen; pearls; ribbons; circle punches; markers; Stickles.