Welcome to my crafty blog... a "garden" of colourful cards, quilting, sewing projects, knitting...and what ever else happens along the way!!


Monday, June 30, 2014

A Foxy Birthday

I bought Wild About Love: Close To My Heart in February and finally inked it up!! 
I loved the variety of foxy images in the set. I also had some Papertrey Ink supplies sitting on my desk, so incorporated them to create this little scene for one of my brother's birthday in May!!
Papertrey Ink supplies (unless noted) 
Card Base: Soft Stone;   Mat: Tropical Teal                                   
Card Front: Vintage Cream;
Sentiment: It's a Jungle, Memento Rich Cocoa ink
Sky: Crystal Blue ink (Close to My Heart) applied with a blending tool
Grass: Garden Variety, New Leaf ink (applied with a blending tool)
Clouds: Up Up & Away dies; Stampers Select White card stock                  
Sun: Heart-2-Heart #6, Canyon Clay, Black, Sweet Blush inks 
Fox & Tree Stump:  These were stamped and then fussy cut.
Wild About Love (Close to My Heart); Canyon Clay ink; 
Stamper's Select White card stock;  Memento Rich Cocoa ink; copic markers
Cake: Tag Its #1, Canyon Clay, markers
Accents: 3 Crystal Blue adhesive gems  (Close to My Heart)
    
Once I finished the card, I made a matching tag and envelope.
Tag Die: Tag Sale #1
Fox: Wild About Love (Close to My Heart); Canyon Clay
Balloons: Heart-2-Heart #2 stamps & dies ; 
Summer Sunrise, New Leaf, Pure Poppy inks
Sentiment: Heart-2-Heart #12; Canyon Clay
Name: Polka Dot Parade Uppercase Alphabet; New Leaf ink

Thanks for visiting today.
Karen C.

Saturday, June 28, 2014

MIM #169: Vellum Overlay

Danielle Flanders demonstrated the use of vellum 
overlays in this week's Make It Monday #169.
(video here).


* I started by stamping a vertical design using stars (It's Your Day) and the postal marks from Postmarks onto a 5" x 3 5/8" panel of Stamper's Select White. (Blueberry Sky and Limeade Ice inks)
* This was mounted onto a 5 1/4" x 3 7/8" card base.


* Tag Sale #5 was cut from Blueberry Sky card stock, and then heat embossed with Polka Dot Basics and embossing powder.

 * The vellum overlay was created by cutting another tag, embossing the Shooting Star (Close To My Heart) and sentiment (Four Square) with embossing powder.
* I stamped the shooting star onto a piece of Limeade Ice Bitty Dot patterned paper, fussy cut it and then mounted it behind the vellum layer. It's very subtle, but it does emphasize the small star. 
* Three candy dots (SU) were added to the bottom of the vellum tag.

* Several strands of Baker's Twine (light blue, dark blue, lime green) were tied onto the tag, then mounted onto the stamped panel with 3D foam tape.


* An accent star was made with Limeade Ice Bitty Dot Patterned Paper and the smallest Star Print die. The center of the star was stamped with Dot Spot and then heat embossed with white embossing powder. 
* A punch was used to make 3 small blue stars. These were stacked onto the green star to give dimension. The finished star was mounted with 3D foam tape.


* The inside of the card was stamped with the star 
and sentiment from Stylish Sentiments: Birthdays. 
One of my brothers will celebrate a birthday in July; 
this will make a perfect card for him!!


PTI Supplies (unless noted)
Stamps - Postmarks, Polka Dot Basics, Dot Spot, Four Square; Stylish Sentiments: Birthdays
Shooting Star & It's Your Day (Close To My Heart) 
Inks - Blueberry Sky, Limeade Ice, Versamark
Paper - Stamper's Select White, Blueberry Sky, Limeade Ice Patterned Paper; Vellum (SU)
Dies - Tag Sale #5, Star Prints
Other - Stampendous White Detail Embossing Powder, Baker's Twine; Candy Dots (SU)
small star punch; copic markers; 3D foam tape

Edited July 31, 2014
I decided to make a matching envelope for my brother's birthday card, 
using the same colour scheme and a variety of images from Postmarks.
The lettering is a Close To My Heart alphabet set.(Charm).

Hope you have a great week-end. Thanks for visiting today.
Karen C.

Saturday, June 21, 2014

MIM #168: Chalk, Stamps & Texture

Melissa Phillips demonstrated a really fun effect in this week`s Papertrey Ink Make It Monday  video #168: Combining Chalk, Stamps and Impression Plates. 
 I had forgotten that I had some blending chalks until I was cleaning up in my craft space today, so decided to try the challenge. Here`s what I did with my chalks, stamps and an impression plate!!
* Polka Dot Basics was stamped with Aqua Mist onto a 5 1/2" x 3 1/2" Stamper's Select White card base. The sentiment (Spring Hills) was stamped at the top with Smokey Shadow ink. The top right hand corner was rounded.

Floral Panel:
* 3 1/4" x 3 1/4" panel  of Stamper's Select White card stock was textured with the Stitching Impression Plate. (square effect)
* Several colours (light and dark pink, yellow, green, aqua) from Inkadinkadoo's Soft Tones Blending Chalks were applied to the  panel.
* Flowers and leaves (Mini Blooms) were stamped with Hibiscus Burst, Sweet Blush, Harvest Gold, Aqua Mist and Soft Moss inks.
The stamped panel was mounted onto an Aqua Mist mat.


Embroidery Hoop and Butterfly
* The embroidery hoop (Stitched with Love) was stamped with Versamark ink onto a piece of vellum (SU), embossed with white embossing powder, and then cut with the matching embroidery hoop die. The hoop was mounted onto the main panel with 3D foam tape.
* Aqua Mist Satin Ribbon was knotted and attached to the top of the hoop.

* The butterfly (Heart-2-Heart #6) was die cut and stamped with 
Harvest Gold and Grey Wool inks (Close To My Heart).
* The heart die (Flip Flops) was cut from white card stock three times. 
These were stacked together and then coloured with Hibiscus Burst ink, 
added to the butterfly image, then positioned onto the vellum.
* I repeated some of the elements from the front of the card on the inside.
The sentiments (Take Three:Spring) were added with Smokey Shadow ink.

Thanks for visiting.
Karen C.

Friday, June 20, 2014

A Birthday Hi!!

 I needed a birthday card for my grand nephew who will be celebrating his 5th birthday this month. I don't have many stamp images to use on "little boy" cards, but an older Stampin' Up set, along with some Papertrey Ink 'extras' provided some inspiration:

PTI supplies, unless noted.  
Truck,Trees & Sentiment:  
Loads of Love & Loads of Love Accessories (SU); copic markers;
Stampers's Select White card stock; Memento Tuxedo Black, Rich Cocoa inks
Sun: Heart-2-Heart #6 die, Summer Sunrise ink
Background: The "sky" was stippled with Crystal Blue ink (Close To My Heart);
the "grass" with New Leaf ink. Green and blue markers were used to create faux stitching. The road way uses journalling lines from School Time along with copic markers.
Card Base: Light Blue card stock (Recollections) was stamped with Crystal Blue (CTMH) with Background Basics: Woodgrain.

The truck, little people, dogs and gift packages were 
coloured with copic markers, fussy cut, then layered, 
before being mounted onto the card front with foam dots.


Inside
Sentiment: Heart-2-Heart #2; Dark Chocolate ink
Balloons: Heart-2-Heart #2; 
Kraft, New Leaf, Pure Poppy, Blueberry Sky, Harvest Gold, Orange inks
Basket: Heart-2-Heart #1 (I used the coffee cup cozy!!)

 Envelope
Stamps - Polka Dot Parade Alphabet: Upper Case; Heart-2-Heart #2; Postmarks
Inks - Blueberry Sky, Summer Sunrise, New Leaf, Dark Chocolate
When I was stamping the postage stamp with a Dark Chocolate cube, 
I dropped it onto the envelope. I didn't want to re-do the envelope, so 
I took the cube and lightly stamped it over the whole envie!! Problem solved!!

Thanks for visiting today.
Karen C.

Tuesday, June 17, 2014

Watercoloured Feathers

Watercolouring and Feathers:
 These trends have been featured on many blogs and videos, 
so I've been anxious to give it a try. I used a feather stamp set from 
Close to My Heart and a word die from Papertrey Ink to make an anniversary card.

* I started by creating two coloured panels on watercolouring paper: 
one with blue, teal, and greens; the other with pinks, oranges and yellows. 
* I stamped the feathers (Feathers: Close To My Heart) with Versamark and heat embossed with white embossing powder, before fussy cutting each feather.


* I cut two word dies (Wonderful Words: Together) from Aqua Mist and Hawaiian Shores and then glued them to the card base to create a shadow effect. 
* The other portions of the sentiment (Mat Stack #2, Fillable Frames Additions 2) were stamped with Hawaiian Shores ink. 
* Two pink and one yellow sequin were added to the card. 
* One corner of the card front was rounded with a corner rounder.

* The blue/green feather was glued to the card base, then the pink/yellow 
one was attached with foam adhesive dots.
* A piece of embroidery floss was added at the base of the feathers.

Thanks for visiting today.
Karen C.

Tuesday, June 10, 2014

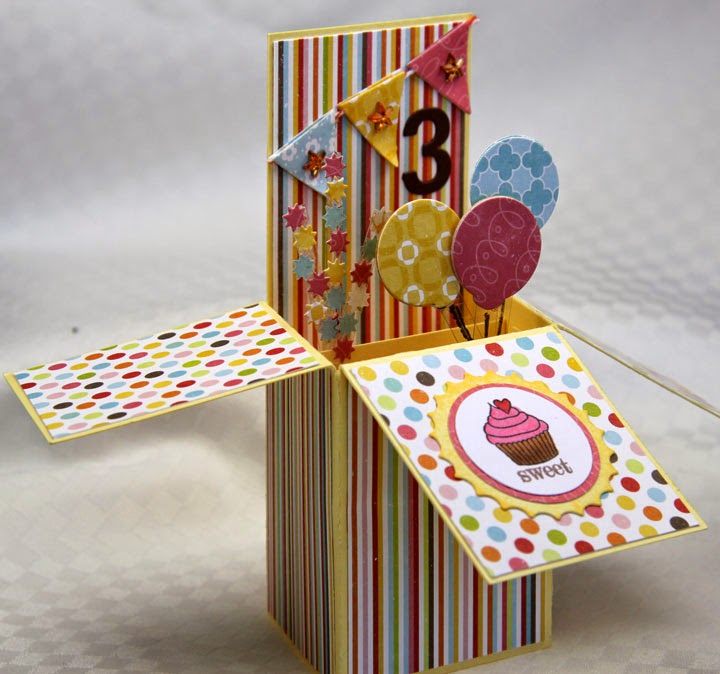
Birthday Card in a Box!!

Have you ever tried making a "Card in a Box"
I had fun creating one for my grand niece's 3rd birthday. 
It must have been a 'hit' because my niece 
said her girls could not stop playing with it!! 
Check out this video for instructions:  

                  
Box: Harvest Gold card stock 
Patterned papers: Echo Park: hello Summer paper pad
Banners: Heart-2-Heart #5 dies; amber adhesive stars
Balloons: Heart-2-Heart #2 dies  Stars: Star Gazer dies
Cupcake: Tiny Treats:Valentine; copic markers; circle punch
"3": Modern Alphabet Numbers die; Dark Chocolate card stock
                

I mounted the balloons and star bursts onto narrow strips of 
clear acetate. They look like they're floating out of the box!!

I was in a rush to send this card and forgot to ask my husband 
to take a picture of the back. I added another panel of card stock 
so that I could stamp a sentiment and sign the 'card'.

Thanks for visiting today.
Karen C.

Saturday, June 7, 2014

MIM #167: DIY Notebooks

“Find magic in the little things"  - Isa Zapata

Erin Lincoln demonstrated a "little bit of magic" in the latest episode 
of Papertrey Ink's Make It Monday. Video link: MIM #167: DIY Notebooks. 
The decorated notebooks are so adorable and so much fun to make. 
I know I'm going to make more. Don't you think they 
would be great for Christmas stocking stuffers? I'm going to 
have to check my Christmas stamps for more ideas!!

I wanted a notebook with a bright and cheery spring time look, 
so I chose a colour scheme of white, yellow, light green and pink.
PTI Supplies, unless noted.
Notebook Cover: Stamper's Select White card stock; Stitching Impression Plate
Frame & Lines: Label Basics;  Sweet Leaf Ink (Close To My Heart)
Butterfly & Hearts: Heart-2-Heart #10 stamps and die; 
Hibiscus Burst ink; Grey Wool (CTMH)
Sentiment: It's Official
Back Cover: Recollections Patterned Paper Pad
 
The Button Card die was the perfect size for the notebook pages.

Inside Pages
I was able to cut 9 pieces from one piece of 8 1/2" x 11"  
card stock, although I didn't use all of them in the notebook. 
I used a thinner card stock (Recollections
so the individual pages are not as thick as PTI's cardstock.


6 White Pages 
I used the same details as the notebook front.


8 Yellow Pages & 8 Pink Pages 
Label Basics stamp, Harvest Gold inks, Hibiscus Burst
Sentiments: LLD Journal It - Top Ten (My Favorite Things)
 Grey Wool ink (CTMH); 


9 Green Pages 
Label Basics stamp; Sweet Leaf & Grey Wool inks (CTMH)
Sentiments: Monthly Moments: Library Card.


Green Pages
I chose 3 sentiments and stamped each of them on 3 pages.

Thanks for visiting today.
Karen C.

Thursday, June 5, 2014

Doodlie - Do Birthday

When I saw Papertrey Ink's Cover Plate: Diagonal Stripes 
during February's product release I wanted to try 
making something similar with my current supplies.

Sentiment: Tea for Two

* Several strips of black card stock were cut, mounted to a Vintage Cream 
card front panel and then attached to a black card base. 
* Doodlie-Do flowers were stamped, die cut, then coloured with copic markers.  
* Several yellow enamel dots were added to the flower centers.

 Card Interior
Sentiments: Wonderful Words: Birthday.
Inks: Simply Chartreuse, Hawaiian Shores (PTI); Memento Tuxedo Black

Thanks for visiting today.
Karen C.

Sunday, June 1, 2014

Catching Up + A Card


3" x 4" Pocket Journal Card

My last post was in the middle of February; it's time for an update.
If you're here for some craftiness, just scroll down for my card project.
 
* I don't usually share too much of my personal life - I like my blog to focus on cards and other projects that I enjoy making. There hasn't been much craftiness happening lately though, as I've been dealing with a major eye problem. I was diagnosed with a detached retina on February 21st. Since the required surgery could not be done in my city, I was immediately sent to Winnipeg (a long drive on the wintery roads of Northwestern Ontario and Manitoba).
* I had my first surgery (scleral buckle) on Sunday afternoon (Feb. 23) and was sent home the next day, with some concerns. There was still some fluid built up which did not allow the retina to attach. The doctor hoped that in the following days/weeks this would correct itself as my eye absorbed the excess fluid.

March - April, 2014
* I continued to be monitored by my own eye specialist; he also consulted with the surgeon. Unfortunately, by March 17th, it was evident that things were not getting better and I was sent back to Winnipeg for a second surgery. 
* This time the procedure (Vitrectomy + Gas) was successful, but I had to sleep on my stomach at night and keep my head down during the day for 2 weeks.  It was brutal!! Having a gas bubble meant that I couldn`t see out of that eye; I had to limit my activities and I couldn't fly due to increased eye pressure!! 
The gas bubble began to dissipate over the last two months. I won't know how much of my vision will be restored for several more months.

May 2014
* I returned to Winnipeg for a follow-up appointment with the surgeon. He was pleased that the retina was still attached, but again I was told that my vision would continue to change. 
* Nine weeks after my second surgery the last remnants of the gas bubble disappeared. That was certainly something to celebrate!! (Happy Dance) Eventually I will have to be fitted for glasses to correct the changes that have occurred; hopefully my vision will continue to improve over the next few months.

 Two Crafty Projects!!
* In the meantime, I have been slowly returning to my craft room. 
I can only concentrate for little blocks of time as my vision makes 
things distorted. (straight lines look wavy, images look crooked) 
which makes the job of lining things up very challenging!! 

* I started a card for Make It Monday #152: 
Layering Dye & Pigment Ink, before the surgery, 
but ran into some trouble with stamping the floral images.  
Looking back, I realized this was due to the detached retina.  
I couldn't bear to throw it out, so I cut it into a journalling card.
This sentiment seems appropriate considering the last few months!!

I made the card again, this time changing 
the position of the flowers and leaves.

Card: Vintage Cream, Smokey Shadow
Background: Woodgrain; Vintage Cream Pigment ink 
Images & Sentiment: Happiness in Bloom,  
Inks: Hawaiian Shores, Simply Chartreuse, Summer Sunrise, Smokey Shadow (PTI); 
Old Olive (Stampin'Up); Twilight (Close To My Heart) 

I added an inside panel of Vintage Cream card stock, then stamped
the sentiment (Happiness in Bloom), the flower, leaves and dots.

Thanks for visiting today!!
Karen C.