Welcome to my crafty blog... a "garden" of colourful cards, quilting, sewing projects, knitting...and what ever else happens along the way!!


Friday, August 31, 2012

Hanging Out (for Emily)

One of my nieces gave birth to her second child in August - a sweet little girl named Emily Charlotte. One of my favourite baby cards to make uses Papertrey Ink's set called Hanging Out. I've made several versions of this card - blue for boys, pink for girls. (You can view the other cards here. 

Sometimes I have used patterned paper for the mat layer, but this time I kept it very simple with a plain pink card stock. The larger white mat layer has been impressed with the Simple Stripes Impression Plate for a little bit of texture.


This card was included in a gift for Emily, so I addressed the card to her!!
I created a complementary scene for the envelope, but this time I used her name in punched circles and attached them to the clothesline. The sunshine stamp is from Back Pocket Basics and the sentiment and butterflies (Sweet Spring) add some colour and whimsy to this envelope:


Card Details: (PTI, unless noted)
Stamps - Hanging Out, Tiny Treats:Valentine, Garden Variety, Sweet Spring; 
Background Bitty Blocks, Back Pocket Basics; SU: Rough Type
Inks -  Spring Moss, Hibiscus Burst, Harvest Gold, Winter Wisteria, Kraft,; 
Memento Tuxedo Black, Rich Cocoa; CTMH: Crystal Blue
Paper - Stamper's Select White, Hibiscus Burst
Dies - Hanging Out die collection; Clouds;
Other Supplies - Simple Stripes Impression Plate; Copic markers;  5/8" circle punch; 
CTMH Bitty Opaques Adhesive Pearls

Thanks for visiting today.
Karen C.


Tuesday, August 28, 2012

Stamper's First Aid!

Have you ever made a card that you wanted to re-do? That's what happened after I made this card for Papertrey Ink's July Blog Hop. You can see the full details and description here. 


There was just something about this card that I didn't like.
.... too much Berry Sorbet
.... not enough contrast/colours
.... the  funny little bow
.... the sentiment seemed to get lost on the patterned paper


So ... I decided to see if I could make
a quick fix by adding a little extra detail.

I cut out a strip of Simply Chartreuse
card stock using the Zig Zag Border
die and then switched out the thin
ribbon bow with a larger one.

And then after a few days .......
                     I still didn't like it!!


I decided the only way I was going to salvage this mess was a major re-do!! 
So I got out some of my favourite stamps and dies and here's the result!! 
And the best part? I love it! 
It has all of the details that I think were missing in my original card. 


Some close up pictures of the picket fence 
and seed frame from Garden Variety II.


The card base and patterned paper are the same as the original and I kept the Marigold image on the background, but added lots of other details to 'jazz' it up!! The Seed Packet was stamped with Text Style and Polka Dot Basics. The little Berry Sorbet bow and Seed Packet are hiding a little secret, too!


I added a several pieces Stamper's Floss (coloured with copic markers)
onto the top of the tag. When it is pulled out ... there's a birthday wish!!


The  bold 'happy', from Pretty Peonies, is stamped onto Tag Sale #1 
and the 'birthday' sentiment was added with Berry Sorbet ink.


Card Details:    (PTI, unless noted)
Stamps - Year of Flowers Collection, Year of Flowers Titles, Garden Variety, Garden Variety II, Polka Dot Basics, Text Style, Pretty Peonies,
Inks - Memento Tuxedo Black, Berry Sorbet, Lemon Tart, Simply Chartreuse, Tea Dye Duo inks
Paper - Vintage Cream, Stamper's Select White, Simply Chartreuse, My Mind's Eye: Follow Your Heart - Be Happy
Dies - Picket Fence, Seed Packet die, Seed Frame II die,  Button Card, Tag Sale #1,
Other Supplies - Cuttlebug Swiss Dots Embossing Folder; Wood grain Impression Plate, Berry Sorbet Topnotch Twill Tape, Close to My Heart Bitty Opaques Adhesive Pearls, Copic Markers, Karen Foster: Scrapper's Floss; 3-D Dots; sewing machine.

Thanks for visiting today.
Karen C.

Sunday, August 26, 2012

Lovely Layers Wedding

When my son was visiting in July, he asked me to make a card for a friend's wedding. I showed him this card using Lovely Layers with Aqua Mist and Golden Harvest that I had made.  It really is a beautiful stamp and die set for weddings and anniversaries ... so elegant. I made a few changes in the overall design and changed the colour scheme for this card:


Details:
The front panel was impressed with the Vineyard Impression Plate and then the large leaf die from Lovely Layers was used to cut the shape from the center of this panel. I carefully stamped the leaf image onto the white card base, by positioning the front panel opening where I wanted it to be on the finished card. The die cut was also stamped with Spring Moss and Simply Chartreuse and then placed on top of the front panel. 3-D foam dots were used to create lots of dimension on the focal image.

The other layers were created with the dies using Winter Wisteria card stock, stamped with Royal Velvet ink; and Lavender Moon and Winter Wisteria flowers on Soft Stone card stock.
The center of the flower has 9 mini lavender pearls for an elegant finishing touch.


The sentiment (Fillable Frames #2) was stamped onto Stamper's Select White card stock with Royal Velvet ink and then cut with the Word Window punch from SU. This was mounted onto a Spring Moss Modern Label (SU).
Two pearls were added to the label.


Inside:
The main sentiment is from Quilter's Sampler and 
the small 'wedding day' sentiment is from Tag-Its #5.

Envelope:
I also made a matching envelope, using the same colour 
scheme and stamps from Lovely Layers. I didn't know 
beforehand, but the wedding colours were lavender and 
green, so this wedding card was a perfect match for the event!!


Card Details: (PTI, unless noted)
Stamps - Lovely Layers; Fillable Frames Additions  #2, Quilter's Sampler, Tag-Its #5, 
Inks - Lavender Moon, Winter Wisteria, Royal Velvet, Spring Moss, Simply Chartreuse
Paper - Stamper's Select White, Winter Wisteria, Spring Moss, Soft Stone
Dies - Lovely Layers Die Collection
Other Supplies -  Vineyards Impression Plate; Stampin' Up Modern label & Word Window punches; 3-D Dots; pearl adhesives, Copic markers
Thanks for visiting today.
Karen C.

Monday, August 13, 2012

Golf Spinner Birthday

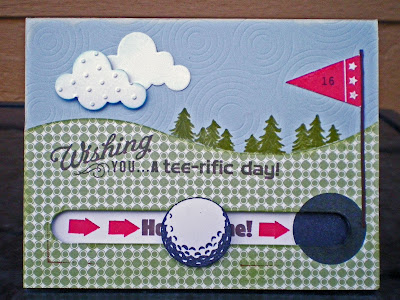
My oldest son celebrated his birthday in July. This is the card I made for his younger brother to give to him. DS1 loves to golf and I thought Papertrey Ink's Movers and Shakers Spinner die would make a great card for him.


I created a background scene for the golfing images, by cutting green patterned paper with the snow hills die from PTI. It was mounted onto a piece of Spring Rain card stock that had been impressed with the Sunshine Impression Plate. Two clouds were die cut and one was embossed with a Swiss Dots embossing folder before adding to the scene.


The slot was cut in the lower portion of the card front so that the golf ball (Clear Dollar Stamps) could 'spin' across the card front. A large circle stamp was used to stamp a black image on the card front and the corresponding position on the card base, to create the 'cup' at the 16th hole!!

The flag at the 16th hole was made by cutting a thin strip of Dark Chocolate cardstock to create the pole and then adding the stamping banner. (Waltzingmouse Stamps and Nestabilities: Nested Pennants)

The background trees (Close to My Heart) were stamped with Simply Chartreuse ink. The sentiment is a combination of two stamp sets: Movers and Shakers Sentiments and Golf Set (Clear Dollar Stamps). The arrows were stamped with Pure Poppy ink using the image from Movers and Shakers Sentiments.

Card Details: (PTI, unless noted)
Stamps - Movers & Shakers Sentiments, Postmarks;  Clear Dollar Stamps: Golf Set; Close to My Heart: A Journey; Waltzingmouse Stamps: Bitty Banners
Inks - Pure Poppy, Simply Chartreuse, Fresh Snow;  SU: Bashful Blue; Memento: Tuxedo Black; CTMH: Chocolate
Papers - Stamper's Select White, Dark Chocolate, Spring Rain; SU: Certainly Celery - Designer Series Patterns
Dies - Movers & Shakers: Spinners, Snow Hills, Clouds; Nestabilities: Nested Pennants
Other Supplies - 1" circle punch; Cuttlebug Swiss Dots Embossing folder; EK Success: 3D-Dots

Thanks for visiting today.
 Karen C.

Thursday, August 9, 2012

Birthday Balloons

My son celebrated his birthday at the end of July and I made several cards for the occasion. This is the one I made for my husband and I to give him. I used a variety of stamps and dies to create this card  - it's always fun to use favourite sets and incorporate them into one design.

 Card Front Description:
* Lots of colourful balloons: cut and stamped then arranged with foam dimensionals. Embroidery floss used as the balloon strings.
* Mover's and Shakers Zipper die: used to create the sentiment panel. 
* The grass (Hanging Out) and the sky and cloud details were added with stamping and sponging techniques. Polka dots were stamped in a variety of colours to resemble little flowers.

* Sentiment (Movers & Shakers): Star Spangled Blue ink (Close to My Heart)
and  "Pull Here" : Harvest Gold ink (PTI)

Here's the 'secret" sentiment, revealed when the 'zipper' was pulled. The inside strip was sponged with more blue ink and a few of the coloured dots, so it blends very well with the panels above and below.


 Inside:
* Pure Poppy balloon and Fine Linen 'string'.
* Striped paper, cut with Rick Rack Border die and outlined with blue marker.
* Sentiments stamped in blue ink, with "32" (Postmarks) stamped in Pure Poppy.


Card Details: (PTI, unless noted)
Stamps - Heart-2-Heart #2, Movers $ Shakers Sentiments, Hanging Out, Polka Dot Basics, Postmarks
Inks - Pure Poppy, Harvest Gold, Fine Linen; CTMH: Star Spangled Blue, Crystal Blue, Clover Meadow
Paper - Stamper's Select White; Bazzill: North Sea;  Echo Park: hello SUMMERRecollection: Cream
Dies - Movers & Shakers: Zipper Die, Heart-2-Heart #2:Balloon die, Cloud dies, Rick Rack Border die.
Other Supplies - embroidery floss;  EK Succes 3D-Dots;  Zig Writer Marker: Blue Jay

Thanks for visiting today.
Karen C.

Tuesday, August 7, 2012

Kayak + Zipper Die = Birthday Fun!!

I usually try to make cards for family members using images that relate to their interests or hobbies. My older brother rides a motorcycle and loves canoeing and kayaking. I've made him several motorcycle cards, so thought I would use the  kayak image from Hit The Road (Stampin' Up). I also really like using Papertrey Ink's Zipper die and matching sentiments from Movers & Shakers stamps, so I incorporated them into his birthday card.


* I picked the patterned paper first and then chose co-ordinating colours for all of the other elements. This was then mounted onto Enchanted Evening card stock. The kayak was stamped with Memento Tuxedo Black and then coloured with copics before hand cutting the image and mounting it onto the focal panel. 
* The sentiments and arrow were stamped with Close To My Heart's Indian Corn Blue ink. Two little Bella Dots were added to the sentiment.
* The card base (Soft Stone) was stamped with Soft Stone ink using Background Basics: Woodgrain to create an outdoor/woodsy feel.

The happy little sun was created by using the 
die and stamp set from  Back Pocket Basics.

Sentiments from Movers and Shakers were stamped 
on the inside with Indian Corn Blue and Summer Sunrise.

Card Details (PTI, unless noted)
Stamps - Background Basics, Woodgrain: Movers & Shakers Sentiments, Back Pocket Basics; 
SU: Hit The Road
Inks - Soft Stone, Harvest Gold, Summer Sunrise, Canyon Clay, Berry Sorbet; Memento: Tuxedo Black;  
CTMH: Indian Corn Blue
Paper - Soft Stone, Harvest Gold, Enchanted Evening, Stamper's Select White;  Fiskars Heidi Grace: Baby Boy
Dies- Movers & Shakers: Zipper Die, Back Pocket Basics
Other Supplies - Woodgrain Impression Plate; 7/8" circle punch, Copic markers; Bella: Gold Dots; 3D-Dots;
Sakura Gelly Roll marker: Golden Star;  

Thanks for visiting today.
Karen C.

Sunday, August 5, 2012

Congratulations Graduate!

My son's girlfriend graduated from a Master's program in June and this is the card I made to celebrate her achievement. I used the university colours of gold and black to make this fun 'spring' card.

I cut and folded a piece of 5 1/4" x 10 1/2" True Black card stock using this tutorial.  The black dotted paper was cut using a Nestabilities Classic Square and then attached to the square front card base.

The main focal point was created using several layers of card stock: 
* Harvest Gold die cut with Inverted Scallop Circle (Nestabilities)
* The frame (Tag-It's #10) was stamped with Smokey Shadow onto white card stock, and then some of the details were coloured with markers (blue, green, violet). The inside of the frame was punched with a 1 3/8" circle punch so it could reveal the stamped images below. The outside of the circle frame was punched with a 1 3/4" punch. The frame is made from 3 layers of punched circles, so it stands away from the background images, for added dimension.
* The cap (Tag-It's #4) and sentiments (Close To My Heart: Express Postage) were stamped on the inside of the circle.
* A small yellow satin bow was added to highlight the sentiment circle.

* Another piece of black dotted paper was cut to fit across the bottom of the card. Harvest Gold card stock was cut with a Photo Finishers die and then stamped with two sentiments (both from Fillable Frames #3).  
* Blue and Green Sparkles (Close to My Heart) were added to the sentiments and the cap for a bit of shine!


* I also added a square piece of card stock to the back of the 'spring' portion of the card, so that I could add a little note.


Card Details:   (PTI, unless noted)
Stamps -  Tag-It's #4, Tag- It's #10, Fillable Frames #3, CTMH: Express Postage
Inks - Smokey Shadow, Hawaiian Shores
Paper - True Black, Harvest Gold, Stamper's Select White;  Making Memories: Small Black Dots
Dies - Photo Finishers Die Collection; Nestabilities: Classic Squares, Inverted Scallop Circles;
Other Supplies - EK Success 1 3/4"  & 1 3/8" circle punches; Offray 3/8" Yellow Satin ribbon; Marvy Markers; CTMH: Blue & Green Sparkles.

Thanks for visiting today.
Karen C.