Welcome to my crafty blog... a "garden" of colourful cards, quilting, sewing projects, knitting...and what ever else happens along the way!!


Tuesday, May 28, 2013

Birthday Stars and Circles

     My brother's birthday was in the middle of May, and since I had the  
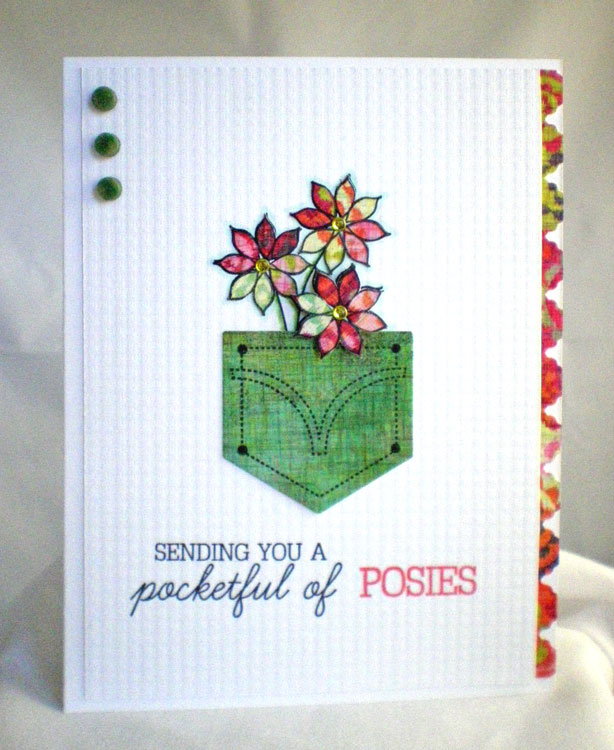
Circle Cover Plate sitting on my desk, I thought I would CASE one of my own cards (here)  for his birthday card. I used 7 different patterns and colours for the stamped circles.

* The 'circles' were cut from white card stock, stamped with various colours and patterns and then inserted into the blue frame. 
* The sentiment panel was cut with one of the Half and Half dies and then stamped with a bracket and sentiment from the Half and Half set. Before securing it to the front of the card I sponged the edges with blue ink, impressed it with the Woodgrain IP and machine stitched along the top of the panel. 
* I die cut the star several times and then stamped one of them with Star Prints in Pure Poppy ink. The stars were layered together to give a little more dimension/thickness and then attached to the sentiment panel. A small star (Golden Harvest) was added to the center of the red star.

Card Details:  PTI, (unless noted)
Stamps - Boy Basics: Simple Circles, Dot Spot, Bits and Buttons, Just for You, 
Star Prints, Half and Half
Inks - Pure Poppy, Canyon Clay, Summer Sunrise, Harvest Gold, Blueberry Sky, 
 Simply Chartreuse, Chocolate (Close To My Heart)
Paper - Stamper's Select White, Blue (Recollections)
Dies - Circle Cover Plate, Seeing Stars die, Half and Half die
Other Supplies - Woodgrain Impression Plate, star punch, sewing machine

Thanks for visiting today.
Karen C. 

Sunday, May 26, 2013

Sending Posies

I was reading a thread on the Papertrey Ink forum about a young girl who 
is fighting leukemia for the second time. A card request was posted on the Simon Says web site with details for sending a card to Maddy Justice.
  
This is the card I made to send her, using a Paper Piecing 
technique by Melissa Phillips on this Make It Monday #117 video.
(I apologize for the horrible pictures - a new camera is on my Wish List!!)

 
I started by stamping the flower grouping into the center of a piece 
of white card stock. Then I stamped it again on several patterned 
papers so that I could cut the petals - 2 petals for each colour grouping.


The coloured flower in the right corner is going to be paper pieced 
onto another card stock piece so that it can be attached with a foam 
dot.The four petal groupings were cut with green, light and darker pink 
patterned papers and then glued to the original stamped outline image.
The Aida Cloth Impression Plate was used to add texture 
to the card front before the finishing details were added:

A piece of green patterned paper was used to die cut the pocket. It was 
stamped with black ink and then glued to the card front. The final paper 
pieced flower was then added so that it appears to hang over the top 
edge of the pocket. Yellow adhesive dots accent the flower centers.

Inside
Sentiments (Heart-2-Heart #12 & #6) were added along with another flower grouping. I used Summer Sunrise ink and the filler stamp in order to colour the flowers. I then over stamped it with Berry Sorbet ink. I didn't cover the stamp completely with ink, so the resulting flowers look variegated in colour. I'm going to try that method to colour flowers again - it was a pleasant suprise to see how it turned out.


Card Details: (PTI, unless noted)
Stamps - Back Pocket Basics, Heart-2-Heart #12 & #6
Inks - Memento Tuxedo Black, Summer Sunrise, Berry Sorbet
Papers - Stamper's Select White, Basic Grey Sweet Threads 6" x 6" paper pad
Dies - Back Pocket Basics; Stampin' Up Adorning Accents Edgelits
Other Supplies - Aida Cloth Impression Plate; 3-D foam dots; Stamping Bella Green Dots; yellow adhesive dots

Thanks for visiting today.
Karen C.

Saturday, May 25, 2013

Papertrey Ink May 2013 Blog Hop Challenge

Blog-hop-logo
This month we were given a rainbow of "bouquet builder" color schemes to 
incorporate into a new floral project.  Using a floral set and one of  the inspiration 
pieces we were challenged to experiment with colors to create a project.

 03

 The above colour scheme appealed to me, but I don't own all 
 of the ink colours suggested, so I created my own combination 
of colours and used the Mini Blooms stamp set for my card. 


Ink Colours 
  PTI: Berry Sorbet, Canyon Clay, Summer Sunrise, 
Close To My Heart: Orange (second generation stamping)
 Stampin' Up: Old Olive 


I was in a bit of a time crunch, so I decided to keep this card very simple. 
I started by stamping the large 'corner' image from Mini Blooms onto scrap paper. It was used as a template/guide to position the flowers and leaves 
onto a white card front, with various ink colours. I also filled in some spaces 
on the left side and added a grouping on the bottom right side.


The sentiment (Movers and Shakers) was stamped with Berry Sorbet. 
The card front was impressed with the Cane Print IP, and the right bottom 
corner was rounded. The card front was matted with Berry Sorbet card 
stock and then attached to a white card base. 
  
After finishing this card I realized it was an "ink and paper" card - not my usual style. 
I like to add layers, die cuts, buttons and "do-dads" to my cards. 
I love the Mini Blooms stamp set, but have only used the little flowers as accents along 
with other stamps. This is my first card using it for the main focal  image - now I'm 
ready to make another card featuring Mini Blooms!!


The inside of the card also has a floral grouping and sentiments. 
(Close To My Heart: Happy Birthday;  Big Birthday Wishes)

Enjoy the blog hop today. Thanks for visiting.
Karen C. 

Tuesday, May 21, 2013

Camera Birgitta Birthday Tag and Gift Bag

My sister-in-law is a real photography buff, so I used that theme for a tag on a birthday gift. After I finished the tag, I thought a gift bag would be a great way to co-ordinate everything!
 Tag:
 
 * I used the Boutique Accessories Card die and cut it twice - once with card stock and once with Limeade Ice patterned paper. The edges were stamped with two different sentiments from Tiny Tags and Tiny Tags II.
 *The original Camera Birgitta image had shorts and a sleeveless top, so by combining two images and doing some extra colouring, I was able to make a more appropriate look for an early spring tag.  
Birgitta was created by stamping the image onto Bella card stock, colouring with copic markers and then fussy cutting the top half (head and torso). The bottom (pants and shoes) were stamped with another image (Autumn Trevor)  and then fussy cut. The pants were paper pieced and the shoes were coloured with copic markers.
 *Grass (MFT border die) and a little ladybug were added to the bottom of the tag and three blue Stamping Bella dots to the top corner.

PTI Supplies, unless noted:
Stamps -  Swiss Pixie Camera Birgitta &amp and Autumn Trevor (C.C. Designs);
Tiny Tags I   & II
Inks - Blueberry Sky; Memento Tuxedo Black
Paper - Bella White; Limeade Ice; Limeade Ice Leaves Paper
Dies - Boutique Accessories Card die; Grass Border die (MFT)
Other Supplies -  copic markers; Berry Sorbet Twill Ribbon; Stamping Bella Dots;


Gift Bag:
     I measured the gift so that I could create a custom size container to hold it. I used Blueberry Sky gingham paper and white card stock. The top edge of the bag was cut with Adorning Accents Edgelits die (Stampin'Up) and Limitless Layers oval was used to cut the handle opening. The gift  bag was accented with an eyelet border die (Limeade Ice ) and Berry Sorbet circles.

Side view of the gift bag shows how I attached the ribbon on the tag, by punching a small hole below the oval opening.
PTI Supplies, unless noted:
Paper - Blueberry Sky Gingham Patterned Paper, Limeade Ice Leaves Paper; Berry Sorbet
White Card Stock (Recollections)
Dies -   Adorning Accents Edgelits Die (Stampin' Up)  Eyelet Border; Limitless Layers 2.25" Ovals;

Tag and Gift Bag


Thanks for visiting today.
Karen C.

Sunday, May 19, 2013

40th Anniversary Tags

     I love making tags to decorate gifts for family members, so I made a set of three tags to add to gifts for my brother and sister-in-law's 40th wedding anniversary. The traditional gift for the 40th is Ruby, so I used that as part of the colour scheme.

     All the tags were die cut with Papertrey Ink's Tag Sale #5 and then embossed with the Canvas Impression Plate. Ruby satin ribbon was added to each tag.

I attached one tag to a bottle of wine with a co-ordinating image 
from Stampin'Up (Cheers to You) and sentiments from Papertry Ink 
(Movers & Shakers Sentiments,   Mini Scrapbooking Series: Journaling Circles) 
The Number Time Trio dies were used to cut "40" from Scarlet Jewel card stock.


The next tag uses Rosie Posie and Rosie Posie Step 2 stamps sets. 
It's  a perfect complement to the gift bag that has ribbon flowers. 
The sentiment  is from Tag- Its #5.

The tag was stamped with a combination of Pure Poppy and Scarlet Jewel 
inks (flowers) and Soft Moss and Simply Chartreuse (leaves). I just got the Rosie Posie sets in my last order and I will be having lots of fun with them!!

I used the hexagon image from Rosie Posie 
and variety of sentiments to create a third tag. 
It's attached to a crystal bowl, filled with red & white candies.
 (PTI supplies, unless noted)
Hexagons - Rosie Posie; Harvest Gold, Scarlet Jewel, Ripe Avocado inks.
Sentiments - Friendship Jar, Just For You; Say It in Style (Close to My Heart)
 "40" - Number Time Trio die; Scarlett Jewel ink

 I have linked this set of tags to the 
 Gift Tag Challenge in the Moxie Fab World.

Thanks for visiting today.
Karen C.

Saturday, May 11, 2013

Kitty Birthday for Parker

I've been busy in my craft room, but haven't taken the time to photograph, edit and blog until today!! I've actually been working on a photo album from our 2010 San Francisco - Alaska Cruise (for the last 4 months!!) I'm determined to get it finished this week-end, so I'm hoping for some crafty time tomorrow. In between scrapping and boring household chores, I've also been making cards, tags and gift packaging for family members. 

One of my little grand nieces celebrated her 2nd birthday at the end of April and here's the tag and card I made for her.

Gift Tag
I used a Stamping Bella image - "Bunny" - to make a tag for her birthday gift and added some sweet balloons from Heart-2-Heart #2.  
The bunny was stamped onto Bella card stock, coloured with copic markers and then fussy cut. I then hand drew the balloon strings before adding the balloons.


The wrapping paper gave me the inspiration for the colour scheme. 
I used pink Baker's Twine to tie around the package and then added 
a bow to the top of the tag.

Stamps - Stamping Bella Bunny; Heart-2-Heart #2, Tag-Its #1; 
Inks - Hawaiian Shores, Limeade Ice, Raspberry Fizz, Kraft;  Memento Tuxedo Black
Paper - Teresa Collins Designer Paper, Bella White
Die - Tag Sale #3;  Heart-2-Heart #2 balloon die
Other Supplies - copic markers; Baker's Twine

Card
I used another Stamping Bella image - "Mavis has a Daisy" for the birthday 
card. Papertrey Ink stamps and dies were also used to create a colourful 
spring scene!!
     I started by stamping the Kitty onto a piece of Bella White card stock and then colouring her with copic markers. The little dress was paper pieced with some blue floral printed paper. This same blue paper was used to mat the focal image and then another mat layer (Canyon Clay) was added. The number was die cut from Canyon Clay using Number Time Trio. 
I added the sentiment (Framed Out #1) to the left corner.

     The focal panel looked rather plain, so I decided to try and create a scene with some additional stamping. I seem to do things in a wonky order, but I really love how the final card turned out. I masked the kitty image so I was able to stamp the picket fence, the grass (Lovely Layers) and flowers (Garden Variety).

All of the patterned papers came from a set from Stampin' Up. 
I used one of the co-ordinating papers to make the flower (Bloom Builders #3).  
I also used one of the stitching stamps from Sew Simple Borders around the focal panel and the card front.

Stamps - Framed Out #1,  Lovely Layers, Garden Variety, Sew Simple Borders; Mavis has a Daisy (Stamping Bella); Picket Fence (Clear Dollar Stamps)
Inks - Summer Sunrise, Canyon Clay, Simply Chartreuse, New Leaf; Cranberry (Close To My Heart); Bashful Blue (Stampin' Up); Memento Tuxedo Black
Paper - Spring Rain, Canyon Clay, Stamper's Select White; Stampin' Up Designer Paper;  
Die - Bloom Builder #3; Number Time Trio
Other Supplies - copic markers; adhesive pearl


 Card Interior
Stamps - Stylish Sentiments: Birthday
Inks - Cranberry (Close To My Heart)
Paper - Stampin' Up Designer Paper 

After finishing the card and tag, I decided to use the colour scheme 
from the wrapping paper ... this time to create a colourful envelope!!

 Stamps -  Postmarks, Mini Blooms, Tag-Its #1; Polka Dot Alphabet (Close To My Heart)
Inks - Hawaiian Shores, Limeade Ice, Raspberry Fizz, Summer Sunrise  

Thanks for visiting today. 
Mother`s Day is starting early here.  
My husband is taking me out for an early Mother`s Day Dinner tonight.
 Have a great week-end and Happy Mother`s Day to all!!

Karen C.

Friday, May 3, 2013

Little Birdie Holiday


Making cards for Christmas is usually a fall and winter task for me, but I decided to start adding to my stash earlier this year. FESTIVE FRIDAY  is a great incentive and inspiration for creating holiday cards all through the year. This week's challenge is to add a bird to a project. 

Here's my 'take' on this challenge, using a variety of stamps and textures. 
 
Card Base -  Rustic White; Stampin' Up Petals-a-Plenty Embossing Folder; 

 Focal Panel - Tiny Treats: Christmas; Loves Lives Here: Holiday;  copic markers;
        Pure Poppy ink; Memento Tuxedo Black & Cottage Ivy ink; 
         Limitless Layers 1 3/4" Circles; 1 1/8" circle punch; 
       Card stock - Pure Poppy, Rustic White, green (from my stash)

 
Sentiment Panel -  Holiday Lights; Love Lives Here: Holiday

 Supplies from Papertrey Ink, unless noted.


Thank you for visiting today.
Karen C.