Welcome to my crafty blog... a "garden" of colourful cards, quilting, sewing projects, knitting...and what ever else happens along the way!!


Sunday, February 27, 2011

Wreath for All Seasons Birthday Butterflies

     I'm still thinking spring and summer should be just around the corner, so I got out my stamps and dies to make a Butterfly Birthday Card. This one is for a Papertry Ink Post Its group member - Happy Birthday Anne!!  

     I really like the Wreath for All Seasons stamp set, as you can change the accents to create such a variety of cards. Here I combined the wreath with some butterfly accents - I used the patterned paper as inspiration for my colour scheme. It's from the Cosmo Cricket Pixie-Licious Mini Deck. 

I stamped the wreath in CTMH Garden Green and then added the berries with SU Lovely Lilac and Pixie Pink.I usually cut a circle as a matting for the wreath, but this time I tried the Nestabilities Labels 9 for the stamped panel and then hand cut the outer edge of the metal die cut to get a narrow purple mat.

     The sentiment is from PTI's Everyday Button Bits. I mounted the cream card stock onto the front of the card and framed it on the top and bottom with narrow purple ribbon. Little purple mini pearls accent this panel.


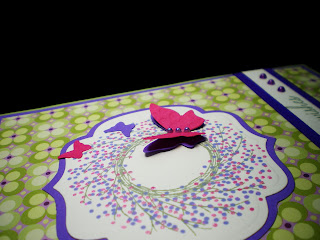
     Here's a close up of the stamped wreath with the purple and pink butterflies. I die cut these from a Sizzix Embosslit "Beautiful Wings". Little mini pearls were added to the body of the larger butterfly.


The card base uses SU Certainly Celery card stock. The inside was stamped with the sentiment from PTI's Signature Series: Butterfly in Lovely Lilac and the Butterfly image in VersaMark.


Card Details
Stamps: PTI Wreath for All Seasons,  Everyday Button Bits,  Signature Series:Butterfly
Inks: CTMH Garden Green;  SU Lovely Lilac, Pixie Pink
Papers: Cosmo Cricket Pixie-Licious; SU Certainly Celery, Vanilla Cream;  Recollections Purple & Pink;
Other Supplies: Sizzix Embosslits Beautiful Wings; Nestabilities Label #9 ; Kaisercraft mini pearls; purple ribbon; 


Thanks for visiting. Have a great week.

Tuesday, February 22, 2011

Welcome Baby

Sweet Little Baby cards . . . .
      Several of my nieces and nephews have started families - 2 boys and 4 girls have been added to the mix !!  (with another baby girl due in May!) 
A number of my son's friends have also started families, so I have been making baby cards more often in the last few years. Here's a card that I made for baby Maria.

      I found this design in 3D Rubber Stamping by Joanne Sanderson, but made some changes by using the Alphabet Bubble stickers to personalize the card with the baby's name. This is a sketch I have made many times (blue gingham and dots for the boys and pink and yellow for girls).  The shimmery pink patterned papers and gingham ribbon used for this card were purchased from my LSS. I used PTI's Stamper's Select White for the card base.


     The little handprints were made by stamping white Fimo modelling clay and baking it in the oven. The last time I made this card I decided to stamp and bake 4 of these little handprints, so I would have them on hand any time I wanted to use this card design - helps to save a little time in the process !!   


      Once it hardens it is very durable, but relatively lightweight. I secured it to the paper and cardstock with lots of Scor-tape. I stamped 'welcome baby'  under the handprint panel. The gingham ribbon and bow and the little pink pearls finish off a sweet card for a new baby girl.


The inside of the card uses the same hand prints stamped in CTMH Blush ink and the sentiment from SU's set - One of a Kind stamped in Hollyhock.


Card Details:
Stamps: Stampcraft Handprints;  Stampin'Up One of a Kind, Short & Sweet
Inks: Close to My Heart Hollyhock, Blush.
Papers: PTI White Stamper's Select;  Reminisce Baby Girl Basics (gingham & dots);  yellow and striped papers from my stash
Other Supplies: Fimo modelling clay;  gingham ribbon;  Kaisercraft pink pearls;  Provocraft decorative scissors;  COLORBOK Alphabet Bubble Stickers.

     Here's a Baby Boy card I made last year using a similar layout. I used a pinking hearts border punch on the yellow strip of paper; Staming Bella Dots on a blue satin ribbon and blue and yellow striped paper for the name panel. The gingham and dotted papers are from Making Memories.

Thursday, February 17, 2011

Birthday Butterflies

   I'm really loving my butterfly dies and these soft colours - must be the thought of warm summer breezes, morning sunshine. Even though it is only February I am already looking forward to all those summer delights!!
     Here's a card that creates those happy thoughts! I made this for one of the members from the  Papertrey Ink Post Its blog group.
                                            Happy Birthday Denise!!


     I used lots of butterflies on this card. The largest one in Aqua Mist was created using the PTI Signature Series: Butterfly die that I also embossed with a Cuttlebug Swiss Dot folder. The rest of the butterflies were cut and embossed using this cute little Sizzix Embosslit called Beautiful Wings. I used the largest image in Lemon Tart and the smallest image in Aqua Mist and Lemon Tart.

      Here's a close up of the card from a side view - showing all the details. I didn't have matching mini pearls, so I coloured white ones with my copic markers to create the aqua ones in the sentiment panel and the yellow-green ones for the body of the buttterfly. Can you see the little antennae on the yellow butterfly? I cut very thin strips of the Old Olive paper and attached them to the back of the die cut.


Here's the rest card details:


Stamps:  PTI Big Birthday Wishes
Inks:  SU Old Olive
Papers: PTI Lemon Tart, Aqua Mist,  Polka DotParade Patterned Paper; SU Old Olive, Confetti White (card base)
Other Supplies: PTI Signatue Series: Butterfly die; Nestabilites Inverted Scallops; Swiss Dot Embossing folder; Kaisercraft white mini pearls; copic markers; Stampin'Up Sizzix Embosslit Beautiful Wings


     This is how I created the sentiment panel on the card. I started with one of the sentiments from Big Birthday Wishes (shown in the top left hand corner) You can see the original stamped image is made up of two lines. But I wanted to use it in the circle format with the butterflies, so I started by cutting up each individual word and arranging them on a scrap paper circle to get the right placement (shown in the bottom right hand corner.


This shows my first attempt at stamping the sentiment (bottom right hand side).


      I tried inking each individual word and stamping it in the appropriate place, but... as you can see.... big inky messes were made instead!! That's when I remembered about masking the stamp with tape, inking it up, removing the tape and then stamping the remaining inked portion. So that's what I eventually did for the final card, and voila! No inky messes on my card!!


Monday, February 14, 2011

Chocolate Treats

Happy Valentine's Day!!
This is a quick post to share my very first chocolate bar cover/band for a Valentine's Day treat. I decided to try this after seeing so many decorated bars on Michelle's blog . Although I'm not totally happy with it, I did learn a few things that I will try the next time.

Here are a few things that I do like:
1. PTI's Wood Impression Plate - I used it on almost all of the papers. I can't stop using this!!
2. PTI's Love Lives Here - the little house image is so fun to work with and has so many options for stamping.
3. PTI's Mat Stack 3  - I like the way you can fit a circle matting in the top portion and still have lots of room for a sentiment at the bottom.
4. That cute little chocolate bow and the Spellbinder's Contemporary Hearts Pendant die - visions of chocolate candy - yummy!!


Things I would change:
1. The belly band should be wider - and lower, so the focal panel is centered on the candy bar.
2. My scalloped edges aren't even, so it looks kinda crooked!!
3. The back of the bar was decorated too - I couldn't bring myself to include a picture. As the kids would say - It's one Hot Mess! So the next time - don't fiddle with the back!!

Thanks for visiting my corner of this blogging world.
Hope you all have a sweet day today.  
I will be back later this week with a birthday card. Take care.


Karen C.

Sunday, February 13, 2011

Love Lives Here Valentine

     I finally got a chance to finish this card  for my husband. I had one design in mind when I started, but as I sat at my desk, trying to complete my "vision", the design kept changing.  After lots of trial and error, this is the card that my DH will receive on February 14th. (He won't know that I started  with a totally different look - I covered up some of the oopsies quite well)

     I've had this "More to Adore" paper pack from Close to My Heart for several years - I just couldn't seem to cut into it. But I've decided it's time to take the plunge and actually start to use my "special" papers. The top of the card uses a small floral paper and the bottom has a striped design. The sentiment from PTI's Love Lives Here was stamped in Versa Mark and embossed with gold embossing powder. The saddle stitch ribbon was originally brown and white, but I coloured the white dashes with a pink copic marker.

     The focal point is a medallion made with one of the coordinating papers in a paisley pattern. I cut 2 of the Nestabilities inverted scallop circles and used instructions from Nichole Heady's blog to make a "Lazy Medallion". I also sponged the tips of the medallion with Chocolate ink. The circle/heart image  is from the set Love Lives Here. I mounted this on a circle of Hollyhock card stock, a parchment circle and finally a chocolate scalloped circle. The heart was coated with Crystal Effects and then added to the center of the circle. I added the little bow and pearl to accent the medallion. I also added three pink hearts on the right hand corner and several mini pink pearls randomly placed to highlight the tiny floral images. Additional brown mini pearls were placed on each of the scallops along the edge of the border. Since I didn't have the right colour for the minis, I used my copics to colour the tiny pink and brown pearls.


The inside of the card is stamped with one of my favourite sayings from this set and then a few hearts were added..... because it isn't Valentine's Day without a lot of hearts!!

Card Details:
Stamps:  PTI Love Lives Here
Inks: CTMH Blush, Hollyhock, Chocolate; VersaMark
Papers:  CTMH More To Adore pattern paper & card stock pack; PTI Stamper's Select White
Other Supplies: PTI  Love Lives Here dies, Heart Prints dies; Limitless Layers I die; Cuttlebug Swiss Dots embossing folder;  Sizzix Hearts #4 embossing folder;  Crystal Effects: Detail Gold embossing powder;  copic markers;  brown saddle stitch ribbon;  Kaisercraft Pink  & white pearls;  Nestabilities Inverted Scallop Cicles; circle punches.


Thanks for visiting. Have a great week-end.

Tuesday, February 8, 2011

Valentine Little Bitty Birds

It's been a while . . . . 
     I've been creating (generally making a mess) in my crafty space, but taking pictures and adding to my blog just hasn't made it to the top of my 'To Do' list. This week I have several cards and projects for Valentine's Day. I usually make something for my sons and husband and then attach a little treat.

     Here are the small cards (2 3/4" x 4 1/4" - one half of an A2 card) I made for my two sons.  I wanted to make sure the cards were masculine, so I started with Kraft card stock and my new PTI Little Bitty Bird stamp set and the awesome Wood Grain Impression Plate. (I love this plate - it's so realistic)


     I started by using PTI's Tag Sale #1 die to cut the Kraft card stock. The tree from Little Bitty Birds was stamped with Memento Tuxedo Black ink and coloured with copic markers. I then added the sentiment with VersaMark and Cranberry ink and embossed with clear embossing powder. The little cream circle was punched out and the tiny heart was added. I then ran the tags through the Cuttlebug with the woodgrain impression plate. Finally one of the bitty birds was die cut, stamped and then added to the tree.

     I wanted to mount the tag onto red card stock, but thought it needed another layer so I hand cut a cream coloured card stock mat for the tag. These were then attached to a Pure Poppy card stock that I had embossed with a Sizzix Hearts #4 embossing folder. A red and brown ribbon was added to the top of the tag with a simple knot.


      I kept the inside very simple. I used cream card stock to cut a Spiral Notebook die, stamped it with the page from School Time in Chocolate ink and added the date from Mini Scrapbooking Series and a little sentiment heart from Tiny Treats:Valentine. This allowed me to add a little handwritten note to each of my sons. 
     One of the cards was sent to my younger son who lives on the East Coast. The other card, along with this 'treat' bag is for my older son, who lives here.


He's very much into healthy eating since he started the P90X exercise program. He told me he didn't want any chocolate for Valentine's Day, so this package contains a few Protein Power Bars!!  
      I used the little dog image and coordinating sentiment from Tiny Treats: Valentine  and mounted that onto a die cut using Spellbinders Pendant - Contemporary Hearts. (I sponged the white card stock with lots of Cranberry ink to create a 'mottled' lookIt was a quick and simple project that I know he will like!!

Card Details:
Stamps: PTI Little Bitty Bird, Tiny Treats: Valentine, School Time, Mini Scrapbooking Series:Tabs & Library Ledger.
Inks: Memento Tuxedo Black;  CTMH Cranberry, Chocolate; VersaMark
Papers: Recollections Kraft card stock; PTI Pure Poppy & Vintage Cream card stock
Other Supplies: PTI Little Bitty Bird dies, Spiral Notebook Die; Clear embossing powder; ribbon; copic markers; Sizzix Hearts#4 Embossing folder
Tag Details:
Stamps: PTI Tiny Treats: Valentine.
Inks: CTMH Cranberry, Chocolate.
Papers: cranberry and white card stock pieces
Other Supplies: Spellbinders Pendant - Contemporary Hearts; Circle punch; markers.

Thanks for taking time to visit today. Have a great week!