Welcome to my crafty blog... a "garden" of colourful cards, quilting, sewing projects, knitting...and what ever else happens along the way!!


Thursday, December 30, 2010

Snowman Gift Tag and Card

     It's hard to believe another year has come and gone. 2010 meant a few changes for me - I started this blog to document my adventures in card making and other crafts.  I also bought my first Papertrey Ink stamps, dies and paper and have been completely smitten with all the creativity of the design team and the loyal followers of PTI.  It's really been fun sharing all of the techniques, ideas and inspiration for cards and projects. Hopefully in 2011 I will be able to try a few more challenges and blog hops.


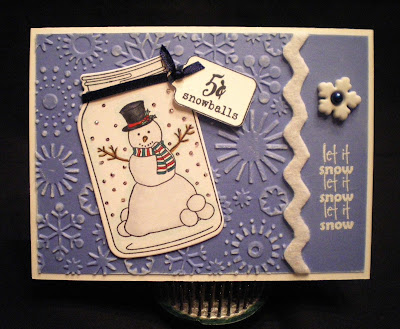
     Today I have one last set of projects to share from this year's Christmas celebrations.  I wanted to try my new Friendship Jar Holiday Fillers from Papertrey Ink and I had seen a number of Christmas gifts for Snowman Soup, so I combined  those ideas and came up with a card, tag and a mason jar filled with Snowman Soup (hot cocoa mix, marshmallows and milk chocolate chips). I added a snowman mug I found on sale at Michael's and packaged it all in a store bought gift bag (with a snowman image of course!!)

     The Friendship Jar was cut using the co-coordinating die and then stamped with Memento Tuxedo Black ink. The snowman from the Holiday Fillers was also stamped with this ink so that  copic markers could be used for colouring. The little tag was stamped from one of the topper images and then hand cut so that I could attach it to the jar with navy ribbon. Stickles were used to accent the snowflakes inside the jar.
     The card uses a plain white card base and blue card stock that I embossed with the Cuttlebug Snowflake folder. I rubbed the white inkpad over the raised sections of the embossing to give a distressed look. The white felt was cut using PTI's Rick Rack die. White embossing powder was used for the sentiment (from C. C. Designs).   A navy blue pearl was placed inside a little snowflake button to give some added colour.

Here's the tag, jar and mug that finishes off the set. I used the Tag Sale #1 
die to cut 2 tags - one for the snowman image and one for the Snowman Soup 
recipe that is underneath.I used the same details on the tag as I did on the card.

The recipe was printed on my computer and I chose a blue colour for 
printing so that it blended nicely with the background card stock.

      The topper for the mason jar was created by cutting a circle of blue and white fabric and then embroidering a red stitch around the edge with my sewing machine. I added two blue felt snowflakes (cut from Peace Be Still snowflake dies) I added one little embroidered flower to hold them all together. Red ribbon was used to 'tie' everything together!!


Hope you enjoy the last few days of 2010. 
I will be back next year (week) with a few birthday cards I have for some 
January birthday girls!  I'm looking forward to more fun card making and projects in 2011.
HAPPY HAPPY NEW YEAR TO ALL!

Sunday, December 26, 2010

Papertrey December 2010 Blog Hop Challenge

 Happy Boxing Day.  
I hope you all had a wonderful holiday with family and friends. I enjoyed a great day with my family - we ate all day, sat by the fire and watched several movies. It was a very relaxing day, as I cooked my turkey on Friday, so I didn't have to spend the day in the kitchen!!

This month Nichole from Papertrey Ink has issued a "Holiday Leftover Challenge" 
Use scraps of wrapping paper, parts of holiday cards, recycled gift tags 
or bits of ribbon on a paper crafting project.  We all have plenty of it laying 
around after all the holiday excitement and this is your chance to 
incorporate some of those pretty little things into an amazing piece of art!


I received lots of PTI goodies for Christmas this year and 
decided to use the Signature Series: Butterfly for this challenge. 
    
     The Butterfly die  was used to cut an old Christmas card and that set the stage for the rest of the card. A white piece of card stock was embossed with the Cuttlebug snowflake folder and then layered onto a green matting before attaching to the white card base.   
     The butterfly was stitched down the center to score the paper and then attached to the card using Scor-tape. PTI's rick rack die was used to cut some more of the green paper and then added to the lower portion of the card. The sentiment was stamped onto an oval white card stock and then matted on a green oval background. Stamping Bella's little blue and red dots add a little colour to the sentiment panel and repeat the circles on the butterfly.
     I'm not usually very good at Clean and Simple - I always seem to want to add more! But I think this would qualify as a fairly simple card - I wanted the butterfly to be the focal point, so I resisted adding lots of extras!!


Here's the old Christmas card that I used. I liked the colour combination 
and cut several options before I decided on the dark green butterfly.


Here are some 'leftovers' that I decided not to 
use on the card. I'll save them for another project!


In order to determine the area of the card I wanted to use, I 
cut the butterfly out on a piece of scrap paper. This allowed 
me to move it around the card until I found the image I wanted.


 Thanks for stopping by! Hope you all have a great week!!

Card Details:
Stamps: PTI Signature Series: Butterfly
Inks: Memento Cottage Ivy
Paper: White, Green cardstock; Christmas card
Other Supplies: Cuttlebug embossing folder; sewing machine; Creative Memories oval cutting templates;PTI Rick Rack die; Stamping Bella Dots

Friday, December 24, 2010

Merry Christmas

 I Wish You All a Peaceful and 
Happy Holiday With Family and Friends. 

Thank you for sharing some of your 
time with me. I appreciate all the 
kind comments and encouragement.

Monday, December 20, 2010

Happy Anniversary Wreath

      My husband and I  celebrated our 34th anniversary on Saturday December 18th.   
(What we were thinking - getting married 1 week before Christmas!!)    Our anniversary has always had a very festive and  "Christmasy" atmosphere!!  When we had our wedding reception the room was decorated with poinsettias and a beautiful Christmas tree, courtesy of the hotel. 

     Here's the card I made for my DH using Papertrey Ink's Wreath for All Seasons.
I started with a white card base and stamped the wreath, then I added red Stickles for the berries. The lower portion of the card was then stamped with Text Style in Caramel ink and the edges were distressed with Vintage Tea Dye Duo.  HAPPY anniversary from Mega Mixed Messages was stamped in cranberry ink on a caramel background and then mounted on cranberry card stock.

     I wanted to add a little extra detail, so I used three rows of scalloped caramel card stock that had been stamped  with Text Style and then sponged the edges using Cranberry Ink. I  layered them under the wreath image to give a bit of dimension to the card.  A cranberry  ribbon and bow was added to the top of the scalloped grouping.


Card Details:
Stamps: PTI Wreath for All Seasons, Text Style, Mega Mixed Messages
Inks: SU Caramel;  CTMH Cranberry, Cloverleaf Green;  PTI Vintage Tea Dye Duo.
Paper: White, Caramel card stock
Other Supplies: Stickles; ribbon; scalloped edge punch; corner rounding punch


     This will be a busy week for everyone. I'm almost finished my shopping - just a few things to pick up. I still have a lot of baking to do, but I enjoy the warmth of my kitchen and the smells of gingerbread this time of year!! My youngest son arrived home on the week-end and will be with us until the 28th, so life is very good. 

Thanks for stopping by and have a great week!

Friday, December 17, 2010

Tiny Treats: Christmas Tags

     I seriously can't get enough of the Tiny Treats: Christmas images from Papertrey Ink.
It really is one of my favourite sets from this season. I have made lots of Christmas cards and tags for family and friends. Here's a few things I've been busy creating over the last few days.

     My nieces, nephews and sons are all grown adults. But over the last few years we have had 5 little ones added to the family mix ( all grand nieces and nephews, no grandchildren yet!!)
Oh how I love shopping and making things for the little folk. Everything has been finished, wrapped and sent along to them and here are some of the tags I made to go with the presents.

I used the Mat Stack 2 die, but stamped it with the Mat Stack stamp from Tiny Treats: Christmas. I just rotated the stamp so that a portion of it showed in the center of the die cut. I then added a bow and ribbon to the top and a little Stamping Bella red Dot to the bottom portion.It looks like a little tree ornament! My 3 1/2 year old neice will enjoy her little deer!

This little guy is off to my 18 month old grand nephew. I again used the Mat Stack 2 die and the Mat Stack 1 stamp from Tiny Treats. This time I stamped and punched the circle image and then added it to the die. I attached it to the Tag Sale #1 die cut which had been embossed with a Dots Cuttlebug folder and then rubbed with some cranberry ink. Blue and white striped ribbon attaches the tag to the curly ribbon.

This little nutcracker will be under the tree for my 4 month old grand nephew. I used a red Limitless Layer to mount the circle and then attached it to the green Tag Sale #1. It was embossed with Swiss Dots and then I added sparkle on each dot with my Stickles!! I used red and white saddle ribbon and  PTI's Red Poppy Baker's Twine to finish this off.

     This little snowman is heading off to my 2 year old grand niece. I used the Tiny Treats: Christmas stamp on the Mat Stack 1 die and restamped the central image and punched it out. It was then attached to the die to create a cute tag.

I showed the 5th tag in an earlier post along with the book bag I sent to my other 2 year old grand niece who lives in New Zealand. You can see that post here.


Thanks for visiting. Have a great day!


Wednesday, December 15, 2010

Signed, Sealed and Delivered

My Christmas cards and letters are in the mail....

I finished  making my Christmas cards and wrote my annual Christmas letter .........
I stamped an image from Tiny Treats Christmas across the top of the letter and added a little colour with some markers. I'm not sure I would do that again. Colouring over 200 little images was a lot of work!!


It always feels so good to get that very big job done!! Some of the cards were made during the year, but the majority of them were done over the last few weeks. I made 15 cards like the ones shown  here , using PTI's Peace Be Still.

The rest of my cards were 'singles' or 'one of a kind', using lots of bits and pieces of paper and embellies in my stash!!   Here's a  'parade' of some of the cards that have not been posted.  I've been busy, but .......  I haven't shown any of these yet.   My blogging skills lag far behind my stamping production..
Hope you enjoy my 2010 cards using a variety of stamps and techniques. I did not list many of the supplies, so if you have questions you can e-mail or leave a comment in the comment section.

Papertrey Ink                               Tiny Treats: Christmas
I used Mat Stack 1 die and the Limitless Layers 
die for the matting of the Tiny Treats image.

I used the Mat Stack 1 die and stamped it with the Tiny Treats mat stamp. 
I also used a red felt mat cut with the Limitless Layers scalloped die.

This card uses the Outlines Alphabet , coloured with Copic markers. I love the little Tiny Treats images all dancing on the letters!! Can you tell where I made a blooper? ( I smudged black ink underneath the letter "m" - after I had finished everything!! So.... liquid applique and stickles to the rescue!!

Stampendous:                                
 I got this stamp set at my LSS - DAT's, last year. I took a Christmas card making class and sent all of those cards out in 2009. These are the ones I made this year and included in my Christmas mailings.
Snowy Short Stacks
 This little elf has liquid applique on his hat and coat.

The 'button' is from a Sizzix die and the turquoise blue snowflake is a Martha Stewart punch.


This little penguin has been 'paper pieced' and liquid applique added to the 
hat and sleeve edges.I also used PTI's Red Poppy Baker's Twine - Love that stuff!!

This card was one of the sketches we used in the card making class. I used left 
over supplies to re-create the sweet little girl in a parka. Lots of glitter on the edges 
of the circle and the patterned paper. I sent these to some of my little grandnieces. 


Imaginesce: 
Polar Bear
 This picture does not do the card justice - I cut out the little bear and popped him up on dimensionals. The background paper has snowflakes in it, so I added another Martha Stewart punched snowflake on top of a solid snowflake punch from Paper Shapers. The scarf is paper pieced with the same background paper.
 Here's another version of the Polar Bear using lots of small snowflake punches 
and Stickles to create glitter in each of the centers. The scarf is paper pieced.


Stampin"Up
Gifts of the Season
The Stampin'Up embossing folder adds a lot of texture to the 
background.I added gold marker to the center of each poinsettia.

The sentiment panel uses the same Nestabilities label die. The 
small corner image is from the same Gifts of the Season stamp set.

Wandering Words
I created the "moon" by using a circle and sponging the yellow ink and 
then masking and adding the stamped image and then sponging blue sky.

Wandering Words - Version 2

 C.C. Designs
Autumn Emma
 I made this sweet card earlier this year, before I had any copic markers. I used water coloured pencils. It's still one of my favourites. I tried to create a little 'holly' pattern on the hat and sweater using red and green dots and dashes. The background has been dry embossed with the Swiss dot folder and then lots of Stickles were added to really bring them to life. I do love my Stickles!!


If you made it to the end,  thank you for your interest!!   
Have a great day!!

Tuesday, December 7, 2010

Christmas Gifts - Book Bag

This is the second post today, so please check out my earlier posting and "walk down memory lane" here: Christmas Past - 2009.

I have really neglected posting on my blog this past week , but I have been trying to get a lot of projects finished - some of them had to be packaged up to be sent out of town, so that has been my focus. I will be sharing some of these in the next few days. 

I found these fabrics in a quilt shop in Ketchikan, Alaska when we were there in September.
I knew the printed letter fabric  would be perfect for several little book bags. 
It took me a while to figure out a design as I had limited material and 3 to make. I used a combination of blues, pinks and a touch of green to create a colourful, fun bag. 
There were lots of bits and pieces to this bag, but once I got started it was quick sewing. The  blue embroidery on the pink and green strips was done with one of the stitches on my sewing machine and adds some detail. Several pockets were designed, because little girls need a place to carry important stuff !!


This bag is heading to New Zealand for my 2 year old grand niece - Mattie. My sister-in-law leaves Canada this week-end  to spend Christmas (and January) with her daughter, son-in-law and grand daughter. My niece and her husband are expecting their second child at the end of December, so it will be a busy month for all of them.  

Here's the final grouping of gifts for Mattie - book bag, 3 little books and "Dora the Explorer" doll. She loves books and Dora, so hopefully this will give her some distraction once the new baby arrives!

I also made a little tag with Papertrey Ink's Tiny Treats: Christmas to 
attach to the final gift package.  (My SIL will wrap everything when she 
arrives in NZ, as it's easier to pack things that are not wrapped up in boxes and bags.)


Thanks for visiting. Have a great week!!

Christmas Past - 2009

Sometimes you need to look back to see how far you've come!
Last December I decided to make a series of Christmas tags for my three 'boys'  (DH, 2 DS).  I had seen this idea on Heather Nichol's blog  (PTI designer) and  thought it was such a good idea. I liked how she personalized the tags by pre-stamping the names right on to the front of the tag.  I did not have copic markers, and only a few Christmas stamps, tools and accessories for card making.   So here is my first attempt at making Christmas tags!!

Christmas Tags 2009 -  Hope you enjoy my "walk down memory lane" !! 


 I used a Close To My Heart set - Merry Pursuits,  featuring four little mischievous elves. We love the Will Ferrell movie ELF so this seemed to be the perfect choice.
I stamped, cut, coloured and embellished three of the images to create unique tags.  It was fun to see all of the little elves on Christmas morning - a different elf for each one of my 'boys'.


Kevin is not a fan of winter, but he loves all things basketball - he still plays in a winter league and often goes to the gym just to shoot baskets!!   I added the basketball lines to one of the 'snowballs' and coloured it orange. He really liked his 'winter basketball elf' tags!


Ian has always been a 'mischevious' fellow - I thought this image would be fitting for him!!
As a child he loved to climb everything - he would build "houses" high in the trees. 
My husband built the boys a raised playhouse and as Ian got older he decided to install lights and a fan in the playhouse - he wired up  everything to a battery ! ( it was quite amazing for such a wee fellow) 


These are the tags for my husband - one set that I added to his gifts and one set that the boys used for their father's gifts. I used two different Nestabilities to die cut the card stock.

Finally, here is the Christmas card I made for my DH. I created the background paper by using a little 'wrapped present' stamp and colouring it in with markers and a silver glitter pen.


This year I have been busy creating some tags for Christmas gifts that I showed here and here .  With my new Papertrey Ink stamps, copic markers and lots of inspiration, my 2010 tags are such an improvement from last year. But.... you know, I think these Elf Tags will find their way onto a few parcels this year. I still put up some of the boy's elementary decorations each year  - memories of times gone by!!

I am still working on a few other projects and will be back to share again soon.  
Thanks for visiting.